Category: recipes

  • Zucchini – two ways

    Zucchini – two ways

    I recently bumped into a friend who has a veggie patch and she asked if I had any recipes for zucchinis as she had lots growing. She also wanted to know what it was with Pemberton that zucchinis grew so well!

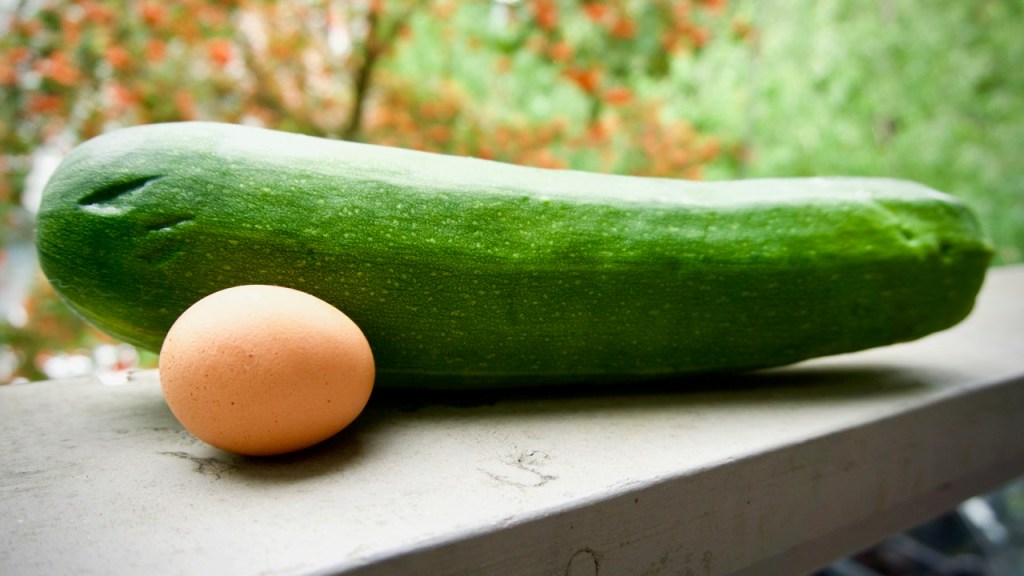
    I wasn’t quite sure what she meant until another friend gifted me the mother of all zucchinis! I mean, this one was about as large as the marrows my grandad used to grow! (Egg for scale.)

    Being curious I did a Google search on zucchinis, which are a summer squash and are a cultivar of the marrow I remember from my childhood. It appears that they can actually reach almost 1 metre (100 cm; 39 in) in length, but are usually harvested when still immature at about 15 to 25 cm (6 to 10 in). They are also very productive plants and just one or two plants will produce enough for a small family. You can also harvest the large yellow squash blossoms and eat them raw or cooked. Only female blossoms produce fruit, so you can harvest most of the male flowers without slowing down the plant’s productivity. Who knew?

    With a zucchini this large I didn’t know what I was going to do with it. I could make a quiche, galettes or even gnocchi. But no, with temperatures much cooler, and with my propensity towards baking, I decided to try both a savoury and a sweet bread.

    The trick to cooking or baking with the grated zucchini is to squeeze some of the moisture out before adding to your recipe. Just use a clean tea towel, place the zucchini in the centre, twist and watch the excess water drip out.

    Whether you prefer savoury or sweet I hope one of the following recipes helps you out with your glut of zucchinis, but if you still have too many then I have a couple more bread recipes that I’d like to try!

    First up is a Zucchini Cheddar Quick Bread made with buttermilk (or a home-made version as in the recipe) and which smelled as delicious cooking in the oven as it tasted not long out of it. Cheesy mouthwatering goodness!

    Ingredients

      • 1 1/2 cups zucchini, grated
      • 2 cups all purpose white flour
      • 2 teaspoons baking powder
      • 1/2 teaspoons baking soda
      • 1/2 teaspoon salt
      • 1 cup milk plus 1 tablespoon vinegar, white or apple cider to make home-made buttermilk or use 1 cup buttermilk
      • 1 egg
      • 3 tablespoons butter, melted
      • 1 1/2 cups grated sharp cheddar
      • 2 green onions, chopped

    Directions

    1. Preheat oven to 350 degrees and spray a 9 x 5 bread pan with non stick spray. (I would also add a layer of parchment paper to the bottom of the pan to ensure that the bread does not stick.)
    2. Wrap grated zucchini in a paper towel, or clean tea towel, and squeeze until some of the liquid releases. (You don’t need to completely dry it out.)
    3. In a large bowl, combine flour, baking powder, baking soda and salt.
    4. If making home-made buttermilk, combine milk and vinegar in a small bowl. (The milk will curdle a bit). If not making then use 1 cup traditional buttermilk. Mix in melted butter and egg.
    5. Add milk mixture to dry mixture being careful not to over mix to avoid the bread turning out flat.
    6. Add grated zucchini, cheese and onions, mixing lightly until just combined.
    7. Pour batter into prepared pan and bake at 350 degrees for one hour.
    8. If toothpick inserted comes out clean, bread is done!  Cool for 10 minutes in the pan.  Remove carefully and cool on wire rack.

    After your savoury zucchini bread what do you need? Orange Zucchini Bread with Orange Glaze of course! The orange provided a nice zing and the glaze was a touch of sweetness against the bread itself. My orange was very juicy and I could have done with a bit more icing sugar to thicken it up. I’ll know for next time. 😉

    Ingredients

    For the bread:

    • 3 large eggs
    • 2 cups sugar
    • 1 cup vegetable or canola oil
    • 1 tsp vanilla
    • zest and juice of 1 large orange
    • 3 cups all-purpose flour
    • 1 tsp salt
    • 1 tsp cardamom (optional)
    • 1/4 tsp baking soda
    • 2 cups grated zucchini

    For the glaze:

    • zest and juice of 1 large orange
    • 3 tbsp. butter melted
    • 1 tsp. vanilla
    • 3 cups powdered sugar

    Directions

    For the bread:

    1. In a large bowl, whisk together eggs, sugar, oil, vanilla, and orange zest and juice.
    2. In another large bowl, whisk together flour, salt, cardamom (if using), and baking soda.
    3. Add the wet ingredients to the dry ingredients, along with the zucchini, and stir until just combined. Do not overmix.
    4. If you’d like to add any nuts, fold in about 1 cup chopped nuts.
    5. Line a 9×5-inch loaf pan with foil or parchment paper, letting the edges hang over the pan. This is a MUST as the bread will to stick to the pan. Coat with non-stick spray.
    6. Spread batter into prepared pan.
    7. Bake at 325 degrees for 60-70 minutes, or until top and edges are golden and a toothpick inserted near the centre comes out clean.
    8. Remove to a wire rack to cool for 10 minutes.
    9. Run a knife along any edges that may have seeped and stuck to the pan.
    10. Remove bread from the pan completely using the foil or parchment paper edges. Cool completely.
    11. Meanwhile, prepare glaze.

    For glaze:

    1. In a medium bowl, whisk together all the glaze ingredients until smooth.
    2. Depending on how juicy your orange was, you may need to add a little water or more powdered sugar! You should be able to drizzle or pour it, but it shouldn’t easily run off the bread.
    3. Drizzle glaze over cooled bread. Cut and serve.
  • Software for Wild Intelligence

    Software for Wild Intelligence

    “Seeds are software, and we have the seeds” -Representative of the chemical giant Seminis, just before selling out to Monsanto

    Usually, plantain is a quiet, unobtrusive little plant. She is known for her excellent healing properties, her usefulness as a spit poultice, and her excellent nutritional properties. She is generally soft spoken, and most people are surprised to notice she has been underfoot all along. She is like coffeeshops in Vancouver: ubiquitous. But lately plantain, sometimes called ‘white man’s foot’ for the way she has followed our footsteps across North America, has been shouting at me. She is poking me with her seed spears. Every time I turn around, there she is. Usually when this happens it means the particular plant that is ‘shouting’ has some particular medicine I need to pay attention to. My resistance is generally high. You think I would actively cultivate some sort of porosity towards these sorts of encounters, but no. When a plant is trying to get my attention (or most things, for that matter) my first response is resistance. When I finally let plantain in all I do is look at her for a moment, but that look takes a photograph that embeds her in my mind and from there she begins to communicate with me.

    plantain
    Plantain

    Because of the way the summer has gone- hot and dry- Plantain is setting seed earlier than usual, and with an abundance I did not notice last fall. Perhaps she is foretelling the future, but it is more likely her actions are a reflection of the present. (When a plant is stressed, their seed production tends to be prolific. Cue the fallen black cottonwood I stood in the ruins of this past spring, who released her white parachute fluff designed to float her future progeny over the entire province OVERNIGHT WHILE SHE LAY DYING ON THE GROUND, while most of the trees were barely starting to open their little seed casings.)

    But that is not what I want to tell you. What I want to tell you is that I want to cry. Each time a Plantain seed spire touches my ankle it is a reminder that things will never be the way that they were. A reminder that I do not have the time and that I am doing too much, too fast, to really listen, to really hear, to really feel any of it. There is grief in these too-early seed spires. Grief that the world is burning; that part of the morphic field of these seeds will always contain the memory of smoke.

    I believe a plant is a part of a specific ecosystem’s innate intelligent awareness made incarnate, and that a seed is the plant’s answer to the questions of its times. And the answer will be different, even among similar species, if they are growing in different locations. A seed is this wild intelligence made portable, designed for dispersal, a portable currency of consciousness.

    So if we really want to rejoin the dance, if we really want to be a part of what is going up in flames around us, what is burning and the new seeds that will be born out of this fire, we need to eat of the wild, NOW. We need to take a little of the otherly intelligence that is the essence of the natural world into our bodies so that we can start to belong to the place in which we are standing. Perhaps this is the beginnings of true reconciliation. Or at least the seeds with which to begin.

    Please don’t think I am being trite. I am not making small of atrocities that have been committed both by and against humanity. I am not saying that by taking yet another thing from the wild we can heal from the many woundings of the entitlement we have been taught to assume. I am saying that we need to begin to build a bridge to another way of being, of living, of feeling, and that if we can ingest the local wild plants that are doing that all around us in the places where we live, who have not cut themselves off from the responsiveness of the wild innate intelligence of their own sovereignty,  then we begin to take those transforms of meaning into our cells, and that begins to alter us.

    Do you remember at the beginning when I said Plantain shouted at me? Well obviously she didn’t, at least not in words. But when I started to pay attention- when I started to unravel the thread of meaning she held for me- she led me here. When I went out to shoot the pictures for this post I stripped a handful of her seeds from their spire, winnowed their husks away by breathing into my palm, put them into my mouth and chewed. They popped between my teeth like chia seeds, and had a similar mucilaginous texture. They didn’t really taste like much but maybe that’s a good thing. Something about pulling the seeds from their stalk felt familiar, the way I sometimes recognize the face of a stranger I have not known in this life.

    Beside the Plantain (and remaining mostly quiet all this time) was a stand of Dock, with seeds also ready for harvest.

    So here is where we get to the practical and super-actionable and amazing part of this post: you can make flour from both these seeds. Yep, that’s right. SUPER SOVEREIGN INTELLIGENCE WILD MORPHIC FIELD FLOUR WITH BONUS SUPER NUTRITION! (Or as we more quietly call it, Plantain/ Wild Dock Flour.)

    Plantain/Wild Dock Flour

    1. Simply go out and gather as much Plantain and Dock seeds as you have the patience for, checking that the ground the plants grow in is free from contaminants and roadside pollutants. There is no need to winnow (separate) the seeds from the hulls as from both kinds of seeds’ hulls are edible and add extra fibre to your flour, as would happen if you added rice bran. If the seeds do not pull off the seed heads easily when you are harvesting, they are not ripe yet and should be left on the plant to mature. As with all wildcafting/foraging, be considerate of the plant’s needs to reproduce and other animals who may depend on the seeds as a food source. (A good rule is to not harvest more than 25% of the yield of a patch, but in the case of weeds like Plantain and Dock (which are prolific) you can sometimes take a little more without ill effects.
    2. If you wish to increase the nuttiness of the flavour of your flour (OR if you are worried about bugs, OR if you are not sure your seeds are completely dry) you can roast your seeds on a cookie sheet in the oven, stirring several times at 200 degrees  until seeds have darkened slightly.
    3. Store whole in airtight containers until ready for use. Grind seeds and hulls in a coffee grinder until they reach a flour like texture. Substitute 1 for 1 to replace up to 1/2c of flour called for in the recipe to add extra nutritional value and wild intelligence to whatever you are baking.


    Author’s note: The seed harvesting in this piece was originally inspired by Katrina Blair’s book ‘The Wild Wisdom of Weeds: 13 Essential Plants for Human Survival” which is an excellent resource for anyone wanting an accessible way to learn to incorporate edible weeds into their diet!


  • Bring out the Beans this Summer!

    Bring out the Beans this Summer!

    It is midsummer still. I am a big fan of beans in the summer. Why? In dried form they last and last. You can throw a bag of dried lima beans in the pantry and cook them 4 years later and they still taste great. Unless you have access to reliable refrigeration when you are travelling in summer, I would prefer to avoid carting meat around.

    Obviously it is hard to resist the call of BBQ salmon or burgers. But for a regular mid-day meal or evening side dish that many would enjoy – and pretty darn safe in above average temperatures – then it is time to put beans back on the table.

    The following is a dish I turn to every summer when I spend time on one of the islands and have limited or unreliable refrigeration. All you need is a large bag of lima beans or fava beans. Once they have been soaked and cooked you can do a number of things.

    First off, sauté the beans in bacon fat with added olive oil. Sauté them with chopped onion and fresh rosemary and pepper. Throw in a few more finely chopped veggies – such as diced bell peppers for colour. This dish makes a great side dish. Then later – add some veggie broth and turn it into a soup. I LOVE soup! And bean soup I enjoy a lot – even at tepid or room temperature. Again, no worries about meat going off in hot weather. Sometimes I don’t have much of an appetite during the hot spells….so beans are a great option for sustenance.

    Here’s to summer creativity in the kitchen – either camping or at a cabin – and bring out the beans!

    Sautéed Lima Beans:

    One large bag of large-sized lima beans (or fava beans)

    Salt and pepper

    Olive oil and/or bacon fat

    Fresh rosemary

    Method:

    Soak beans for 6 hours, then drain water and cook beans with fresh water covering the lima beans by 3 inches.

    Bring to boil and simmer until beans are tender

    Note: DO NOT RUSH THIS PROCESS. If you take beans off stove too early and before they are fork tender they will NOT cook well later.

    When tender, drain beans and sauté beans in bacon fat and olive oil and chopped onion and other veggies as available. Add 2 tbs of fresh rosemary. The dish is finished when the bacon fat gives a caramelised finish and subtle crust to the beans. Using a large cast iron enameled pot gives a good finish to the beans!

    Serve as side dish or main (maybe add some chopped cooked bacon).

    Option 2:

    Take your leftover sautéed beans and add to a soup stock made strictly with veggie ends, 30 peppercorns, and 2 bay leaves. See broth photo attached. I used the ends/cores from bell peppers, dill stems, onion ends, parsley ends and cauliflower stalks – which were going to go into the “green bin” but I saved. Someone else’s veggie “waste” is my soup stock base!

    Black Bean and Veggie Hash:

    3 cups cooked black beans

    1.5 cups cilantro, chopped

    3 tbs bacon fat and/or olive oil

    1 cup onion

    2 cups thinly sliced zuchini

    1-2 cups corn kernels

    juice of one lime

    1 tbs cumin

    pepper to taste

    Method:

    Saute onion, zucchini, and black beans in fat and/or oil. Add cilantro, cumin and corn. Saute until veggies are soft, caramelized and flavourful. When finished add lime juice and pepper to taste. Makes an amazing lunch or side dish. And you can always add 2-3 cups of veggie broth to leftovers for a delicious soup following day.

    Enjoy the rest of summer and happy slurping!

  • Sunny Sunny Days

    Sunny Sunny Days

    We are all ruled in someway or another by the big burning circle in the sky; we crave it after days go by with out it and we curse it away when it’s too hot. Sweltering days call for cool delicious foods high in water content – as beer and bubbles only keep us mildly hydrated no matter what we tell ourselves.


    Enter watermelon poke.


    If you eat at anyone of our amazing local sushi joints you will probably recognize the “poke” part as a dish commonly made with ahi tuna marinated in a sesame-soy dressing. (Personally, it’s one of my go to’s and I can easily crush an entire bowl to myself.) So when on a blistering hot day one of my favourite blog sites posted a recipe replicating this traditional Hawaiian dish using watermelon I was beyond excited. I immediately biked to the grocery store, bought a watermelon, got extremely sweaty in the process and ate the crap out of the final product… and so has everyone else I’ve fed it too.


    Here’s my take on 101 Cookbooks recipe: the link will take you to the actual recipe if you don’t like free balling like me. I also prefer to make it a day or few hours before consumption to allow the watermelon to marinade and soak up all the sauce.


    Step Uno: Deal with your watermelon.


    • Slice a bunch into small cubes ½“ – 1” cubes, I like a good variety of sizes. Use a small to medium sized melon depending on how many folks your feeding.


    Step Two: Make your sauce.


    • Combine the zest & juice of one lemon (or lime whatever is on hand), some ponzu, rice wine vinegar and sriracha (to taste) then whisk in some sesame oil and avocado oil.


    Step 3: Combine everything together and let sit in the refrigerator until you’re ready to eat!

     IMG_5090

    Step Quatro: Dress it up.


    • Serve topped with green onions, sesame seeds and long ribbons of cucumber or daikon radish.

    IMG_5096

    Don’t forget to save some slices of watermelon for the kids and the hound!

  • Nidhi Raina’s Collard Greens and Cottage Cheese

    Nidhi Raina’s Collard Greens and Cottage Cheese

    Collard Greens and Cottage Cheese

    Collard Greens and Cottage Cheese
    Serves 4
    If you had a chance to try this at the Pemberton Farmers market this month, you will bookmark this page. Visit Nidhi under the Downtown Community Barn on Friday, between 3pm and 6:30pm, and see what she’s cooked up for Market-goers this week.

    Ingredients:
    Collard Greens 5 medium leaves
    Indian Cottage Cheese 100 grams
    Fresh green peas 50 grams
    Fennel powder 1 tsp
    Ginger powder 1 tsp
    Paprika 1/2 tsp
    Salt to taste
    Milk 1 cup
    Olive oil 1 tsp
    Non dairy coconut milk 1/2 cup

    Method
    1. Wash collard Greens, remove veins, stem julienne and set aside.
    2. Cube Cottage Cheese into bite size squares and set aside.
    3. Heat a medium size ceramic pan and warm the oil.
    4. Add all the spices and sauté for a minute.
    5. Add the milk or ccconut milk and bring to a boil. Simmer for 5 minutes on low heat to cook the spices.
    6. Add the Cottage Cheese and cook for a minute.  Add the peas and simmer another minute.
    7.Serve hot on rice!

  • A summer pot luck staple – Broccoli Salad

    A summer pot luck staple – Broccoli Salad

    Summer is well and truly here! (I can say that with conviction as it’s currently 37˚C!). And with summer comes backyard bbq parties and the dilemma of what to take with you as your pot luck offering.

    Well, worry no more! This month’s recipe, borne out of the need to find a salad not imported from the US of A (I’m on a Trump boycott AND trying to buy less produce wrapped in plastic), has a dressing that tastes exactly like the one in the Kale and Brussel Sprout pre-packaged salad kit you can get from Pemby’s grocery store. So it’s delicious, and it’s also so easy to make you’ll be left wondering why you ever bought a ready made salad in the first place!

    DSC00088

    So here it is, the tastiest, easiest Broccoli Salad ever. And make sure to tell everyone you made it yourself! 😉

    Ingredients:

    • 8 cups broccoli cut into bite sized pieces
    • 1/3 cup red onion diced
    • 1/2 cup dried cranberries
    • 1/4 cup sunflower seeds
    • 1/2 cup bacon bits (I used turkey bacon because I don’t eat the other variety!)
    • 3 tablespoons cider vinegar
    • 2 tablespoons sugar
    • 1 cup mayonnaise
    • Salt & pepper

    DSC00083

    Directions:

    1. Whisk together cider vinegar, sugar, mayonnaise, salt and pepper in a medium bowl. Set aside.
    2. In a large bowl, combine broccoli, onion, cranberries, sunflower seeds, and bacon bits.
    3. Pour the prepared dressing over and mix well.
    4. Refrigerate for an hour before serving.
    5. Preparation time = 15 minutes.
    6. Yields 8 servings.

    DSC00084

  • Soup for a Future Rainy Day – Curried Lentil Cauliflower Soup

    Soup for a Future Rainy Day – Curried Lentil Cauliflower Soup

    We had a cool period for a bit recently and being on the coast, it was a good opportunity to bring out my soup pot. Back into a heat wave so save this one for the next cool spell. I didn’t get a photo of it but it was a hit with some children I served it to as well as adults. Attached is a photo of some beautiful Squamish salal.

    Curried Lentil Cauliflower Soup with Coconut Milk and Cilantro

    Ingredients:

    3 tbs pure olive oil

    2 leeks, cleaned and chopped

    1 fennel bulb, chopped

    4 tomatoes, chopped

    1 medium cauliflower, chopped

    1 cup cilantro, chopped

    6 cups chicken broth

    1.5 cups red lentils

    2 tsp salt

    2 tsp pepper

    2 tbs cumin

    1 tbs curry powder

    1 can full fat coconut milk

    Method:

    Sauté leeks in olive oil on medium low heat until caramelised. Add all other vegetables and cilantro, and sauté until soft and caramelised.

    Add broth and lentils and coconut milk.

    Bring to boil and simmer 20 minutes.

    Blend half of soup in blender until smooth and adjust salt and pepper to taste.

    Garnish with chopped cilantro if desired.

  • Stop glorifying the summit and enjoy the climb: an astrological forecast for pasta makers

    Stop glorifying the summit and enjoy the climb: an astrological forecast for pasta makers

    Years ago, I read a horoscope that said, “Dear Capricorn, you’d be better off enjoying the climb than glorifying the summit.”

    Or at least that’s how I remember it. The precise words are trivial. In effect, the astrological forecast reminded me of the value of process.

    We need such memorandums, because we often forget about the value in getting our hands dirty. We seldom recognize the profits in puzzling out the crux move.

    And, we barely admit our battles.

    I’m sure you’re wondering what this has to do with fettuccini.

    Well, I might argue that you should take the time to frolic in the process of making a plate of pasta – from scratch. From sourcing the flour, eggs and olive oil to wrapping the toothy noodles around your fork, it’s all part of a process that can soothe the mind and the soul.

    Fresh pasta (2 of 2)

    This dish started with a trip the Pemberton Farmers’ Market and a chat with local farmers.

    Eggs & bacon sourced from the kind folks at Spray Creek Ranch.

    Arugula sourced from the ever-witty Naomi at Four Beat Farms.

    Flour sourced from Anita’s Organic Mill (purchased at M1).

    Killer noodle recipe ripped from “The Pasta Bible” circa 1994. (I went old school version – bonus points right?!).

    “Pasta Dough No. 4”

    2 1/2 c. all-purpose flour + extra for flouring surfaces and strips of fresh pasta

    1 egg

    7 egg yolks

    1 tbsp. olive oil

    1/2 tsp. salt

    I added a wee bit of water when the dough was too dry to pull together in a solid mass. I’d say add no more than a teaspoon of water at a time.

    The recipe calls for sifting and fussy stuff like that, but I took a rustic approach. Perhaps, be careful when pulling the flour into the egg lake, if your crater breaks you can lose all your egg over that cliff that I call countertop edge.

    My Post (54)

    Rustic instructions (feel free to ask questions in the comments)

    1. Mound the flour on the countertop and make a deep crater for the eggs.
    2. Crack the eggs into a pinch-bowl one at a time (it makes it easier should you have to fish out a shell or manage a breach of the crater wall) and gently slide them into the crater until you have all of them neatly inside. Add the olive oil too.
    3. Gently beat the eggs, until well combined.
    4. Pull the flour into the egg lake until the liquid is absorbed.
    5. Pull the crumbles together and start to form a dough.
    6. Knead.
    7. Refrigerate, wrapped tightly (in a bees’ wax cloth, or cling wrap if you must) for at least an hour.
    8. Roll out the dough.
    9. Cut the dough into strips.
    10. Dust the strips in flour.

    To save my wrists, next time, I’ll use my stand mixer for the kneading as well as the rolling. You must knead it until it’s glossy and stretchy. Maybe 10 minutes, maybe more (add music and dancing, if you’re bored). I made the dough before work and rolled it out before dinner.

    You can roll out the dough with a pin, but ensure that it’s very thin before cutting it into strips. I rolled my dough to the thinnest possible setting and it was still plump compared to store brands.

    Be sure to drop the fettucini strips into rumbling water, because the temperature drops quickly with a big batch. If you’re really unsure about your dough, try cooking a few strands for about 4 minutes. Then taste test.

    I used Jamie Oliver’s carbonara recipe (which is actually Gennaro’s recipe) for the sauce and added arugula for colour.

    Enjoy. And, be sure to let me know how it went.

    ~

    Lisa Severn is going to Pemberton again — this weekend. She’s praying for a complete annihilation of the mosquito population with the 30 deg. heat.

    ~

    Start a conversation with Lisa over @rhubarbstreet or look for more on Lisa and her co-conspirators… err… co-contributors.


  • Save Your Fork

    Save Your Fork

    My need to forage continues. This week’s victim: Saskatoon berries. Just try walking past the currently loaded bushes of perfectly plump, deep purple berries – I dare you. Even Shadow comes to a complete skid stop to forage on the lower quarters of these native shrubs. Our mission over the last week was to beat the bears to the berries around our place and hit up a few other spots I’d been scoping. We were more than successful; stained fingers, a full bucket and swelled bellies. I figured the best way to capture these jewels was by channeling my inner Julia Child and baking a pie. So, here we go!


    Step Uno: make your crust. Use your favourite double crust recipe or try mine.

    2½ cups flour – tsp salt – 1 cup unsalted butter (frozen) – 6 to 8 tbsp ice cold water

    • Combine the flour and salt in a medium sized bowl. Then grate the butter into the flour. I cut the butter into two halves and grate one at a time, leaving the second in the freezer until I’m done the first. Once both blocks are done use your hands to combine the flour with the butter by gently rubbing it through your hands. It doesn’t need to be fully incorporated but what your looking for is a bunch of little “butter peas” coated in flour. I’m ghetto and don’t own a pastry cutter but if you have one then small cubed blocks of butter cut in will give you the same effect. I have found that grating the butter gives great distribution in the pastry with a very flaky end result – BINGO! Now add most of the water and blend until just combined. Turn the mixture out onto your working surface and bring together the dough by kneading it into a ball, using more water if needed. Separate the ball into two with one just a bit bigger then other and shape them both into flat-ish discs. Cover separately with plastic wrap and retire them to the fridge to rest for at least an hour.


    Step Two: the filling. (Plus turn on your oven to 425°F now to preheat it)

    5 cups Saskatoon berries – 3 tbsp flour – ⅓ cup sugar – zest of a lemon (optional)

    • Combine everything together, easy-peasy.


    Step 3: build your pie.

    • Take the smaller disc out of the fridge and place it on a floured surface. Grab your rolling pin and push the disc out to about a ¼“ thick and place into your pie plate. Pour those prepped Saskatoons in next! Scatter a few slivers of butter over the top of the berries. Grab the last disc and flatten it out to the same thickness as the bottom, re-flouring the surface if needed. The reason for the last dough disc being a bit bigger is that the filling of your pie usually makes a mini mountain and you want to ensure you’ve got plenty of dough to blanket the whole hill, and then some. Before layering on the dough topper, wet the edge of the bottom dough with water – this helps them stick together. Crimp, roll or pinch the dough layers together. Brush the top of the pie with a beaten egg and slice a few air holes into the top.


    Step Quatro: Bake and wait.

    • Place your pie on a baking sheet and into your preheated oven. Bake at the preheated 425°F for 15 minutes then lower the temperature to 350°F for an addition 45-60min or until the crust is golden brown. Cool on a wire rack.


    Step Five: eat now or freeze for later.

    • I chose to freeze my pie and savor it later this fall with friends when we’re craving a taste of summer. Luckily, I saved a bit of the filling and had just enough left over dough to make 4 mini tarts. They were consumed quite quickly.


    There is a CBC story that recalls a visit by the Duke of Edinburgh to a small town in the Yukon many moons ago. He stops for a meal at a local diner and as the waitress reaches to remove his dinner plate she warmly says to him, “Save your fork Duke, there’s pie”.


    Wives’ tale or not the phrase has stuck with us for generations… and this pie for sure warrants saving your fork.

  • Rhubarb, rhubarb, rhubarb…

    Rhubarb, rhubarb, rhubarb…

    Having already written a couple of posts with sweet recipes I was convinced that my next inspiration would be of the savoury variety. That was until my physio mentioned she had lots of rhubarb growing in her garden (it’s currently in season) and did I know of any recipes.

    Well, that got my inquisitive side poring over Pinterest trying to find the perfect rhubarb recipe for her. I found cakes, pies and mojitos and shared a few I thought easy and suitable. However, some were deemed too complicated and one recipe was overlooked due to the lack of an oven; but not in my kitchen! And so it happened that was the recipe I tried when just the right amount of rhubarb turned up on my doorstep! (Plus the recipe calls for a bundt tin which I have a slight obsession with at the moment!)

    I had been looking for a recipe that I thought would bring out the fresh, slightly tart, flavour of the rhubarb but still with just the right amount of sweetness and this Lemon Rhubarb Bundt Cake, from BC food blogger Warm Vanilla Sugar, fit the bill exactly!

    DSC00089

    Of course, I did not intend to eat this cake all by myself, particularly given the weight loss crusade that I am currently on, so it was shared with friends. Plus a large chunk was also offered back to the rhubarb provider, and well received at that!

    Hopefully you can get your hands on some rhubarb before it is out of season and give this cake a try. I can guarantee it won’t last long!

    PS I promise the next recipe will not be a cake!

    Ingredients

    For the cake:

    • 1 cup (2 sticks) unsalted butter, softened
    • 1 3/4 cup granulated sugar
    • 2 lemons, zested
    • 3 eggs
    • 1 tsp pure vanilla extract
    • 2 1/2 cups + 2 tbsp all-purpose flour, divided
    • 1 tsp baking powder
    • 1 tsp Kosher salt
    • 3/4 cup buttermilk
    • 3 cups rhubarb, diced in 1/2-inch pieces
    For the Lemon Glaze:
    • 2 cups icing sugar
    • 1 lemon, juiced
    • 1 tbsp melted unsalted butter (FYI I didn’t use)

    DSC00074

    Directions:

    1. Preheat oven to 350 degrees F. Grease and flour a bundt cake pan. Set aside.
    2. In the bowl of a stand mixer, or a large mixing bowl, beat together the softened butter, sugar and lemon zest until light and fluffy, about 3-5 minutes. Scrape the sides of the bowl with a spatula and then add the eggs, one at a time, until fully incorporated. Mix in the vanilla.
    3. In a large bowl, whisk together 2 1/2 cups of flour, baking powder and salt. Add 1/3 of the flour mixture into the egg mixture along with 1/3 of the needed buttermilk and mix on low speed. Alternate with flour and buttermilk until both are fully incorporated.
    4. In a medium bow, or large ziplock bag, toss the rhubarb with the remaining two tablespoons of flour until the rhubarb is well coated. Gently fold rhubarb into the batter with a rubber spatula until it’s distributed evenly.
    5. Turn out cake batter into the prepared pan, using a spatula to gently spread and level it out.
    6. Bake for about 60-70 minutes, or until the cake springs back gently when touched and a toothpick inserted into it comes out clean.
    7. Allow cake to sit and cool in the pan on a wire rack for 30 minutes.
    8. Meanwhile, make the glaze by whisking together all the glaze ingredients until smooth. Thin with extra lemon juice or thicken with more powdered sugar as you see fit.
    9. When the cake is cooled, tip it out onto a serving plate and generously drizzle cake with the lemon glaze.
    10. Slice and enjoy.
    11. Yields 12 slices but it depends on how big your slices are! 😉

    DSC00094