Category: recipes

  • The Time is Coming Soon…To Pick the First Ripe Saskatoons!

    The Time is Coming Soon…To Pick the First Ripe Saskatoons!

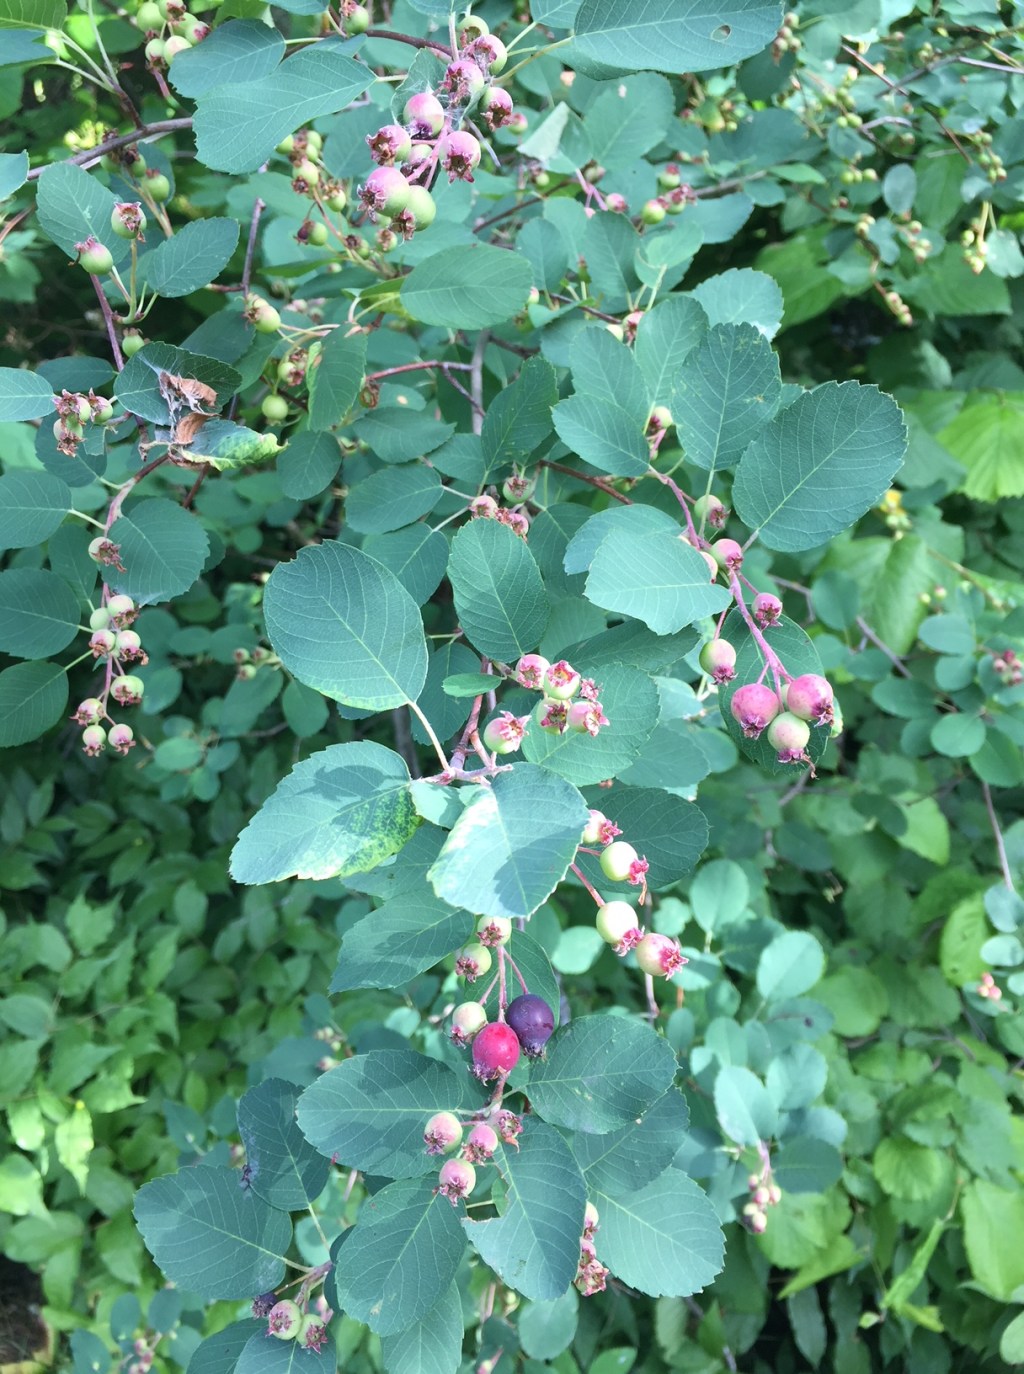
    I never liked saskatoon berries when I moved to Pemberton. What was the fuss about? The little things were grainy and full of seeds. I was not impressed although I knew people who adored them. Years passed, and each year I ignored the little purple berries that grew so plentifully around me. Then one day I looked down in my yard and it was covered in little shrivelled saskatoons. They had dropped off the tree and the sun had dried them out. I popped one in my mouth and the flavour was unexpectedly…fantastic. Like a raisin or currant but better. I scooped up all the berries I could and gobbled them up.

    The next year I purposely dried a few cups of saskatoon berries in a dehydrator and used them in a cracker recipe with rosemary, substituting saskatoons for raisins. Then two years ago I started enjoying the taste of fresh saskatoons. I will now paw through all the trees in my yard like a bear and cram them into my mouth. Yes, my taste buds really have changed. I eagerly anticipate the arrival of these little berries now.

    As a non-gardener (I am pretty much successful with only rhubarb, raspberries, apples, plums and cherries – and possibly parsley and cilantro if I’m lucky) saskatoons are an amazing return on zero investment. No watering, no weeding. My kind of berry!

    My granola recipe which follows is adapted from my aunt’s recipe. We share an enthusiasm for a dry granola (not soggy or moist) that stays crunchy in milk. Many granola recipes call for oil which I think is not a good ingredient in granola. After your granola is baked, add a cup of dried saskatoons for a Pemberton treat!

    Crunchy Almond Granola with Dried Saskatoons:

    2/3 cup unsweetened shredded coconut

    2 cups chopped almonds (almond pieces should be the size of gravel)

    3 cups slow oats

    ½ tsp. salt

    2 tsp. cinnamon

    ½ cup runny honey (warm on very low heat if hardened)

    1 cup dried saskatoon berries

    Method:

    Preheat oven to 300F.

    Combine all ingredients (can use a mixer). When fully combined, add honey. Mix very well.

    Spread onto two parchment-lined rimmed baking sheets.

    Bake for approximately 30 minutes, stirring the granola thoroughly every 10 minutes. You must watch granola carefully as it will burn quickly and every oven is different.

    Cool.

    Add 1 cup dried saskatoons.

    Mix well and store in glass jar in fridge for up to several months. Granola and plain Greek yogurt makes an easy, quick, and nutritious breakfast! Enjoy!

    IMG_6291

  • Living Cuisine – Sarinda Hoilett welcomes strawberry season, with foods that heal and rock your taste buds

    Living Cuisine – Sarinda Hoilett welcomes strawberry season, with foods that heal and rock your taste buds

    Strawberry season has arrived just in time for my first Traced Elements post.  The following recipes are all plant based, raw, made with love. They are intended to light up your taste buds wihile nourishing you on the deepest level.

    Processed with VSCO with a6 preset

    Most of my recipes don’t involve too much chemistry so feel free to play with measurements and ingredients.  Taste things as you go and adjust according to your own taste preferences.

    I have included 2 cultured recipes here because supporting your microbiome with fermented foods is essential not only to your gut health but to your mental and emotional wellbeing.  Our bodies are a complex ecosysytem. Of the bacteria in our bodies it is estimated that only 10% are human cells. What we eat can influence everything from our moods, food cravings, weight gain/loss, food allergies and disease expression.

    image2

    Our microbiome is affected by chronic stress, lack of sleep, processed foods, antibiotics and other pharmaceuticals.  Newborns are seeded with good bacteria when passing throught the birth canal and from breast milk. It’s important that special attention is payed to children born by c-section.

    Our gut health is dynamic and we can easily create balance by eating more pre-biotics foods (Jerusalem artichokes, raw dandelion greens, raw or cooked onion, raw garlic, raw leeks, raw asparagus, chicory, bananas, asparagus, beans) and more probiotic foods such as Kombucha, Kefir, homemade yogurt, natto, tempeh, miso, saurkraut and cultured vegetables.  

    IMG_8057

    Strawberry Pie

    This recipe is simple and can pass for breakfast or dessert.  You will need a food processor and an 8” or 9” pan.

    Ingredients

    • 5 cups of fresh strawberries
    • 2 cups of almonds, sprouted* if possible
    • 1.5 cups of dates, pitted ( I prefer to use medjool or date paste**)
    • 2 Tbsp coconut oil (optional)
    • 1 lemon
    • 2 Tbsp powdered psyllium husk, powdered chia seed or irish moss gel*** – as a stabilizer / thickener  for the filling
    • 2-4 Tbsp honey, maple syrup, agave or couple drops of stevia

    Processed with VSCO with a6 preset

    Crust

    1. In the food processor pulse the almonds until they are an light “mealy” consistency.  Don’t overprocess.
    2. Add dates and combine until the mixture sticks together when you squeeze between finger and thumb
    3. You can add the coconut oil which helps the crust set  
    4. Press mixture into your chosen pan and refrigerate while you prepare filling

    Filling

    1. Slice and dice 4 cups of the strawberries, place in a mixing bowl and set aside
    2. Place the remaining cup of strawberries in a food processor or blender and combine with a squeeze of lemon juice, sweetener and thickener of your choice.  
    3. Add mixture to sliced berries and combine with a spoon.  Pour into pie crust
    4. Let set in refrigerator.

    *Sprouted Almonds – soaking nuts removes enzyme inhibitor and makes them more digestible.  Almonds are best soaked 8 hours or overnight. For this type of recipe you want your almonds dry so you would have to dehydrate them after soaking for 24hrs.  You can skip this step for the purpose of this recipe. Alternatively, the Wellness Center at Nesters in Whistler sells Sprouted Almonds by Living Intentions

    **Date paste can be made by soaking dates until soft and blending with just enough water to have a smooth jam like consisitency.  Note: once you have added water you’ll need to refrigerate your date paste. Will keep 2-4 weeks.

    ***Irish Moss (AKA carageenan in its processed form) acts as a stabilizer and has many health benefits in its whole unprocessed form.  You can purchase this algae from Harmonic Arts. Once you prepare the gel it can be added as a thickening agent to smoothies and desserts.

    To make the gel, soak whole irish moss overnight, rinse well to remove any ocean debris, place in high speed blender/Vitamix and add barely enough water to cover.  Now blend it like you mean it. This is where the magic happens. In less than a minute the the irish moss will turn into a smooth gel. It will get thicker once refrigerated.  It has a bit a distinct taste which can usually be masked by some sweetness.

    PS – I store everything in glass

    IMG_8069

    Cultured Raw Strawberry Cheezecake

    This is one of my all time favourite recipes.  I wanted to try fermenting the cheezecake filling this time and the results were delish!  I’ll give you both options. Original and cultured. For best results you will need a high speed blender, although a food processor could work.

    Cheezecake filling

    • 3 cups of raw cashews, soaked 2 hours or more
    • ¾ cup fresh lemon juice (not bottled – only the best for you!)
    • ¾ cup unpasturized honey
    • ¾ cup coconut oil
    • ½ tsp sea salt
    • Dash of vanilla extract or powder

    Strawberry topping

    • Approx 2 cups fresh or frozen berries
    • Dash of lemon juice
    • Dash of sweetener – agave, honey, maple syrup, stevia or monk fruit drops – totally optional, fresh strawberries are sweet enough on their own

    Preparation

    1. Sprinkle ¼-½ cup powdered dry coconut at the bottom of a spring form pan and set aside
    2. In a high speed blender combine honey, lemon juice, coconut oil, salt, vanilla, and then slowly add cashews
    3. Pour cheezecake filling into springform pan and let set in the freezer
    4. Combine the strawberry topping ingredients in the blender  (once again feel free to improvise with toppings and flavour combos)
    5. I usually wait at least 20 minutes before pouring toppings onto cheezecake layer

    This cake is best stored in the feezer.  Take it out 20-30 minutes before serving

    Cultured version

    1. Blend 3 cups of cashews with approx 1 cup water.  Then added ½ tsp probiotic powder.
    2. Transfer cashew mixture into a glass bowl and let sit in a slightly warm place for 8 hours.  I use my Excalibur dehydrator for this stage set at 95 degrees F
    3. After 8 hrs your cashew mixture should have a slightly tangy taste.  Transfer to blender and add remaining ingredients:
    • ½ cup coconut oil
    • ½ cup honey
    • ½ cup fresh lemon juice
    • ½ tsp sea salt
    • Dash vanilla

    Processed with VSCO with a6 preset

    Coconut yogurt

    This is a a super simple alternative to the overprocessed commercial dairy-free yogurts.

    Given coconuts don’t grow in Pemberton this is a bit of a treat.

    • 2 cups coconut meat (you can purchase frozen in bags at Stay Wild or Nesters)
    • 1 ½ cups water
    • ½ tsp probiotic powder

    I typically double the recipe which will make two 1 litre mason jars

    In high speed blender combine coconut meat and water.  Stir in probiotic powder. Pour into 1 litre glass mason jar.  Place in dehydrator on lowest setting for approximately 8hrs or wrap in towel and place in a warm place.  Refrigerate.

    Processed with VSCO with a6 preset

    Recipes by Sarinda Hoilett

    Photos (and quality control): Jaya and Ruben Guibert


  • Nootka Rose Jelly

    Nootka Rose Jelly

    For me the art of slowing down and smelling the roses has turned into taking advantage of the surplus of this native shrub behind my house, plucking their petals and creating something delicious. As it is in my garden where I rarely follow my planting plans the same holds true to my style of cooking; recipes are but a base. I’ll admit my first batch, from a recipe I followed, did not set. This led me to taking matters into my own hands, going with the flow and trusting my strong sense of jamming. So, queue up some Bob Marley as I guide you to making your very own wild rose jelly.

    INGREDIENTS

    ≈4 cups wild rose petals, lightly packed

    4½ cups boiling water

    ¼ cup fresh lemon juice

    5½ cups sugar

    2 pkgs liquid pectin

    Other: cheesecloth, jars, lids, tops, a big pot & lots of love

    Start by foraging for rose petals: try to pick in areas away from the roadside and pick higher then a dog may pee! Give them a small bath in the sink to get rid of the majority of bigger bugs and pick out any of the greens. Don’t stress too much about getting everything, as you’ll end up straining the lot later. Place them in a nonreactive bowl, cover with the boiling water and allow steep for 1-2hrs. The petals will lose their colour and look quite dull but patience is key here.


    While your petals are steeping prepare your jelly vessels. This recipe makes approximately 8-9 cups of liquid gold; I use a mishmash of 125ml and 250ml jars and usually prepare a few more then what’s needed, just incase. Wash every thing then put the lids and tops in a pot submerged in water and place on the stove over medium-high heat. Jars can go on a cookie sheet in the oven at 250°F. You want these to sit in their respective mediums for at least an hour.

    When you’re satisfied with how long the petals have steeped or you can’t wait any longer get ready for some magic. Add the lemon juice and watch the water go from blah to vibrant pink! It’s science.


    Pour the petals and water through a strainer lined with cheesecloth straight into a big pot squeezing all the liquid out that you can. You want 4 cups of rose water; if you’re a bit short just add a bit of filtered water. I found this recipe made the right amount of water so you should be fine but feel free to measure if you’re not sure. I like to wing things. Add the sugar and bring up to a boil, stirring to ensure all the sugar incorporates into the rose water. Once at a  hard boil keep it here for 2 minutes skimming any foam off the top. After the time has elapsed remove from the heat, add the pectin and stir to combine for 5-6 minutes – no less – more is okay but no less.

    Now you’re ready to put your creation into jars and await the sweet satisfying sound of popping lids. Some recipes call for a water bath to finish the canning process but I’ve never done that. I just go with what my mom taught me, which is what’s outlined here, and it’s never failed me just like her.

    IMG_4022

    This simple tasty treat can be enjoyed may ways but my favourite thus far is on coconut ice cream or straight out of the jar… Happy jammin’!

  • Where There’s Smoke…

    Where There’s Smoke…

    Summer is almost officially here, although it’s basically felt like summer this past month with the weather we’ve been having. The sun is out, the flowers are blooming, and the rain clouds have stayed away for the most part. While this is incredibly enjoyable, it makes one remember what else comes with sunny, dry weather.

    Fire.

    According to the BC Wildfire Service, since April 1st of this year there have already been 242 fires, with an area of over 37,000 hectares affected. And that number is only going to grow. Just last week the historic Ladner Creek trestle bridge went up in flames from a simple, discarded cigarette butt. I will never forget the wildfires from three years ago that caused smoke to hang like a pall over our beloved valley, mixing with the 40°C weather to create an uncomfortable miasma. I imagine that most of you, like me, feel some trepidation when hot weather lingers, and look to the horizon with dread for signs of smoke.

    But thankfully, unlike the old adage, smoke doesn’t necessarily mean fire. If you are heading up Reid road to Mosquito Lake this summer and happen to smell smoke, don’t panic. It’s probably coming from our house, and it’s not a fire.

    My boyfriend’s birthday was this past week, and I gave him a new digital electric smoker. He’s over the moon. Visions of smoking everything from bacon, salmon, trout, and even mac n’ cheese are dancing through our heads. Our first creation was this beauty, smoked pork shoulder, and it couldn’t have been easier. A simple spice rub, a five hour stint in the smoker with some apple and hickory chips, and the occasional spritz with an apple cider vinegar and apple juice mix, and voilà. And yes, it tastes just as good as it looks.

    This summer, I sincerely hope the only smoke I have to reckon with is the kind that produces delicious results like this.

    pork

  • Wildflower Gummies!

    Wildflower Gummies!


    20180509_1701241
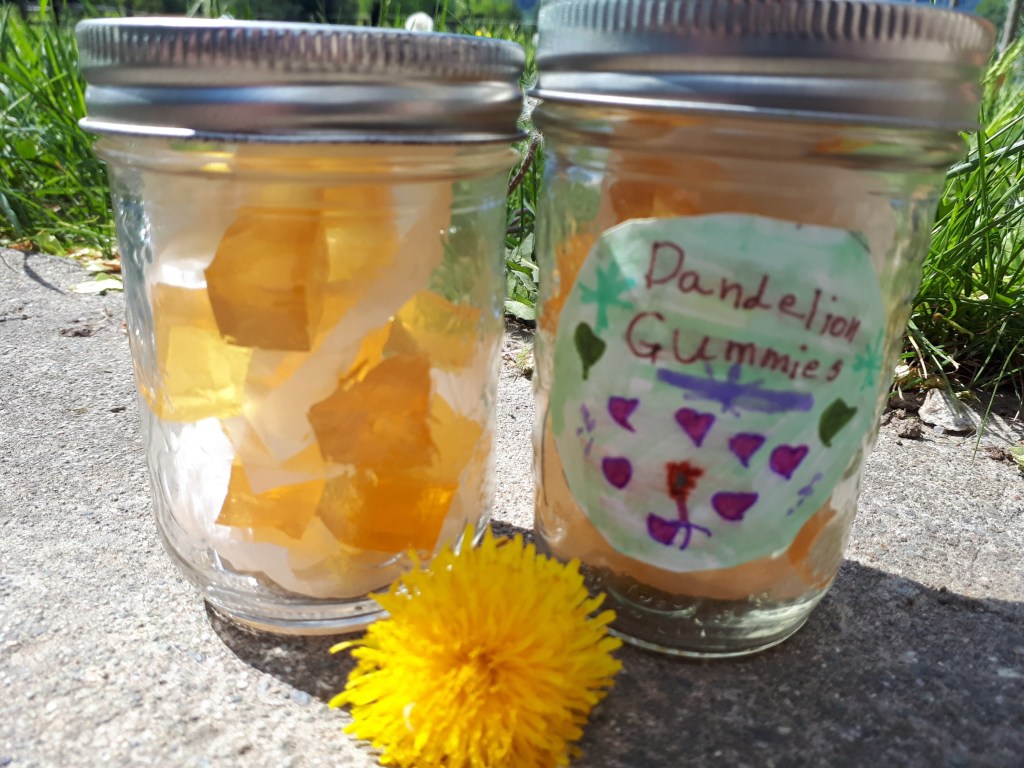
On May 11, I hosted a camp where we were supposed to make dandelion jelly. I had all these beautiful ideas in my head about the kids picking a huge bowl of blossoms out in the back field with the bees and other pollinators, their, fingers becoming stained yellow with pollen… how romantic. Of course, this is not how it happened in real life.

    “Jelly, what’s that?” one of the girls asked.

    “Well, it’s like jam, except there are no chunks in it, and we can make it from flowers!”

    “THAT SOUNDS GROSS!!” They replied in chorus. “EWWWW! WE ARE NOT MAKING THAT!! DISGUSTING!!”

    Well, that stumped me. For a moment.

    “Wait… we could make dandelion GUMMIES. Would that be better?”

    “YES!!” It was unanimous. GUMMIES were obviously WAY better than jelly.

    While we were waiting for our gummies to set in the freezer, we went outside and picked dandelions in the front yard. I showed the girls something my dad taught me when I was a little kid: that if you pick the largest dandelion stem you can find and take off its flower, it makes a noise like a kazoo! It takes a bit of patience to find the right stem, and sometimes you have to break it shorter and shorter before it will start to make  noise. It’s some kind of magic that happens when the dandelion milk in the bottom of the stem starts to vibrate, so it helps to have a juicy one! Two of the girls got bored and wandered away to play tag with Vinnie the sheep. But Avery was very excited about playing dandelions. “This is the best day of my life!” she exclaimed. “Now I can annoy everyone FOREVER!”


    20180511_142337
    Our gummies after being cut into bite sized morsels!

    As we cut up, divided up and packaged our very own homemade dandelion gummies, I realized this gummie making is an incredible way to get even the most squeamish of kids interested in the world that is growing all around them. If seasonal edible flower gummies can lead them to being able to identify a few species growing in their own back yard, then they learn to have a relationship with that particular plant, and that relationship can be a gateway to curiosity. In what other ways that plant can be used? What kind of environment does it like to grow in? Knowing a single plant intimately is enough to make the natural world come alive. I bet that even from reading this post you will notice dandelions more. Your awareness of them will become sharper, more open. And this kind of curiosity- this relatedness- is precious. It leads to a sense of belonging to the maze of green abundant life that exists outside our windows, the same way that knowing a friend in a crowd makes being amongst that many strangers less overwhelming. So if all we need is a few cups of cane sugar to kindle this relationship, then so be it!

    20180511_1432542
    Posing with our finished product!

    And don’t worry, I am going to give you recipes. I am also going to acknowledge I am leading you on a little, as dandelion season is almost completely over in Pemby. Don’t worry, you can use any edible fragrant flower to make your gummies. That means, lilacs = yes. Peonies = yes. And those wild roses that are just starting to bloom? Yes, you can use those too!!

    First, you need to make a flower syrup. I make mine in big batches, as I like to be able to keep some to make into summer drinks (a few tbsp and a bit of mineral water over ice on a hot day = heavenly). Please note that the syrup recipe is not intended to be canned, as the proportions are not tested for safety. So please keep your syrups in the fridge! I am confident you will use them up before they have a chance to go bad. This recipe makes about 6c of syrup, which is quite a lot. You can always halve or quarter the amounts if you want to make a smaller batch.

    Wildflower Syrup:20180509_165901

    2c flower petals

    4c cane sugar

    5c water

    1 organic lemon, sliced

    1. Prepare your flowers. It is best to harvest them in full sun at the height of the day. (From noon to 3 pm.) That way the flowers will retain the most potency and fragrance. Whichever kind of flower you are using, do your best to use only the petals. (In the case of dandelions, this means removing the green base of the flower.) Use flowers as close as you can to the time of harvest, as they will lose potency as soon as they are picked.
    2. Bring the water to a boil and add the cane sugar and stir until dissolved.
    3. Add flower petals and sliced lemon and cover your pot or bowl with a tea towel or cheesecloth to keep out flies, and leave out at room temperature to infuse for 2-4 days, stirring once per day. You want to optimize the length of your infusion without your syrup starting to ferment. If you see lots of bubbles or you are happy with the flavour, it’s time to move onto step 4…
    4. Strain and bottle your syrup. Enjoy!


    Wildflower Gummies 20180511_1440321

    1c flower syrup

    3pkj (3tbsp) gelatin*

    1. Find a mould for your gummies. I used the bottom of a tupperware container and cut them into squares, but you could get super creative here. You don’t need parchment or non stick spray or anything.
    2. Heat your flower syrup until just before boiling. Separate 1/4 -1/2 c of syrup and shake or whisk the Gelatin into it. (I used a small Mason jar and shook it to combine the gelatin, then strained out the residual lumps using a tea strainer as I feel you get less foam this way.)
    3. Add the gelatin mix to the rest of your syrup, stir well to combine, then pour it into your mould. If foam has accumulated on top of your gummy, skim it off with a spoon.
    4. Let your gummies set. I put mine in the freezer, but if you are not in such a rush you can just leave them out.
    5. To get your gummy out of the mould, dip your mould into warm water for a few minutes (being careful not to get water on your gummy). Then run a knife around the edge of your mould and you should be able to pull it right out. Don’t be afraid to use your fingers to pull it out of the mould- you won’t wreck it.
    6. Now you can cut your gummy into shapes with a sharp knife or cookie cutter. You could also roll them in sugar and leave them out for a few days is you want a chewier texture. I was happy with mine as they were as I found them already quite sweet. If you don’t go the additional sugar method, I would keep your gummies in the fridge as they do have quite a bit of moisture in them and will mould if they are not devoured within the first few days. Enjoy!

    *I used Knox Gelatin which comes pre-portioned in little paper packages, but I saw Stay Wild has boxed gelatin that is also gluten free!

  • A Couple of No-Bake Sweet Treats for Hot Pemberton Days

    A Couple of No-Bake Sweet Treats for Hot Pemberton Days

    Pemberton is a haven for horse lovers, golfers, mountain bikers, gardeners, farmers, adventure-seeking backcountry enthusiasts, ski and snowboard lovers (who would prefer to not reside in Whistler, or who cannot afford Whistler housing prices), and people who can tolerate extreme heat and bugs.

    I am none of those people, and thus look upon May to late September with dread when the temperatures hit north of 28C – which is frequent. However, Pemberton is also a place for people who enjoy peace and quiet and beautiful vistas – this is something I like very much about Pemberton.

    In light of the extremely high temperatures we are experiencing as of late, my entry this month will focus on two quick, satisfying and fairly healthy sweet treats. One of them, my peanut butter balls, are a staple in my fridge and I make them often. They are a good source of protein and healthy fats; a healthy peanut butter cup! Secondly, my healthier version of marzipan can be eaten on its own, dyed and made into fun fruit shapes, or rolled out to cover a cake – the famous Princess cake which I think is a Swedish tradition. In any case, sugar is reduced – but it does contain raw egg so do not serve to young kids, and anyone takes a risk consuming raw egg. I will take that chance.

    Therefore, my recipes this month do not highlight Pemberton ingredients – but highlight the importance of cooking and baking to suit Pemberton weather. Which seems to get hotter every year.

    Peanut Butter Balls (makes 10-12)

    (I use a kitchen scale for my recipes and I highly recommend owning a scale for bakers)

    6 oz Adams Original Salted smooth peanut butter

    2 oz coconut oil, (unmelted)

    4 oz coconut sugar

    ½ tsp salt

    1 tsp vanilla

    Coating:

    3 squares Lindt 90% dark chocolate

    1 tsp coconut oil

    Method:

    In a stand mixer, mix peanut butter and coconut oil together well. The coconut oil will take a while to fully incorporate.

    Add rest of ingredients and blend well.

    Refrigerate one hour.

    Take out of fridge and form dough into balls using 1 tbs of dough and place on a wax-paper lined plate.

    Refrigerate 1 hour

    Meanwhile make coating by melting coating ingredients slowly on stove or use a double boiler so chocolate doesn’t burn. If you have a very low setting on your stove, use that.

    When cold, dip balls into coating. Refrigerate ½ hour. Enjoy!


    Marzipan: (makes about 2/3 cup of marzipan)

    4 oz almond meal

    1 oz icing sugar

    1 egg beaten or 1 egg white (you won’t need all the egg)

    1 tsp almond extract

    Method: Using a Cuisinart, blend almond meal and icing sugar. With blade running add almond extract. Then slowly, add egg one tsp at a time until mixture comes together around the bowl. The marzipan should have a firm texture, not a mushy texture. Now you can do whatever you want with your marzipan, including eating it as-is!


  • April Kitchen Sadhana

    April Kitchen Sadhana

    In yogi language (Sanskrit) the word sadhana often refers to a conscious spiritual practice, discipline or service.

    In the last year I participated in an absolutely divine online course with a local yoga teacher.  Each month we got amazing content including a particular kitchen sadhana – ideas like herbal bitters or kitcharis and other ayurvedic potions.

    I’ve carried this ritual of kitchen sadhana into my life as I find it very grounding.

    This month I have two particular recipes that I’m really excited about.

    The first is one of my absolute favourite foods to make when I need something easy to digest that is also a complete meal and very comforting and nourishing. Kitchari (sometimes spelled kichadi) refers to a stew-like one-pot meal which is a mixture of two grains. Spring is often a time when we are shedding the stagnant, dense energy of winter and the heavier foods we’ve been eating to up-shift to the lighter, more buoyant foods of spring, like dandelion greens and fresh nettle. The great thing about kitchari is that you can use any vegetables you have on hand.

    up to april 2018 200

    This particular recipe is with a mix of mung beans and basmati rice and I had butternut squash, spinach and frozen peas on hand so in they went.

    Here is the link for the recipe:  http://www.mapi.com/ayurvedic-recipes/soup-and-salad/khichadi-mung-bean-and-basmat-rice-stew.html

    up to april 2018 201

    The next spring kitchen sadhana is a work in progress. It comes from a cookbook I have taken out from the library seven times in the past three years called The Nourished Kitchen by Jennifer McGruther.

    Nearly May 001

    For me, it is not an everyday kind of cookbook but a fun experimental one. Of particular interest to me is her chapter on fermentation. I love water kefir and kombucha and homeade sodas but usually buy them. I am now 3 days in to creating my own live wild yeast and ginger starter. From this, I can then create my own water kefir and beet kvass or flavoured sodas and the starter keeps living as long as you replenish what you use and keep it fed and/or refrigerated.

    Nearly May 002

    It doesn’t look super delicious now but I love the simplicity of just ginger, water, unrefined sugar and time in the environment and from here the off shoots will be a complex flavour sensation and also great for gut health like ginger lemon water kefir or beet kvass mixed with spring water on a hot afternoon. A great reward for my kitchen sadhana. You can find this cookbook at the Pemberton Library and she also has a website you can check out at https://nourishedkitchen.com/

  • Counting Points – Banana and Chocolate Chip Mini Muffins

    Counting Points – Banana and Chocolate Chip Mini Muffins

    It had to be done. Well, something had to change, and so on 1st April I re-joined Weight Watchers Online. No joke!

    My goal is to lose 10% of my starting weight and then see what happens from there. One thing that is for sure, I have to make better food choices and become a fitter, healthier version of myself. The hard part will be keeping it off and not allowing myself to go back to where I was, and where I was heading. But I have done it before so can do it again, and learn better habits this time round.

    I know that Weight Watchers is not for everyone, and in this village, many people lead such an active lifestyle that they don’t suffer with weight problems. At least they don’t appear to. But for some of us we need to track what we eat so that we can see where we are going wrong and then make a conscious decision to do better.

    The Freestyle programme is different to the plan that I was on before and I am having to learn it all again but, so far, it has encouraged me to eat more fruit for snacks, instead of the junk I was tucking into before. Also I don’t eat meat, with the exception of turkey, chicken and fish which are all zero points on this plan, so I am learning to eat more balanced meals throughout the day. And having the new puppy has helped me become more active as he needs to go for walks every day. I no longer have an excuse!

    However, sometimes a treat is in order, so I looked for a recipe on the Weight Watchers site and found this one for Banana and Chocolate Chip Mini Muffins. They did the trick and were a healthy option. (I even made them better for me as I didn’t have any chocolate chips to hand – bonus! Plus I made a half batch and then shared them with friends so they wouldn’t be hanging around in my kitchen providing an unnecessary temptation). So, I am pleased to share this recipe in an effort to show that diet food doesn’t have to be just salads and that everything in [reduced fat and sugar] moderation can help move the number on the scales in the right direction! Look out for more healthier recipes over the next coming months.

    Ingredients

    • cup low fat vanilla yogurt
    • 1cup fat free skim milk
    • 1cup uncooked quick oats
    • 1tsp vanilla extract
    • large egg, beaten
    • large banana, mashed
    • 11cups all-purpose flour
    • 1cup unpacked brown sugar
    • tsp baking powder
    • 1tsp baking soda
    • 1tsp table salt
    • 1cup mini chocolate chips, divided

    Directions

    1. Preheat oven to 375ºF. Coat 36 mini muffin holes with cooking spray (use three 12-hole pans).
    2. In a large mixing bowl, combine yogurt, milk, oats, vanilla extract and egg and set aside 5 minutes for oats to soften and then stir in banana.
    3. In a separate bowl, stir together flour, brown sugar, baking powder, baking soda and salt. Stir flour mixture into yogurt mixture to moisten ingredients (do not beat – the dough will be very thick). Reserve 1 tablespoon chips; stir in remaining chips.
    4. Spoon batter by heaping tablespoons into prepared muffin holes; sprinkle each with a few reserved chocolate chips. Bake until golden brown and a tester inserted in centre of a muffin comes out clean, about 15 to 18 minutes.
    5. Yields 1 muffin per serving which equals 2 Weight Watchers Freestyle points. (Or 1 point if you leave out the chocolate chips! 😉)

  • How to Enjoy Pemberton Deer Meat

    How to Enjoy Pemberton Deer Meat

    I did not grow up eating deer meat. Beef, yes. Chicken, yes. Salmon and sole, yes. But deer meat, no. So when I moved to Pemberton and began sharing my fridge with a hunter, I was in for a change in dietary habits.

    While it was not something I can say I enjoyed eating at first, over the years I have learned that deer meat can be just fine. I would like to add that I am grateful for the deer, and the deer meat. Deer eat leaves in the forest, and that is a healthy, natural diet that is passed on to us in the form of healthy, natural, and lean meat. I also like the fact that we know where our meat comes from.

    Some Recipes Work for Deer Meat. Others Do Not:

    My advice to any readers who either have just taken up hunting, or are living with people who hunt, is that some recipes complement deer and others do nothing for it. For instance, do not create a delightful, light, refreshing marinara sauce with Lillooet tomatoes and fresh basil, and expect that it will taste great mixed with a pound of ground deer meat. It will not. (I do not call it venison – that’s chef talk. Deer meat it is.)

    Stew Meat and Ground Meat are Your Friends:

    No matter how much a hunter tries to tell you that “deer roast is amazing”, do not believe him or her. A pork roast? Sign me up. A beef roast? Pass the Dijon. A deer roast? I have [expletive] tried and tried for over a decade and not once has one turned out well. Do not let that hunter persuade you into deer steaks either. In my culinary opinion, another waste of time.

    In short, your entire deer should be turned into either ground or stew meat, with all due respect for the animal.

    Recipes That Have Worked for Me:

    My best recipes for deer meat are used over and over again, and they are best suited for fall, winter and early spring. By late spring we are pretty much done with deer meat, but it can still be used in warmer weather for my taco fiesta recipe which follows.

    My favourite recipe that truly complements deer meat (or disguises it – depending on your point of view) is Shelley Adams’ Whitewater Cooks at Home recipe for Curried Lamb & Lentil Soup. It is delicious, full of flavour, freezes and reheats beautifully, and anyone I have served this to loves it (including many people who do not eat wild game). Deer stew meat is substituted for the lamb.

    Honourable mentions go to Shelley’s recipe for Beef, Leek and Pot Barley Soup (swap out the beef for deer stew meat) from the same book, and her Whitewater Cooks Chilli from her first cookbook. I have still not found the ideal pasta sauce recipe but the one I use is the Best of Bridge cookbook series Best of the Best for their lasagna recipe – the sauce can be used over any pasta. It is really only good on a fall or winter chilly night as it is quite heavy – and the flavours may be a bit dated for today’s palates. But a heavy pasta meal can be very satisfying and comforting on a dark, cold, winter night so it works for me sometimes.

    Mexican Taco Fiesta with Pemberton-Area Deer Meat (Serves 6):

    Here is a recipe I just came up with recently that is delicious, kid-friendly, and appealing to the palate year-round. I choose to serve the tacos without cheese or sour cream, but it’s a personal choice. I also make a cooked salsa with canned tomatoes, making this recipe a practical choice in winter months when fresh tomatoes are expensive and not flavourful.

    Ingredients:

    1 lb. ground deer meat

    3 tbs. home mixed taco seasoning

    1 12-count package of authentic corn tortillas

    10 romaine lettuce leaves, shredded

    1 recipe cooked tomato salsa (recipe follows)

    2 cups cooked black beans

    2 cups finely chopped cilantro

    2 cups cooked corn kernels (fresh or frozen)

    Choice of hot sauce for garnish

    Method:

    Cook your deer meat in a very large cast iron fry pan or a heavy-bottomed large saucepan until no longer pink.

    When fully cooked, add 2 cups water and 3 tbs. of taco seasoning.

    Add cooked black beans, cilantro and corn and simmer until the liquid is boiled down (but not so much that your meat mixture is dry).

    Warm tortillas in oven for 15 minutes at 180F

    Chop up lettuce into small shreds.

    Assemble tacos with meat mixture, salsa and lettuce over a tortilla, at the table. No need to roll up (corn tortillas will fall apart easily). Cut up and eat with knife and fork.

    Enjoy!

    Cooked Salsa:

    Ingredients:

    1 litre of canned, diced Lillooet tomatoes

    1 cup chopped cilantro

    1 cup chopped white or yellow onion

    1 tsp. salt

    1 tsp. ground pepper

    Method:

    Sauté onions til very well cooked or caramelised. Add cilantro, tomatoes and salt and pepper. Simmer until most of the liquid is boiled down.

    Leftovers:

    Combine the salsa, the deer meat mixture, and shredded lettuce and sauté over medium heat until hot. Makes a great lunch next day!

    IMG_5492


  • New puppy = new cake recipe!

    New puppy = new cake recipe!

    I think I mentioned in my first post that I have a love of baking. I don’t get to bake very often though as that would mean eating it all afterwards, but for visits with friends or special occasions I can make an exception. Well, those two things just happened to collide this past weekend.

    You see, this week my husband and I drove up to Fort St. John, and back, to collect our new puppy. And yes, before you ask, we do both believe in #adoptdontshop but the breed we love is not regularly found at a shelter and we did research our breeder and were satisfied that they were not a puppy farm. Besides, he is a cutie.

    IMG_5053

    And so, for this occasion, it seemed appropriate to bake a cake to take round our friends house while introducing them all to the new puppy. Plus I wanted another excuse to try my Bundt tin!

    I had saved several Bundt cake recipes on Pinterest but this One-Bowl Chocolate Buttermilk Bundt Cake seemed like just the right thing and looked very appetizing in the pictures. I hoped my version would look, and taste, as good.

    Version 2

    Ingredients

    Cake

    • 3 cups all purpose flour
    • 2 cups sugar
    • 2/3 cup cocoa
    • 1/2 tsp salt
    • 1 tbsp baking soda
    • 2 large eggs
    • 1 1/4 cup low fat buttermilk (or standard will do)
    • 1 cup vegetable oil
    • 1 cup boiling hot water
    • 1 tbsp vanilla

    Glaze

    • 1 cup sugar
    • 1/3 cup cocoa
    • 1 tbsp cornstarch (I used 2 tbsp to make the glaze a bit thicker)
    • 1 cup boiling hot water
    • 1 tsp vanilla extract
    • ¼ cup butter

    Directions

    Cake

    1. Preheat your oven to 350F.
    2. Thoroughly grease a bundt pan and then sift cocoa powder over and set aside.
    3. Add all cake ingredients to a large bowl and mix until well blended using a hand mixer.
    4. Bake for an hour (check at 50 mins) or until the cake springs back when touched lightly with a finger.
    5. Remove from oven and let cool completely before frosting.

    Glaze

    1. In a medium saucepan, whisk together the sugar, cocoa, cornstarch and hot water.
    2. Cook, stirring often over a medium heat until thickened slightly.
    3. Remove from the heat and add the vanilla and butter, and stir until the butter melts.
    4. Set your cake over a rack with something to catch all the drips and then pour the frosting over the cake.
    5. Let the frosting set a little before adding sprinkles.
    6. Let set for at least an hour before eating and enjoying.

    I was very happy with the results. It took minutes to put together and everyone really seemed to enjoy it, even going back for seconds (which is good as it meant less to take back home with me). Oh, and everyone loved the puppy too!

    fullsizeoutput_824