Category: recipes

  • Just a couple of cupcakes!

    Just a couple of cupcakes!

    Monday 25th February was National Cupcake Day. Well, it was for SPCAs and Humane Societies across Canada, who encourage the baking and selling of cupcakes as a way to raise money.

    As Qanik was fortunate to have one of his images chosen to be part of the 2019 campaign it seemed only fair that I do my bit too.

    So, having chosen the Victoria Humane Society as my nearest participating society, I had to decide on what cupcakes I was going to make and then get people, mostly work colleagues, to purchase them!

    I decided on giving potential buyers the option of three different flavours:

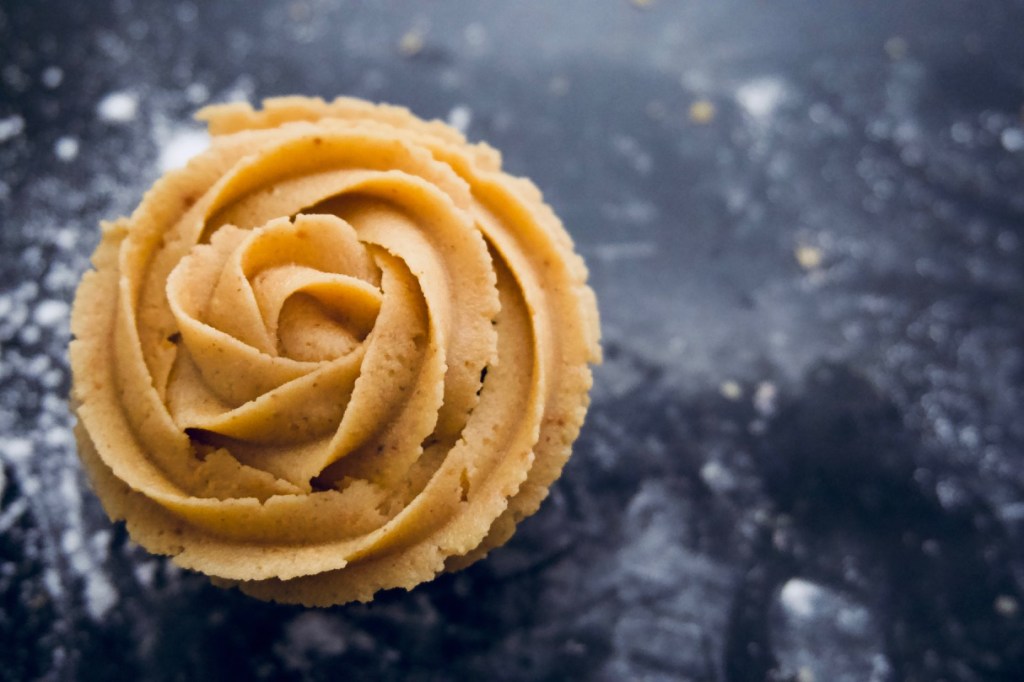
    The orders started making their way to me and, on Sunday, I spent most of the day baking and icing 89 cupcakes! The flavour that received the most requests was the Dark Chocolate with PB Frosting so here it is for you to make and try for yourself!

    Ingredients

    For the Cupcakes

    •  8 tablespoons unsalted butter, cut into 4 pieces
    •  2 ounces bittersweet chocolate (finely chopped)
    •  ½ cup Dutch-processed cocoa powder
    •  ¾ cup all-purpose flour
    •  ½ teaspoon baking soda
    •  ¾ teaspoon baking powder
    •  2 eggs
    •  ¾ cup granulated sugar
    •  1 teaspoon vanilla extract
    •  ½ teaspoon table salt
    •  ½ cup sour cream

    For the Peanut Butter Frosting

    •  1 cup icing sugar
    •  1 cup creamy peanut butter
    •  5 tablespoons unsalted butter (at room temperature)
    •  ¾ teaspoon vanilla extract
    •  ¼ teaspoon kosher salt
    •  cup heavy cream

    Directions

    1. Make the Cupcakes: Adjust oven rack to lower-middle position and pre-heat to 350˚ F. (If you are using a non-stick muffin pan, heat the oven to 325˚ F.) Line standard-size muffin pan with baking cup liners.
    2. Combine butter, chocolate, and cocoa in a medium heatproof bowl. Set the bowl over a saucepan containing barely simmering water; heat the mixture until the butter and chocolate are melted and whisk until smooth and combined. (Alternately, you can microwave the mixture at 50% power, stirring every 30 seconds until completely melted.) Set aside to cool until just warm to the touch.
    3. In a small bowl, whisk together the flour, baking soda and baking powder.
    4. In a medium bowl, whisk the eggs then add the sugar, vanilla and salt and whisk until fully incorporated. Add cooled chocolate mixture and whisk until combined. Sift one-third of the flour mixture over the chocolate mixture and whisk until combined; whisk in the sour cream until combined, then sift remaining flour mixture over and whisk until batter is fully mixed and thick.
    5. Divide the batter evenly among the muffin pan cups. Bake until a skewer inserted into centre of the cupcakes comes out clean, approx. 18 to 20 minutes.
    6. Cool cupcakes in the muffin pan on a wire rack for 15 minutes. Remove the cupcakes and set on wire rack to cool to room temperature before icing, about 30 minutes.

    1. Make the Peanut Butter Frosting: Place the icing sugar, peanut butter, butter, vanilla and salt in the bowl of an electric mixer fitted with a paddle attachment. Mix on medium-low speed until creamy, scraping down the bowl with a rubber spatula as you work. Add the cream and beat on high-speed until the mixture is light and smooth.
    2. Assemble the Cupcakes: Frost the cupcakes with an offset spatula, or with a decorating tip (I used a Wilton 1M tip and a rose pattern). Store at room temperature in an airtight container for up to 4 days.

    Want to know how to frost in a rose pattern? Check out this quick video tutorial.

    My cupcakes were a success and I managed to raise over $300.00 for my chosen charity. Next up are muffins and dog treats for Treat Week for the Sea to Sky BC SPCA!

  • A Six O’Clock Solution for Deer Meat…You’re Welcome.

    A Six O’Clock Solution for Deer Meat…You’re Welcome.

    After many years of trying to incorporate deer meat into quick last-minute dinner dishes – and failing – I am happy to report that I have a solution to those last-minute woes. The answer is a jar of Classico pasta sauce – the Italian sausage variety! By chance I tried it one night and it actually complements deer meat.

    I have turbo-charged it with a whole cauliflower and some parsley for flavour. But this is an easy last-minute dinner for anyone with deer meat in the freezer. Unfortunately I’ve had to throw out many deer meat experiments over the years. So here’s hoping you enjoy this one, as deer meat has a particular flavour that does NOT mesh well with any old jarred sauce!

    Quick & Delicious Pasta Sauce for Deer Meat:

    3 tbs pure olive oil

    1 large yellow onion, small dice

    1 cup chopped parsley

    1 whole medium cauliflower, small dice

    1 tsp pepper

    Salt to taste

    1 lb ground deer meat

    1 jar Classico pasta sauce (Italian sausage, peppers and onions variety)

    Method:

    Sauté onion parsley and cauliflower in olive oil over medium low heat until caramelised. Add pepper.

    In separate fry pan, brown deer meat.

    Add meat to cauliflower mixture.

    Add sauce.

    Simmer 5-10 minutes.

    Serve over a whole grain pasta such as spaghetti or penne. Enjoy!

  • Baking… it’s not just for people!

    Baking… it’s not just for people!

    Well, of course, it’s only people that can do the baking, but everyone can benefit from the outcomes. Like my puppy, who just turned one!

    What says love and happy birthday more than some home-baked cookies. Nothing, that’s what!

    I researched a few different recipes knowing that the main ingredient should be peanut butter as that’s one of his very favourite things! Also, I wanted to make something so I knew what was going into his cookies. The only difference with mine, compared with the recipe, was that I didn’t have any wholewheat flour so used all-purpose instead and used some chicken stock to bind it all together.

    For this occasion I went with the “Best of Breed” biscuits but I’ve already decided that the next biscuits I make will be peanut butter and banana and peanut butter and pumpkin – all three of his favourite things!

    Ingredients

    • 2 cups White Whole Wheat Flour or Whole Wheat Flour
    • 1 cup rolled oats, regular or quick
    • 1 tablespoon dried parsley or 2 tablespoons chopped fresh parsley
    • 1/2 cup nonfat dry milk
    • 1/2 teaspoon salt
    • 2 large eggs
    • 1 cup (9 1/4 ounces) peanut butter, crunchy or plain
    • 1/2 cup + 1 tablespoon cold water, or enough to make a cohesive dough

    Directions

    1. Preheat the oven to 300°F. Lightly grease a couple of baking sheets, or line them with parchment.
    2. Put the dry ingredients in a mixing bowl and stir to combine.
    3. Add the eggs and peanut butter. Stir to combine; the mixture will be crumbly.
    4. Add 1/2 cup + 1 tablespoon cold water, or enough to make a cohesive dough. Depending on the season, you may need to add a bit more (winter), or a bit less (summer).
    5. To make the cookies, roll the dough into walnut-sized balls onto a lightly greased or parchment-lined baking sheet and flatten to about 1/4” thick.
    6. Alternatively, roll the dough out to about 1/4” thick and cut out with a cutter of your choice. Gather and re-roll the scraps, and continue to cut biscuits until you’ve used all the dough.
    7. Lay the biscuits close together on the prepared baking sheets. Since the biscuits don’t include any leavening (baking powder, yeast, etc.), they won’t spread.
    8. Bake the biscuits for about 40 to 60 minutes, baking the smaller cookies for the shorter amount of time, the larger biscuits for the longer amount of time.
    9. When finished, the biscuits will be dark golden brown, and will be dry and crisp all the way through.
    10. Store in an airtight container or ziploc bag.

    And yes, they were birthday boy Qanik approved!

  • The Last Squash

    The Last Squash

    Bittersweet times are upon me these days as my personal stock levels of fresh garden produce dwindle down to the last survivors. Luckily seed ordering is in full effect to keep the dream alive! Yet, even though the light at the end of the winter tunnel grows brighter every day, you can still guarantee there will be times when we feel the need to: bundle up, get adventurous, come home and devour a hot bowl of soup.

    But I’ll reiterate before continuing that… #summeriscoming.

    Feeling inspired from an Instagram post by my “neighbor” Anna for a mega hearty vegetable broth and a recipe from My New Roots, I set forth to honor my last butternut squash with a soup so full of nutritional goodness that would make the new Canadian Food Guide salivate.

    So here we go – Butternut Miso Soup.

    Step Uno: Make Anna’s stock.

    • Once you’ve got all the goods simmering away go out and adventure for a few hours then come home to the most AMAZING smell, ladle up yourself a cup and savor the goods! Freeze what you don’t use in different sized containers for later. (I added in some carrot and celery because I had it on hand and well, I’ve never made a stock with out either!)


    Step Two: Start making the soup.

    Butternut squash, peeled & diced into ½“ pieces (approx. 3 cups), roasted at 375°F with some coconut oil, salt and pepper – one medium sized onion, diced – 3-4 cloves garlic, minced – 2-3 Tbsp fresh grated ginger (I keep mine in the freezer for easy grating and its keeps longer) – miso paste (Fuji Market in Whistler has a great selection, I used AWASE Miso)

    • Add some coconut oil into a Dutch oven over medium heat, then add the onion and cook until translucent then add in the garlic and ginger; allow everyone to mingle until fragrant. Then add in the butternut squash and cook for 5 minutes to absorb the flavors. Top the lot with the veggie stock and allow to simmer for 10-15minutes. Use one cup of water and combine with ¼ cup miso paste, whisking to combine then add to the pot. Remove from the heat and use an immersion blender to smooth out the soup. Add more stock or water to obtain your desired consistency and season with salt & pepper.

    Step 3: Wasabi cream.

    1 Tbsp wasabi powder – 1 Tbsp water – 2 Tbsp mayo – squeeze lemon or lime juice – dash of tamari

    • Whisk everything together and get ready to be addicted, and willing to putting this sauce on everything.

    Step Quatro: Eat the soup.

    • Serve the soup drizzled with the wasabi cream, sprinkled with black sesame seeds and topped with some pea shoots, micro greens or whatever is on hand. That is all.

    img_7124

    Simple. Delicious. Nutritious. Most importantly: made and grown with love.

    And remember… always trust a Swede.


  • A Veggie-Laden Twist on Shepherd’s Pie 

    A Veggie-Laden Twist on Shepherd’s Pie 

    Shepherd’s Pie is another great dish for experimenting with. It is also great comfort food on a winter evening! Lately I have been omitting tomatoes and garlic from my recipes. I don’t love garlic in particular and I am cutting back on acidic tomatoes. Eliminating these two ingredients is a challenge, as they pack a lot of flavour.

    With a lot of time in a good cast iron Dutch oven, you can bring out the flavour in SO many veggies. For shepherd’s pie you can experiment, but this time I used: 1 cup diced green cabbage, ½ an eggplant, a large yellow onion, 2 cups parsley, and several healthy dashes of Worcestershire sauce – as well as S&P.

    If you sauté those veggies at a low-medium heat for a good ½ hour – or more, you will have the flavour you want. And not have to resort to tomatoes for zing, or the usual garlic! The other veggie-friendly thing I did was steam a whole cauliflower and then mash it along with 8 fingerling potatoes, with plenty of butter and salt and the cauliflower steam water. All in all, this shepherd’s pie was a hit, and had tons of servings of nutritious veggies in it to boot. This is my re-boot of the usual “carrots, peas and corn” shepherd’s pie – which by my palate has had its day!

    Veggie Turbo-Charged Shepherd’s Pie:

    Ingredients:

    3 tbs pure olive oil

    ½ eggplant, small dice

    1 cup green cabbage, small dice

    2 cups parsley, chopped

    1 large yellow onion, small dice

    1 tsp pepper

    2 tbs Worcestershire sauce

    1 lb ground Pemberton-area deer meat, or grass-fed lean ground beef

    1/3 cup unsalted butter

    1 medium cauliflower

    8 small yellow potatoes (Pemberton Sieglindes are a treat)

    Salt to taste

    Method:

    Sauté all veggies (except cauliflower and potatoes) until well cooked and caramelised in cast iron Dutch oven.

    Brown deer meat/ground beef in a separate cast iron fry pan, then and add to veggie mixture.

    Add ½ cup chicken broth and 2 tbs cornstarch. Mix well. Mixture should thicken nicely.

    Boil potatoes until very fork-tender.

    Steam cauliflower.

    Puree steamed cauliflower in food processor fitted with steel blade until very smooth.

    Blend cauliflower and potatoes together in stand mixer with butter, salt and cauliflower steam water until you have a smooth consistency.

    Pour veggie mix into 9×13” casserole dish and spoon mashed potatoes/cauliflower over top. Spread well.

    Bake 350C for ½ hour.

    Enjoy!

    ** Leftovers: next day add a good splash of chicken broth to a serving of shepherd’s pie and it forms a stew that is very satisfying in a Thermos for lunch on the go.

  • Food and Feelings: Intentions for 2019

    Food and Feelings: Intentions for 2019

    Oh hello, 2019! I’m not someone who’s all about the “new year, new me” mantra but I do like to use the new year as a time to remind myself about the things that I love. I also use this time to set achievable intentions. To be honest, I celebrate my actual new year on my birthday (August 8th) and that is when I set bigger BHAG-ish goals. For 2019, I’ve set some intentions that will help inspire my happiness and that may require guidance from the community. I don’t have a very green thumb, I’m a creature of habit and I love being outside.

    If you have any suggestions or tips on any of the below intentions, please comment below this post or email. #help

    Pemberton on Christmas Day.

    Intention one:  Try something other than Pad Thai at Barn Nork

    I’m a frequent diner at Barn Nork (and also a frequent eater of their take out). I always switch up the starters but I can’t seem to deviate from their delicious Pad Thai. HELP! My goal for 2019 is to provide my taste buds a new experience via the Barn Nork train.

    Intention two: Always have local farm fresh eggs

    My name is Blair and I’m an egg-aholic. I start off every single day with a delicious breakfast that 99.9% of the time includes eggs. Since moving to Pemberton in 2012, I discovered how delicious farm fresh eggs are. Sometimes they are easy to buy and sometimes I feel like Sherlock Holmes trying to hunt down someone who will sell me at least a dozen. Over the years I’ve collected a few different resources for farm fresh eggs and I’ve learned to buy two dozen at a time. When I can’t find the eggs I desire, I buy them from the store and they just don’t have the same taste (in my opinion). Why should I let my eggs dip below my taste bud’s standards? I shouldn’t and I won’t! So, 2019, bring on the farm freshies!

    Intention three: Grow my own flowers (to cut)

    I’ve always been a sucker for fresh cut flowers. They are pretty and smell divine. I realized that during 2018 I spent a lot of money on purchasing flowers. Because I enjoy flowers so much, and I have the space to grow them, why try growing them? My husband has a greener thumb than I do and he’s agreed to help me out with this intention. I’m looking to grow flowers that are cat-friendly AND that are low maintenance. What do you think I should grow?

    One thing to note is that this past summer was the first summer (ever) that I managed to keep my lavender plant alive. GO ME!

    Intention four: Pick my raspberries, every day

    When I moved to town I shared with Shayne my love for raspberries and that I’ve always wanted my own raspberry bush. So, we planted a raspberry bush and we seemed to plant them in the right spot because they love to grow! Usually, halfway through the season, I seem to slip away from picking them daily and eventually forget about them. I usually have a moment where I remember (when I’m no where near Pemberton) and call a neighbour to send their kids to pick the berries. I have NO REASON to not pick the raspberries on a daily basis (unless I’m out of town, which, I guess, is a reason). I should also freeze them if I have too many. So, backyard bush, bring it on!

    Because it’s now January 10, 2019, and I’ve shared my intentions publicly with you, please hold me accountable. Also, if you have any words of encouragement or advice, please send them my way. Cheers to an awesome 2019 full of new menu choices, fresh cut flowers, raspberries galore and eggies from my neighbours.

    Blue sky in Pemberton on Christmas Day.

    P.S. Want to drop me a line? My email is blair@blairkaplan.ca.

  • Where’s the Beef?

    Where’s the Beef?

    Happy New Year everyone!

    I don’t know about you, but I’m a little glad the holidays have passed. Don’t get me wrong. They were wonderful. Full of love, laughter, good times, and of course good food. One of the things I love most about the holidays is the food and drink. There are special recipes that I save only for this time of the year: homemade eggnog, butter tarts, ginger molasses cookies, mulled wine. Sure, I could whip up butter tarts any day of the year, but saving them for this special occasion makes them sparkle.

    The big finale, though, is Christmas dinner. The tradition in my family is turkey, but a few years ago I spent Christmas at Nathan’s parents’ house on Vancouver Island, and I wanted to make something special for his family as a thank you for welcoming me into their home. So I decided to try a new recipe: Beef Wellington.

    Ever since that year Beef Wellington has been the go-to Christmas dinner for Nathan and I. The original recipe came from Gordon Ramsay, but I read it incorrectly, which caused some interesting adaptations on my part. Instead of chestnut mushrooms, I used chestnuts and mushrooms to make my duxelle (mushroom paste). And last year we made another change that is here to stay. We went in on a quarter cow here in Pemberton, and with it came four beautiful beef tenderloin medallions. So instead of preparing a whole tenderloin, we did individual Beef Wellingtons, which I’m happy to share with you here today. The puff pastry to meat ratio is higher, they’re super easy to prepare ahead of time, and they look like perfectly wrapped little presents when they’re completed. Ideal for Christmas dinner. After trying this, you may never go back to turkey again. (Sorry.)(Not sorry.)

    Individual Beef Wellingtons

    Ingredients

    Beef tenderloin medallions, ~ 1.5″ – 2″ thick
    Grainy mustard
    Mushrooms (I used brown mushrooms this year, but any kind is fine.)
    Whole chestnuts
    Prosciutto (2 slices per medallion)
    Prepared frozen puff pastry, thawed.

    1.Roast the chestnuts. Peel while still warm, and set aside to cool.

    For two years I roasted my chestnuts in a cast iron pan over our woodstove, mostly for the novelty of singing “Chestnuts roasting on a woodstove.” This year I roasted them in the oven and it’s way easier, and faster. Make sure to score your chestnuts with an X, and I soaked mine for about an hour first. The idea is that the water will create steam and help loosen the skin under the shell. If you find they’re not peeling very easily, they probably need more time in the oven.

    2. Dice your mushrooms, and saute with a little butter and a sprinkle of salt. Cook until most of the moisture is gone, and they are soft and browned. Set aside to cool.

    The size of your dice doesn’t matter because we’re going to put them in a food processor later. The salt helps draw out the moisture. We’re looking to remove most of the moisture from the mushrooms so they don’t make the puff pastry too soggy.

    3. Mix the chestnuts and the mushrooms in a food processor until they form a smooth paste. Set aside.

    duxelle

    You may notice that I haven’t given any specific quantities up until this point, and that’s because this step is personal preference. Your mushroom to chestnut ratio is entirely up to you, as well as how much of this paste you would like. I was making Wellingtons for nine people, so I used an entire bag of chestnuts, and about fifteen to twenty mushrooms. It made enough for about two tablespoons per Wellington. You can also skip this part entirely if you don’t like mushrooms, or chestnuts.

    4. Pat your beef medallions dry and season with salt and pepper. Sear in a hot pan with a little olive oil, only a minute per side. Set aside on a plate. Brush the tops with grainy mustard while still warm.

    I like to use a little steak spice on mine as well. You barely need a minute in a nice, hot pan. We’re not looking to cook the steaks; we’re just looking for a little char on the outside to add flavour.


    5. Assembly time. Place a small piece of plastic wrap on your workstation. Lay down two pieces of prosciutto in an X pattern. Spread a spoonful of your mushroom/chestnut mixture in the centre. Place the beef medallion mustard side down on top of the mixture. Gently fold up the edges of the prosciutto, and tightly wrap with the plastic. Let sit in the fridge at least 30 minutes, or until you’re ready to wrap with puff pastry.


    You can prepare these ahead of time up until this point and keep in the fridge, or you can go straight to wrapping in puff pastry. The time spent in the fridge helps firm up the Wellington and makes it easier to wrap with the puff. I usually let these sit in the fridge while I prepare my puff pastry. If you’ve let them sit in the fridge for longer, let them sit out at room temperature for a little while to ensure even cooking.

    6. Roll out the puff pastry to approx. 1/4″ thickness. Cut into squares large enough to wrap around your Wellingtons. Unwrap the medallions from the plastic wrap, being careful not to dislodge the prosciutto, and place upside down on your puff pastry square. Wrap the four corners of the puff pastry around the meat, and use a little egg wash to help seal.

    I’m sorry I don’t have a picture for this step. The size of your puff square should be just enough to fold over the beef, like you did with the prosciutto. You can make egg wash by beating one egg with a bit of water, approx. 1-2 tsp. Try not to roll your puff pastry too thick, otherwise you’ll be eating more puff than meat. Thinner is better.

    7. Place Wellingtons on a baking sheet covered with parchment. Cut slits into the top of the pastry, and brush all over with egg wash. Bake at 400ºF for 25-30 minutes, until golden brown.


    Cooking time will depend on the thickness of your meat, and your oven. Use a meat thermometer to ensure you don’t overcook your meat. I overcooked the meat a little this year in favour of a more golden pastry, but nobody seemed to mind because they were so delicious. I cut some triangles from the puff to frame the slits, using a little egg wash to glue them down.

    And there you have it. Individual Beef Wellingtons. They go great with a fresh, green salad to counterbalance the heavy meat and puff pastry. It takes a bit of planning and prep, but you may find these sneaking into your own traditional holiday recipes before long.

    atty (2)
    Enjoy, and happy eating!
  • Old Fashioned Egg Nog

    Old Fashioned Egg Nog

    I grew up in rural Ontario, and every New Years Eve my family and I would drive 3 miles down our snowed-in gravel road to the farm of Joanne Cowling. Having come to Canada from England many years earlier, Joanne kept her meticulous British accent and a series of beautifully maintained gardens, complete with goats, sheep, pigs, geese, ‘chooks’ (chickens) and a pony named Sandman. Upon entering the red brick farm house my brother and I would remove our winter clothes and make a beeline for the kitchen where Joanne would ladle out a hand-thrown clay goblet of homemade egg nog for each of us. As I sipped its heady creamy goodness, I always wondered what made the adults laugh so loud as they drank theirs. (I suppose I did not see the brandy making its way from goblet to goblet, how conversation slipped more easily in its presence). Then my brother and I would weave between the legs of neighbours to get to the large table that was laid out with hundreds of Joanne’s famous hors d’ourves: crab wrapped in filo pastry, thin slices of marinated beef tongue, smoked salmon sprinkled with capers, warm brie cheese, and Christmas cookies cut into the shapes of animals, decorated with fancy icing and tiny silver balls. But in the collage of these most delicious morsels, it is the egg nog that I remember most; that rich impossible creaminess.
    About 10 years ago, through a series of arm wrestles, afternoon coffees, and barn chore trades, my mom finally convinced Joanne to write her recipe down, and the ‘nog became part of our family tradition. Every year when I go home for Christmas there is the requisite jug of thick, creamy (and quite boozy) ‘nog chilling in a snowdrift outside the back door.
    Over the years I’ve sampled many attempts at the enigma that is egg nog. And I have to tell you that nothing, and I mean NOTHING has come close to the velvety indulgence of this homemade ‘nog. It takes a little bit of time and effort, a little bit of coaxing and folding and stirring and chilling. But the results are worth it: a rich, milkshake-thick ‘nog, meant to be sipped, savoured, and shared- or stirred into your morning coffee.

    Recently, concern had been expressed over the consumption of raw eggs (which are essential to traditional egg nog’s frothy texture) because of the possibility of exposure to Salmonella bacteria.
    The Canadian Food Inspection Agency states that “Although Salmonella is rarely found in eggs in Canada… foods made from raw or lightly cooked eggs may be harmful to vulnerable people such as young children, the elderly, pregnant women and people with weak immune systems.” (A study conducted by the USDA in 2002 showed that only one in every 30,000 eggs in the national food system was contaminated with Salmonella bacteria).
    In quest of an opinion closer to home, I visited Trout Lake farmers market and talked to vendors selling local eggs. “An egg is an egg.” One farmer told me. “I’m a big believer in cooked food. But I’ve got a friend who gulps them down raw all the time, and never seems to have a problem.”
    “The big thing is to know your farmer” another told me, restating the mantra of the local food movement. “You want to know that the flock has no history of salmonella, and that the eggs have been properly washed and stored.” Eggshells themselves form a hermetic seal, which means they are impervious to contamination once they have been laid, unless the shell has been cracked or compromised. So when sourcing eggs for this recipe, choose ones with shells that are clean, uniform, and unbroken, that have been refrigerated as soon as possible after laying, and that are not past the best before date. (If 3141194799_9e84cca519_zyou’ve bought undated eggs from a local farmer, use them 3-4 weeks after purchasing, and don’t be afraid to ask if he or she ever eats them raw.) If you want to be extra cautious you can always buy cartons of pasteurized egg yolks and whites from any large grocery store. I personally prefer the full-bodied taste of eggs from organic free-run hens, and believe that chickens who’ve had a chance to scratch in the dirt and get splashed with the occasional raindrop lay healthier, more nutrient-rich eggs. I also like knowing the name of the person who hands me my carton, rather than selecting one from the cold glare of a supermarket display case.                         Whichever source of eggs you choose, after you’ve whipped, mixed and folded a batch of this incredible egg nog into being, take a moment to send a few thoughts to the chickens that have made all of this possible. Then take a sip. Let the holidays begin!


    Old Fashioned Egg Nog

    Makes approx. 2 litres

    I find it easiest to separate eggs by cracking the whole egg into the palm of a clean hand, and then letting the white drain out between my fingers. You can also use an egg separating tool, or pour the yolk from shell to shell until all the white has drained away. Be careful not to get any yolk in with the whites, or they will not whip as well.

    If you wish to make a non-alcoholic ‘nog, substitute 1 ½ cups whole milk and 1 tsp vanilla in place of the brandy or rum.

    10 Egg Yolks
    3 1/2 cups white sugar
    1 1/2 cups Brandy or Rum
    10 egg whites
    1 litre whipping cream
    ½ tsp fresh grated nutmeg

    Put a bowl in the freezer to chill for making the whipped cream.

    Whip the yolks together with the sugar using an electric mixer until they are light in colour and a consistency similar to buttercream.

    Add the alcohol a little at a time, mixing all the while. Continue to mix until all the sugar has lost its granular texture.

    In a clean stainless, ceramic, glass or copper bowl, whip the egg whites until they form stiff peaks. Room temperature whites whip best. Fold the egg whites into the yolk/sugar/alcohol mixture.

    Whip the cream in the bowl that has cooled in the freezer until it is stiff. Gently fold it into the ‘nog along with the grated nutmeg.

    Store in the freezer for a milkshake-like consistency, as the alcohol will keep the ‘nog from freezing. Or keep refrigerated. Either way, the ‘nog is better if allowed a few hours for the flavours to mingle. Stir before pouring, and grate additional nutmeg over the top of each glass before serving. Enjoy!

    *Author’s note: this article originally appeared in Edible Vancouver’s Winter 2011 issue, but as the online edition is no longer available in its entirety, I though it was worth a repost. 🙂

  • Turbo-charged Veggie Deer Curry

    Turbo-charged Veggie Deer Curry

    This recipe is adapted from Shelley Adam’s Curried Lamb and Lentil Soup from Whitewater Cooks at Home. I turbo-charged it with way more veggies, but I owe the amazing spicing and core concept of this recipe to Shelley Adams, whose cookbooks, especially the first two, changed the way I cook, and made cooking exciting for me.

    The main difference from Shelley’s original recipe is I’ve added half an eggplant, a full 2 cups of blanched spinach, and 2 cups of chopped green cabbage. You can also add ½ a cauliflower! I also added half a parsnip and took out the garlic cloves and her can of diced tomatoes. I’ve swapped out the lamb for deer.

    I hope Shelley approves. I am driven to create hearty dishes that complement veggies. In winter I prefer my veggies well cooked and spiced. Ideally, they are in a good hearty soup!

    Turbo-Charged Veggie Deer Curry:

    2 tbs pure olive oil

    1 tbs fresh ginger, minced

    ½ tsp red pepper flakes

    1 tsp turmeric

    1 lb Pemberton deer stew meat

    6 cups water

    1.5 cups green lentils, rinsed

    2 tbs pure olive oil

    1 large yellow onion, small dice

    ½ eggplant, small dice

    2 cups chopped cilantro

    2 cups green cabbage, finely chopped

    ½ parsnip, small dice

    2 cups blanched spinach or chard, chopped

    1 red pepper, small dice

    ½ yellow pepper, small dice

    2 carrots, small dice

    ½ cauliflower, small dice (optional)

    1 tbs cumin

    1 tsp coriander

    1 tsp garam masala

    2 tsp salt

    1 tsp pepper

    Method:

    Sear deer meat in dutch oven or stainless soup pot on medium-high heat with ginger, chili flakes and turmeric until meat is well browned. Add lentils and water.

    Bring to boil, then reduce heat and simmer 45 minutes.

    In another large soup pot, add olive oil at medium heat. Add fenugreek and mustard seeds and cook until they pop. Then add ALL other veggies: onion, turnip, peppers, eggplant, blanched spinach, cilantro, etc. Sauté low and slow until soft and translucent and/or caramelised. Then add cumin, coriander and garam masala.

    Finally add the deer and lentil mix to the veggie mixture and simmer for another 20 minutes or so. Add salt and pepper to taste.

    Enjoy!


  • Space Saving Sauerkraut

    Space Saving Sauerkraut

    I live in a barn. Between the barn and my little house is a mud room. It’s a liminal place: half barn, half house. These days, it’s where I keep all my tack, tools, and wild/crafting materials for the camps that I run. The counter is generally littered with things that need to be put away. Like that unidentified bracket fungi that smells like apricots… and the bags of sand and gravel from October’s Fairy Gardens.

    Because I keep it at about ten degrees all winter (to keep the various stored items happy and the pipes from freezing) the mud room is also where I throw all the veggies I pull out of the garden and procrastinate about dealing with. One morning a few weeks (when I had to remove 6 large pumpkins from the top of the washing machine so I could do a load of laundry) I realized things were out of hand. The pumpkins were still too intimidating. I couldn’t quite look them in the eye. Plus they were in great shape so there was no need to rush processing them. The cabbages on the other hand… and the bowl filled with unwashed root veggies… oh dear. Definitely starting to go. I cut away the rotting bits from the cabbages, washed the salvageable carrots and beets, and then did the only responsible thing: I made Kraut.

    Sauerkraut is the best way to make a large volume of cabbage store in as small a space as possible. The lactic acid fermentation process loads it with helpful wild gut bacteria, boosts its nutritional value, and enables us to store it for a long time. It also makes a boring vegetable delicious. ‘Kraut- while traditionally just cabbage, salt and water- is also flexible and can accommodate the addition of a wide variety of veggies and flavours. For mine, I used the 3 small heads of cabbage, two handfuls of carrots and beets, kale stalks and leaves from Four Beat Farm, and two wild apples that I picked on the way home from Clinton last summer. For flavour, I added a small thumb of ginger, a handful of dried Saskatoon Berries, and five Juniper Berries.

    20181115_121843
    Kraut-to-be: here you can see the texture and flavourings before salt is added

    Directions:

    • First, shred or chop your cabbage. If you are going to play with adding other veggies, make sure you keep about 75% cabbage to make sure achieve a good lactic acid ferment. You add use almost anything you can think of to flavour your ‘Kraut. Caraway seeds. Black peppercorns. Seaweed. Dried fruit. Spruce tips. Citrus zest.
    • Add salt, and mix/rub it well into the veggies with your hands. You want to macerate your cabbage, as you want the salt to break down the cell walls and begin to release water. How much salt should you add? Well… more than you think you should. The salt acts as a preservative, and will help your ‘Kraut keep its texture so it doesn’t ferment down into a goopy mess. Taste your cabbage/veggie mix. It should taste quite salty. As you rub them, the veggies should start to shine a little bit, as well as moisten and soften.
    • Pack your crock! I use a small pottery crock I found at a thrift store. You can also pack your ‘Kraut into a large mouth Mason Jar. You can use utensils for this, but I prefer to use my fist. It’s fun to punch your food, and you can put more pressure on the ‘Kraut. You want to REALLY mash it down so that all the air pockets are squished out and it starts to release water. Add more handfuls of cabbage/veggies, and press down. Continue in this way until all your Kraut-to-be is in the crock. You should have enough water that’s been released at this point that it covers the top of the ‘Kraut when you apply pressure.
    • Because you can’t stand there squishing it forever, you need to add weight to the top off your ‘Kraut. The ‘Kraut needs to stay submerged in its own juices so that it doesn’t mould as it ferments. (Fermentation=good, mould=bad.) I use a large class coaster that’s a little smaller than the diameter of my crock, topped with a Mason Jar. You can also use rocks as weights, provided they’re clean! Then you can cover the top of your crock with cheesecloth or a dishtowel to keep out dust and mould spores but still let it breathe, which is essential for the Lactic Acid fermentation process. If you don’t have enough juice that’s been released from the veggies to keep your ‘Kraut submerged, you can top it up with a little water or brine.
    20181115_1230191
    The crock and (and accompanying Mason Jar of water that acts as a weight to keep the Kraut submerged)
    • Wait and taste! How long it takes your ‘Kraut to be done depends on how warm your environment is, and how tangy you like your ‘Kraut. The usual window is one to four weeks. The longer you let the fermentation go, the stronger the flavour will be, and the more beneficial bacteria you will cultivate. However, the longer you wait the softer your veggies become. If you keep tasting the ‘Kraut as it progresses, then you will be able to stop the fermentation it when it reaches your favourite balance of flavour and texture.
    • When you’re smitten with your ‘Kraut, take it out of the crock and compost any bits with surface mould. (Sometimes a little ‘Kraut will stick to the sides of the crock and turn white and fuzzy, but the rest of the batch that is still submerged will be fine). I pack mine into clean half pint jars and keep them in the fridge. This stops the fermentation process, but does not kill any of the lactic acid and other goodness.
    • Enjoy! Yum. Cleaning up and making more space was never so delicious…