Category: food

  • Bring your own bubbles: how to make a ginger bug (wild fermented soda) ie your own healthy pop

    Bring your own bubbles: how to make a ginger bug (wild fermented soda) ie your own healthy pop

    You know the scene in the BFG when the giant introduces Sophie to the most scrumdiddlyumptious drink in the world, frobscottle?

    My mate and I decided to scale back our adult-beverage-drinking, after we went into pandemic survival mode with the help of a case of wine and a couple of cases of beer, and discovered, months (and unwelcome pounds) later (although it still felt like March), that the daily take-the-edge-off habit was not really sustainable over the long-term, or over the conceivable life of COVID-19, which could be years.

    Embracing sober-curiosity in July meant asking ourselves questions in a curious way: what need in me is rising up and seeking fulfilment right now? What can I do to meet that need, in lieu of pouring a glass of wine? It was interesting to realise what those needs were, as we found substitutes – glass of water, cup of tea, fancy little cheese and cracker platter to call the day to an end, delicious oxymels brewed up according to Natalie Rousseau’s recipes.

    Sometimes I was just thirsty. Sometimes, I wanted a little reward for having done such a good job of adulting all day. Sometimes, we wanted to create a feeling of celebration. Sometimes, the day felt so much like every day that had come before it, that we needed some kind of ritual to mark it as special (which goal was somewhat undermined by choosing alcohol as the ritual every day.) Some days, I just needed to claim one single fucking moment that was mine, after an endless stream of moments catering to everybody else, even if it was literally just a mouthful.

    And it has been fun to discover that I can meet these needs in other ways (although the last one is proving the trickiest.)

    The celebration, the specialness, the coming together is quite wonderfully met with frobscottle. Or, our version, ginger lemon soda. (Doesn’t make you toot. But the bubbles are spectacular.)

    It’s probiotic, if that tag helps you feel generally better about consuming things.

    So that’s the long introduction that could be summed up with a clickbait headline: the drink that makes you feel happy, while sober!

    In one of the first posts we ever shared on Traced Elements, Denise shared about making a ginger bug, and I was intrigued.

    (Here’s the Nourished Kitchen post that explains all about it.:

    Ginger bug is a slurry of fresh ginger, sugar and water that has been allowed to ferment until bubbly and foamy. Brewers use the bug to brew probiotic tonics and drinks like root beer, ginger beer or probiotic lemonade.

    Like sourdough starter, ginger bug is a starter culture that is rich in wild bacteria and yeast. These starters kickstart the fermentation process for other fermented foods. Sourdough starters provide the bacteria and yeast to make bread. Kombucha mothers make kombucha tea. And ginger bugs make homemade, naturally fermented sodas.

    When you mix ginger and sugar together with water and let it sit, the wild bacteria and native yeasts in your kitchen and on the ginger itself begin to proliferate and grow. These wild microorganisms eat the sugar in your bug, and produce carbon dioxide as a result.

    When mixed with a sweetened herbal tea, fruit juice or other base, the microorganisms in the ginger bug consume the sugar in the tea or juice. As they do, they reproduce and emit carbon dioxide that gives homemade soft drinks their bubbles.

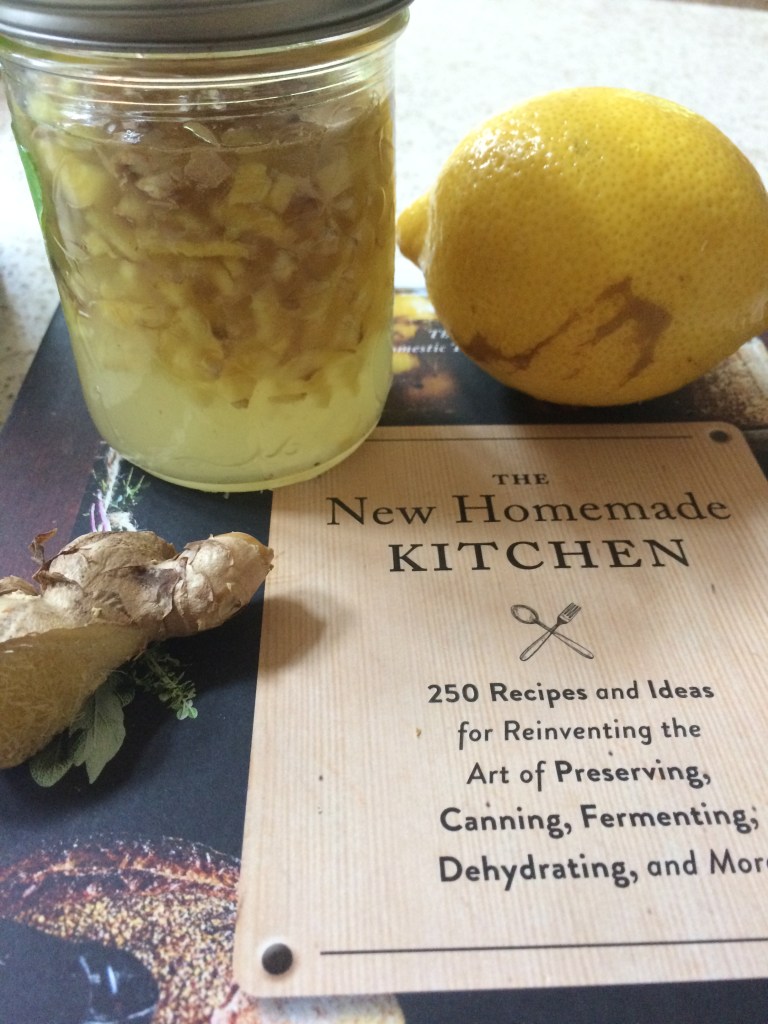
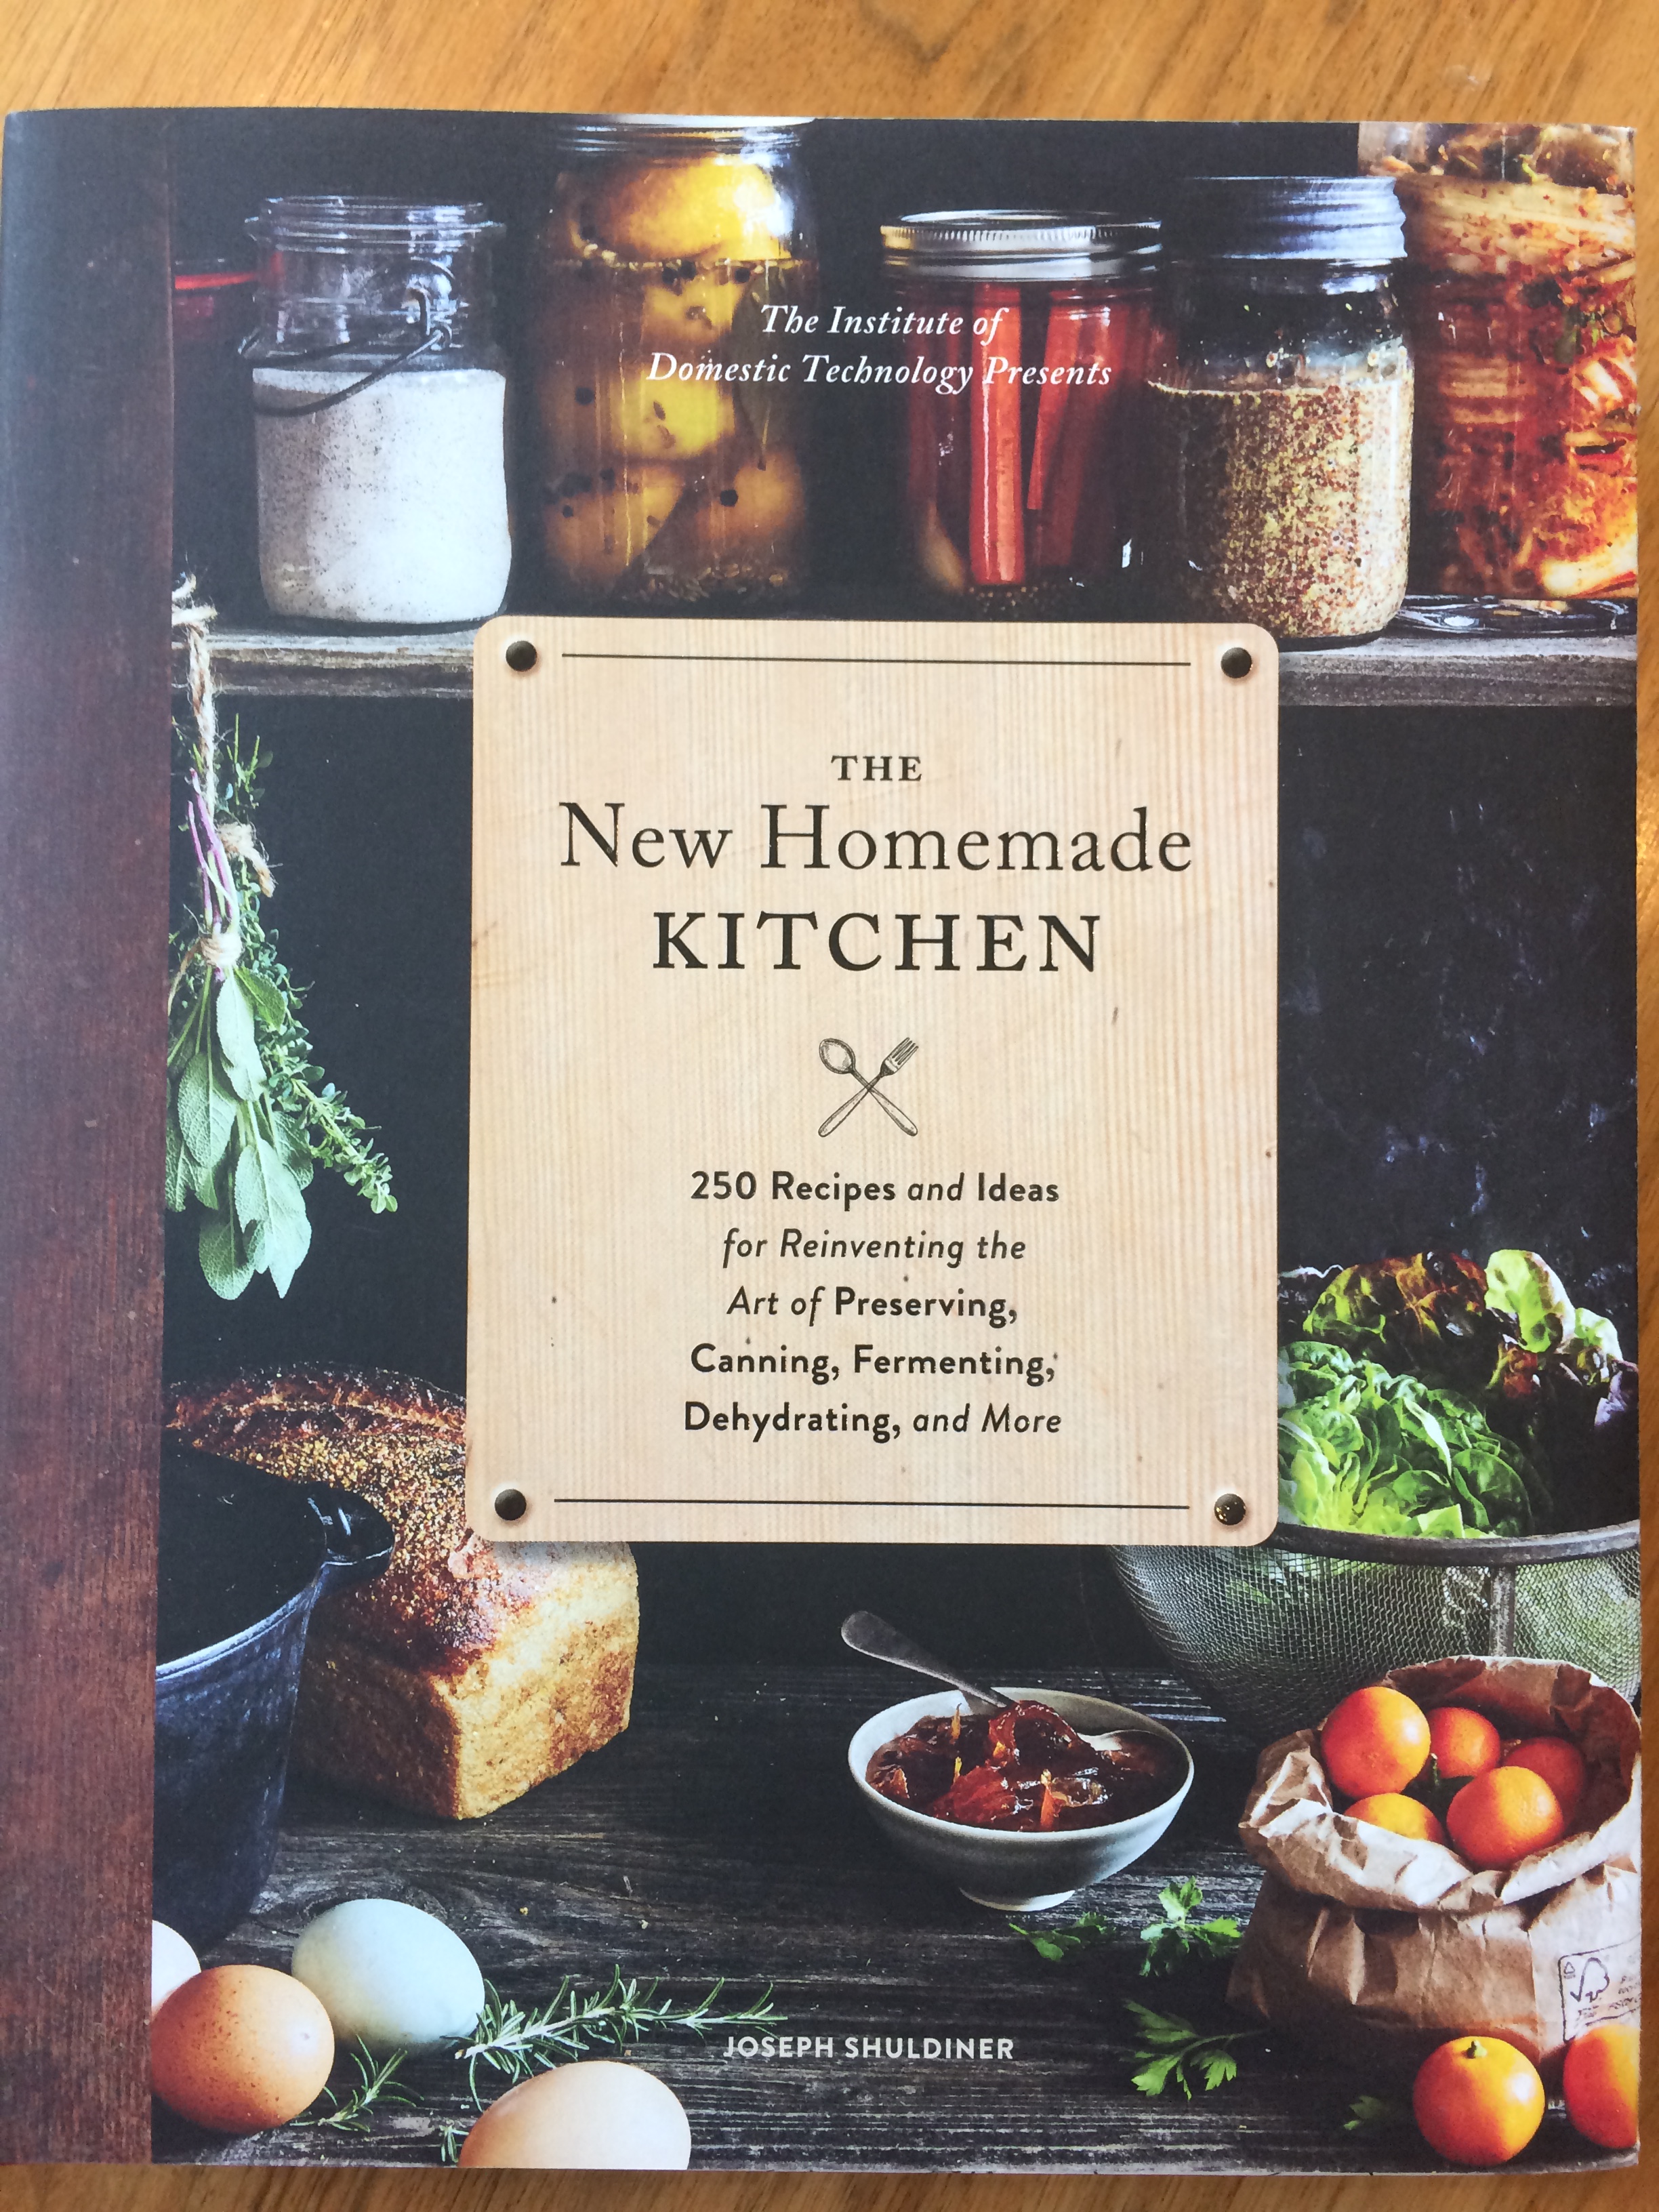
    When I opened up my copy of The New Homemade Kitchen: 250 Recipes and Ideas for Reinventing the Art of Preserving, Canning, Fermenting, Dehydrating and More by Joseph Shuldiner (last mentioned as my pickling bible), I was enchanted by this statement:

    Wild Fermented Soda

    Fermented soda is made with your own live, wild starter, fermented using only fresh ginger and sugar, charmingly referred to as a “ginger bug.”

    It’s super easy.

    These instructions follow the recipe from The New Homemade Kitchen, a wicked-good reference for any kitchen, which has emboldened me to experiment joyfully:

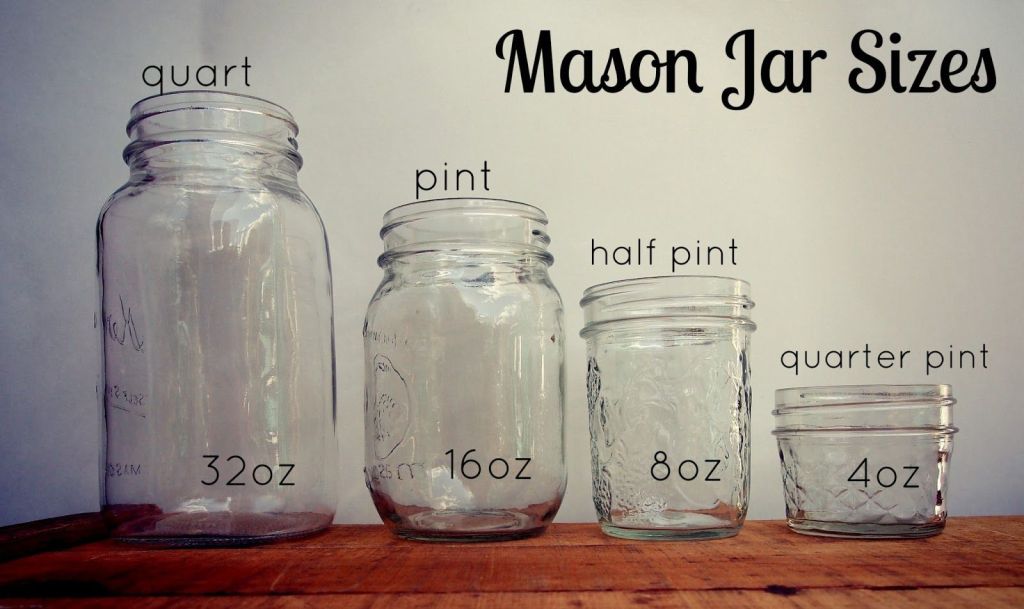
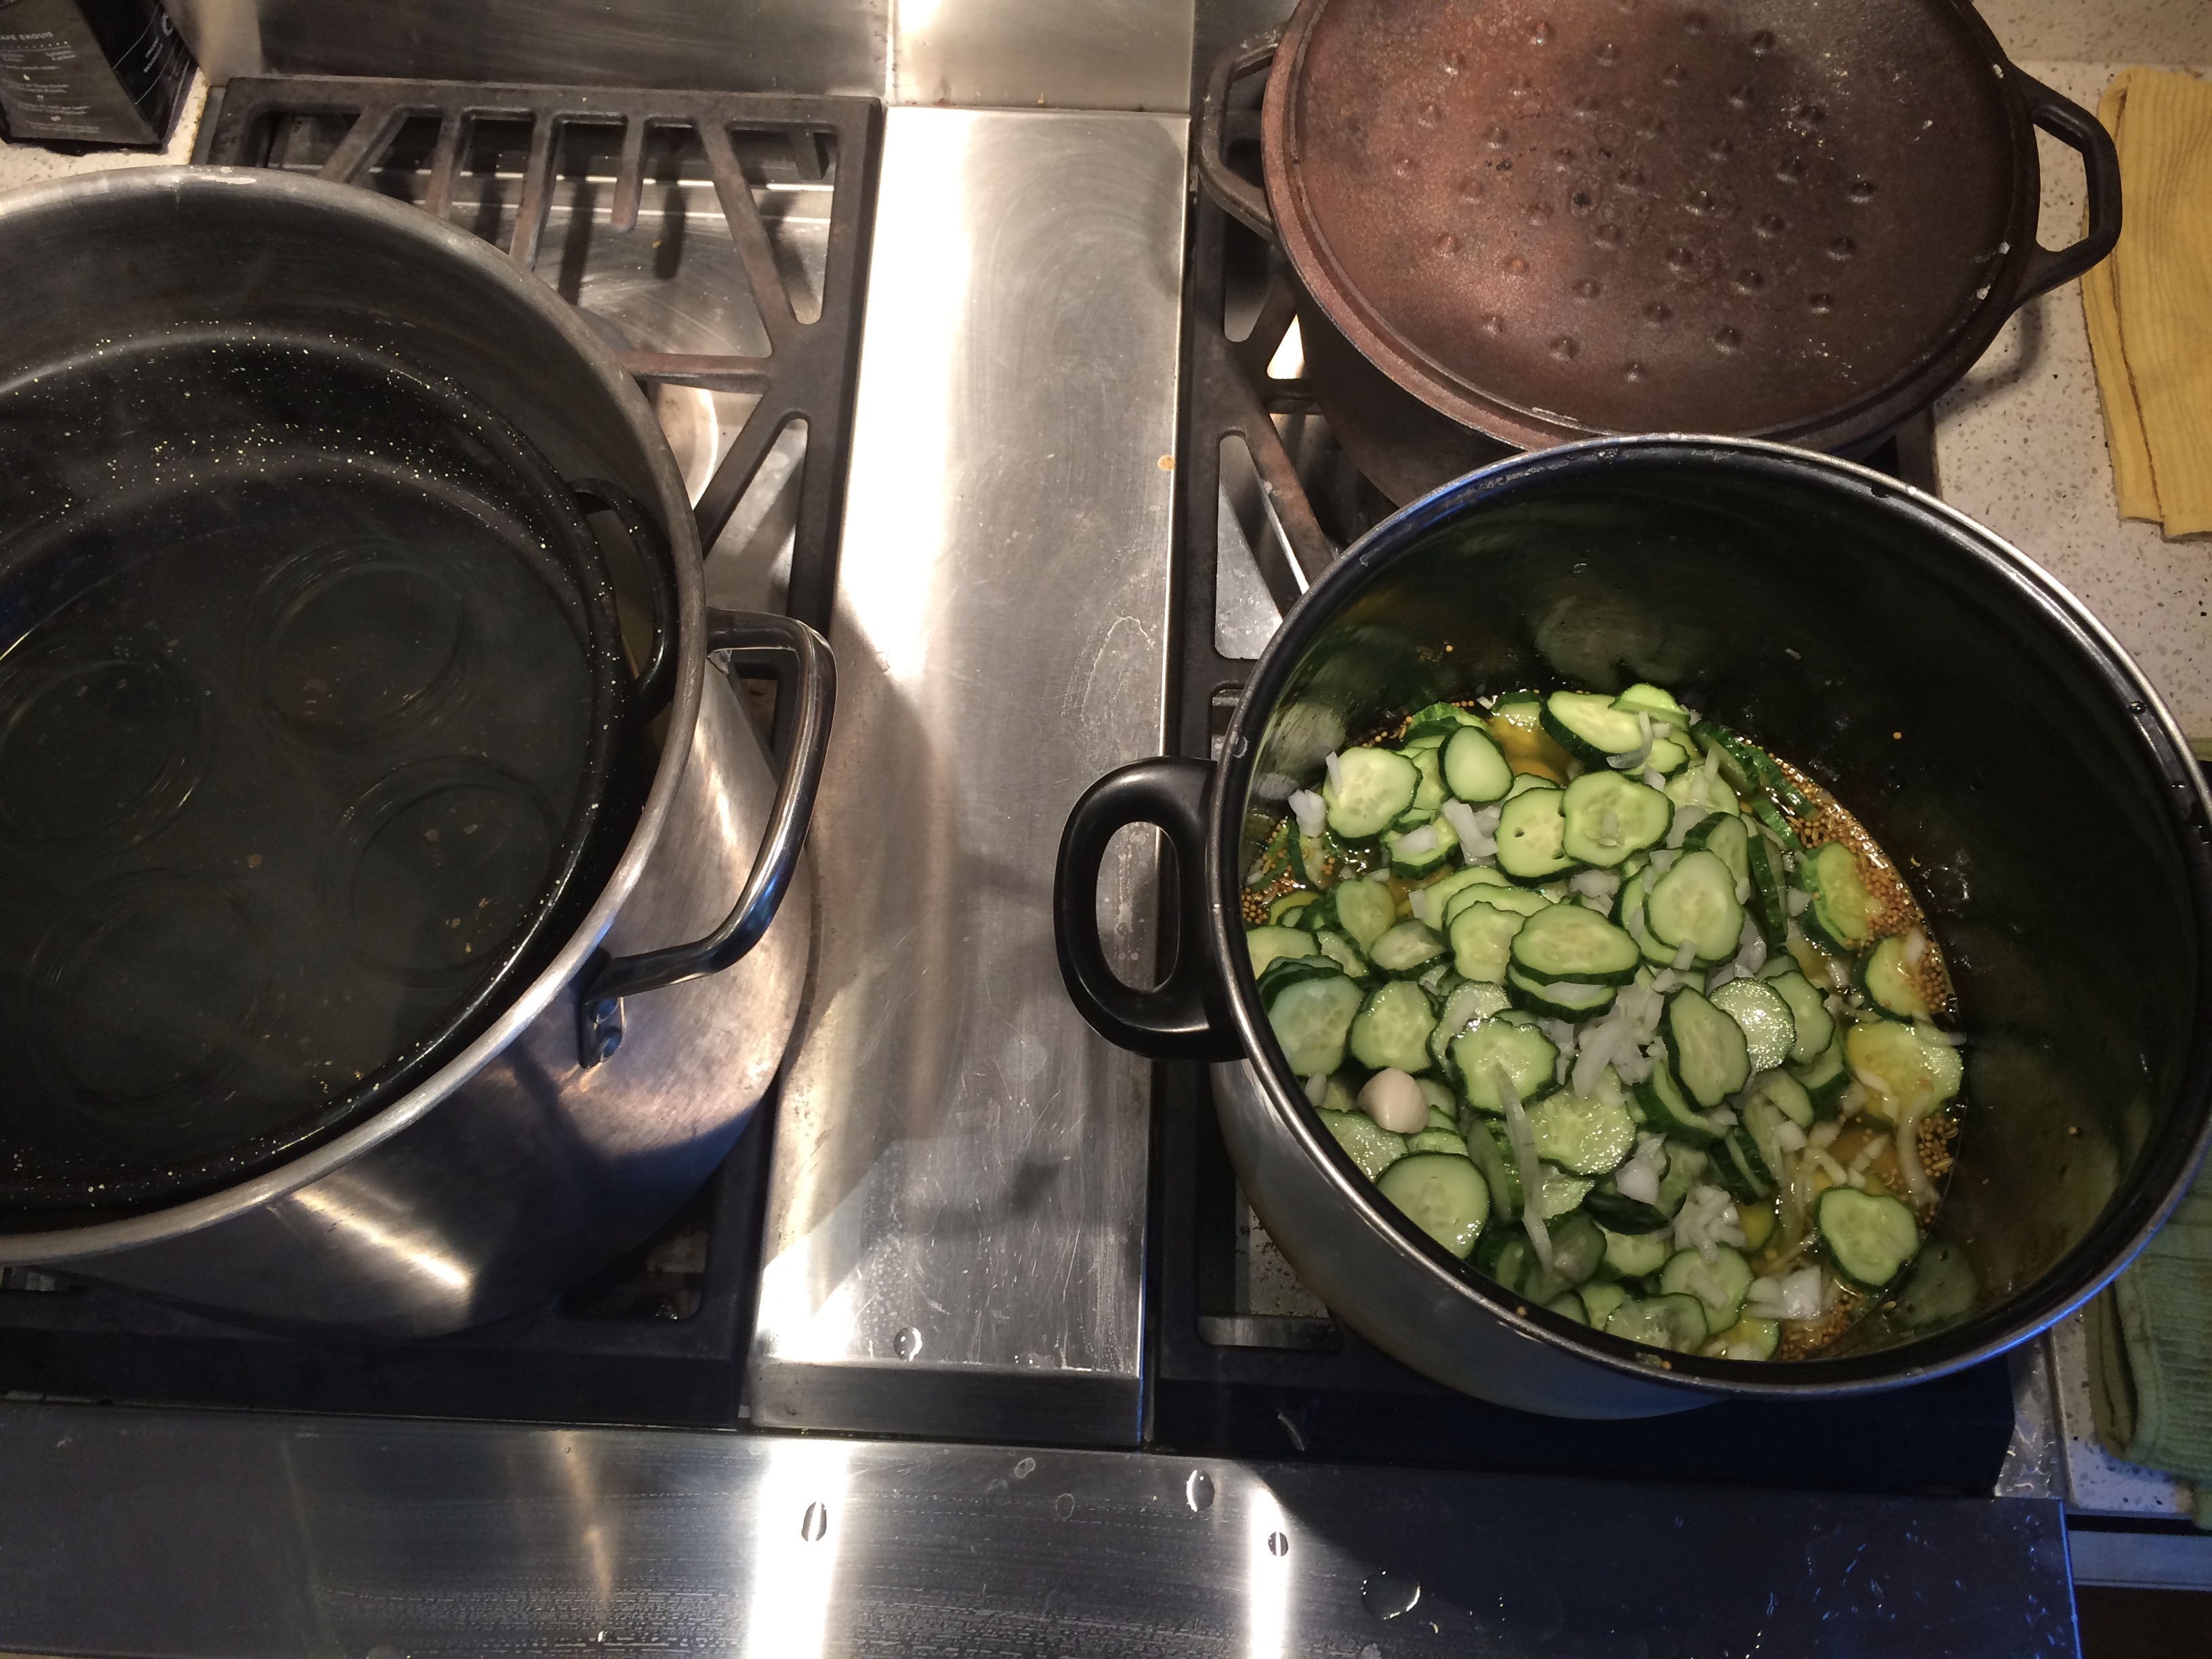
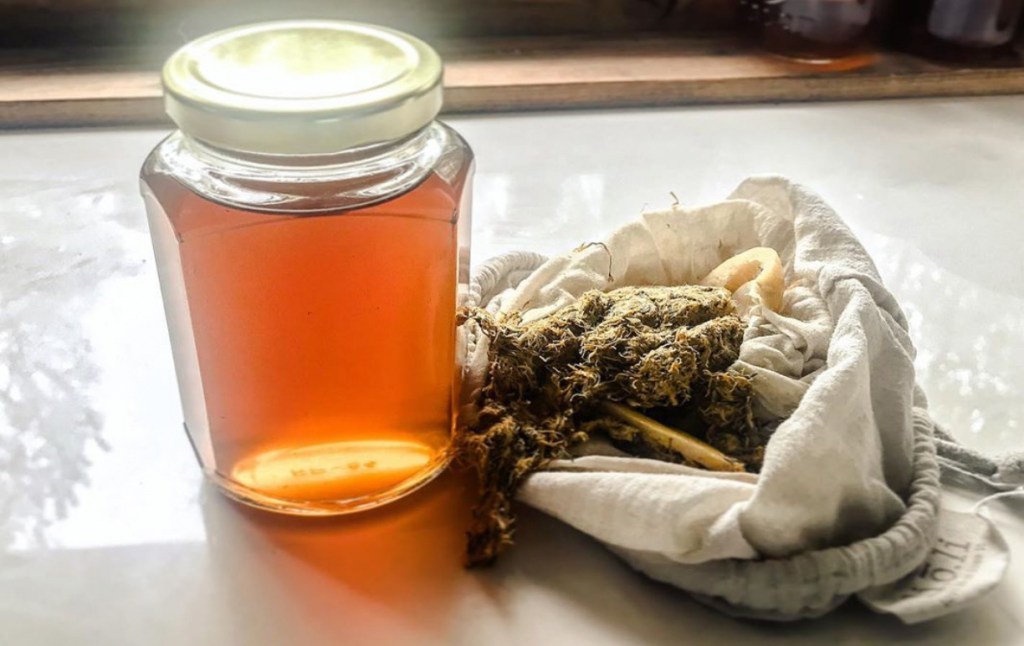
    Take a large (pint-sized) mason jar, (the book suggests a half pint, but we quickly upsized, to meet our production demands… maybe start with the half pint and then scale up?), add 1 tbsp fresh unpeeled finely chopped ginger and 1tbs white sugar. Fill with filtered water (if using tap water that is treated, let it sit out for a while so the chlorine can burn off; if you are on a well, you can use that water). Leave about an inch of headspace at the top. Stir to combine, then cover the jar and set it aside at room temperature.

    Feed your ginger bug every day, at roughly the same time, by adding another 1 tbsp of chopped ginger and 1 tbsp of sugar. Stir, and cover. After 5-7 days of daily feeding, the “bug” should fizz strongly when the ginger is added. It’s now ready for soda making!

    Soda making!

    The first week was the hardest – remembering to feed it, being patient, feeling sceptical, wondering if I actually really want to cultivate and house and invite the proliferation of invisible bacteria that are *already living in my kitchen* (say what?? I mean, ewwwww.)

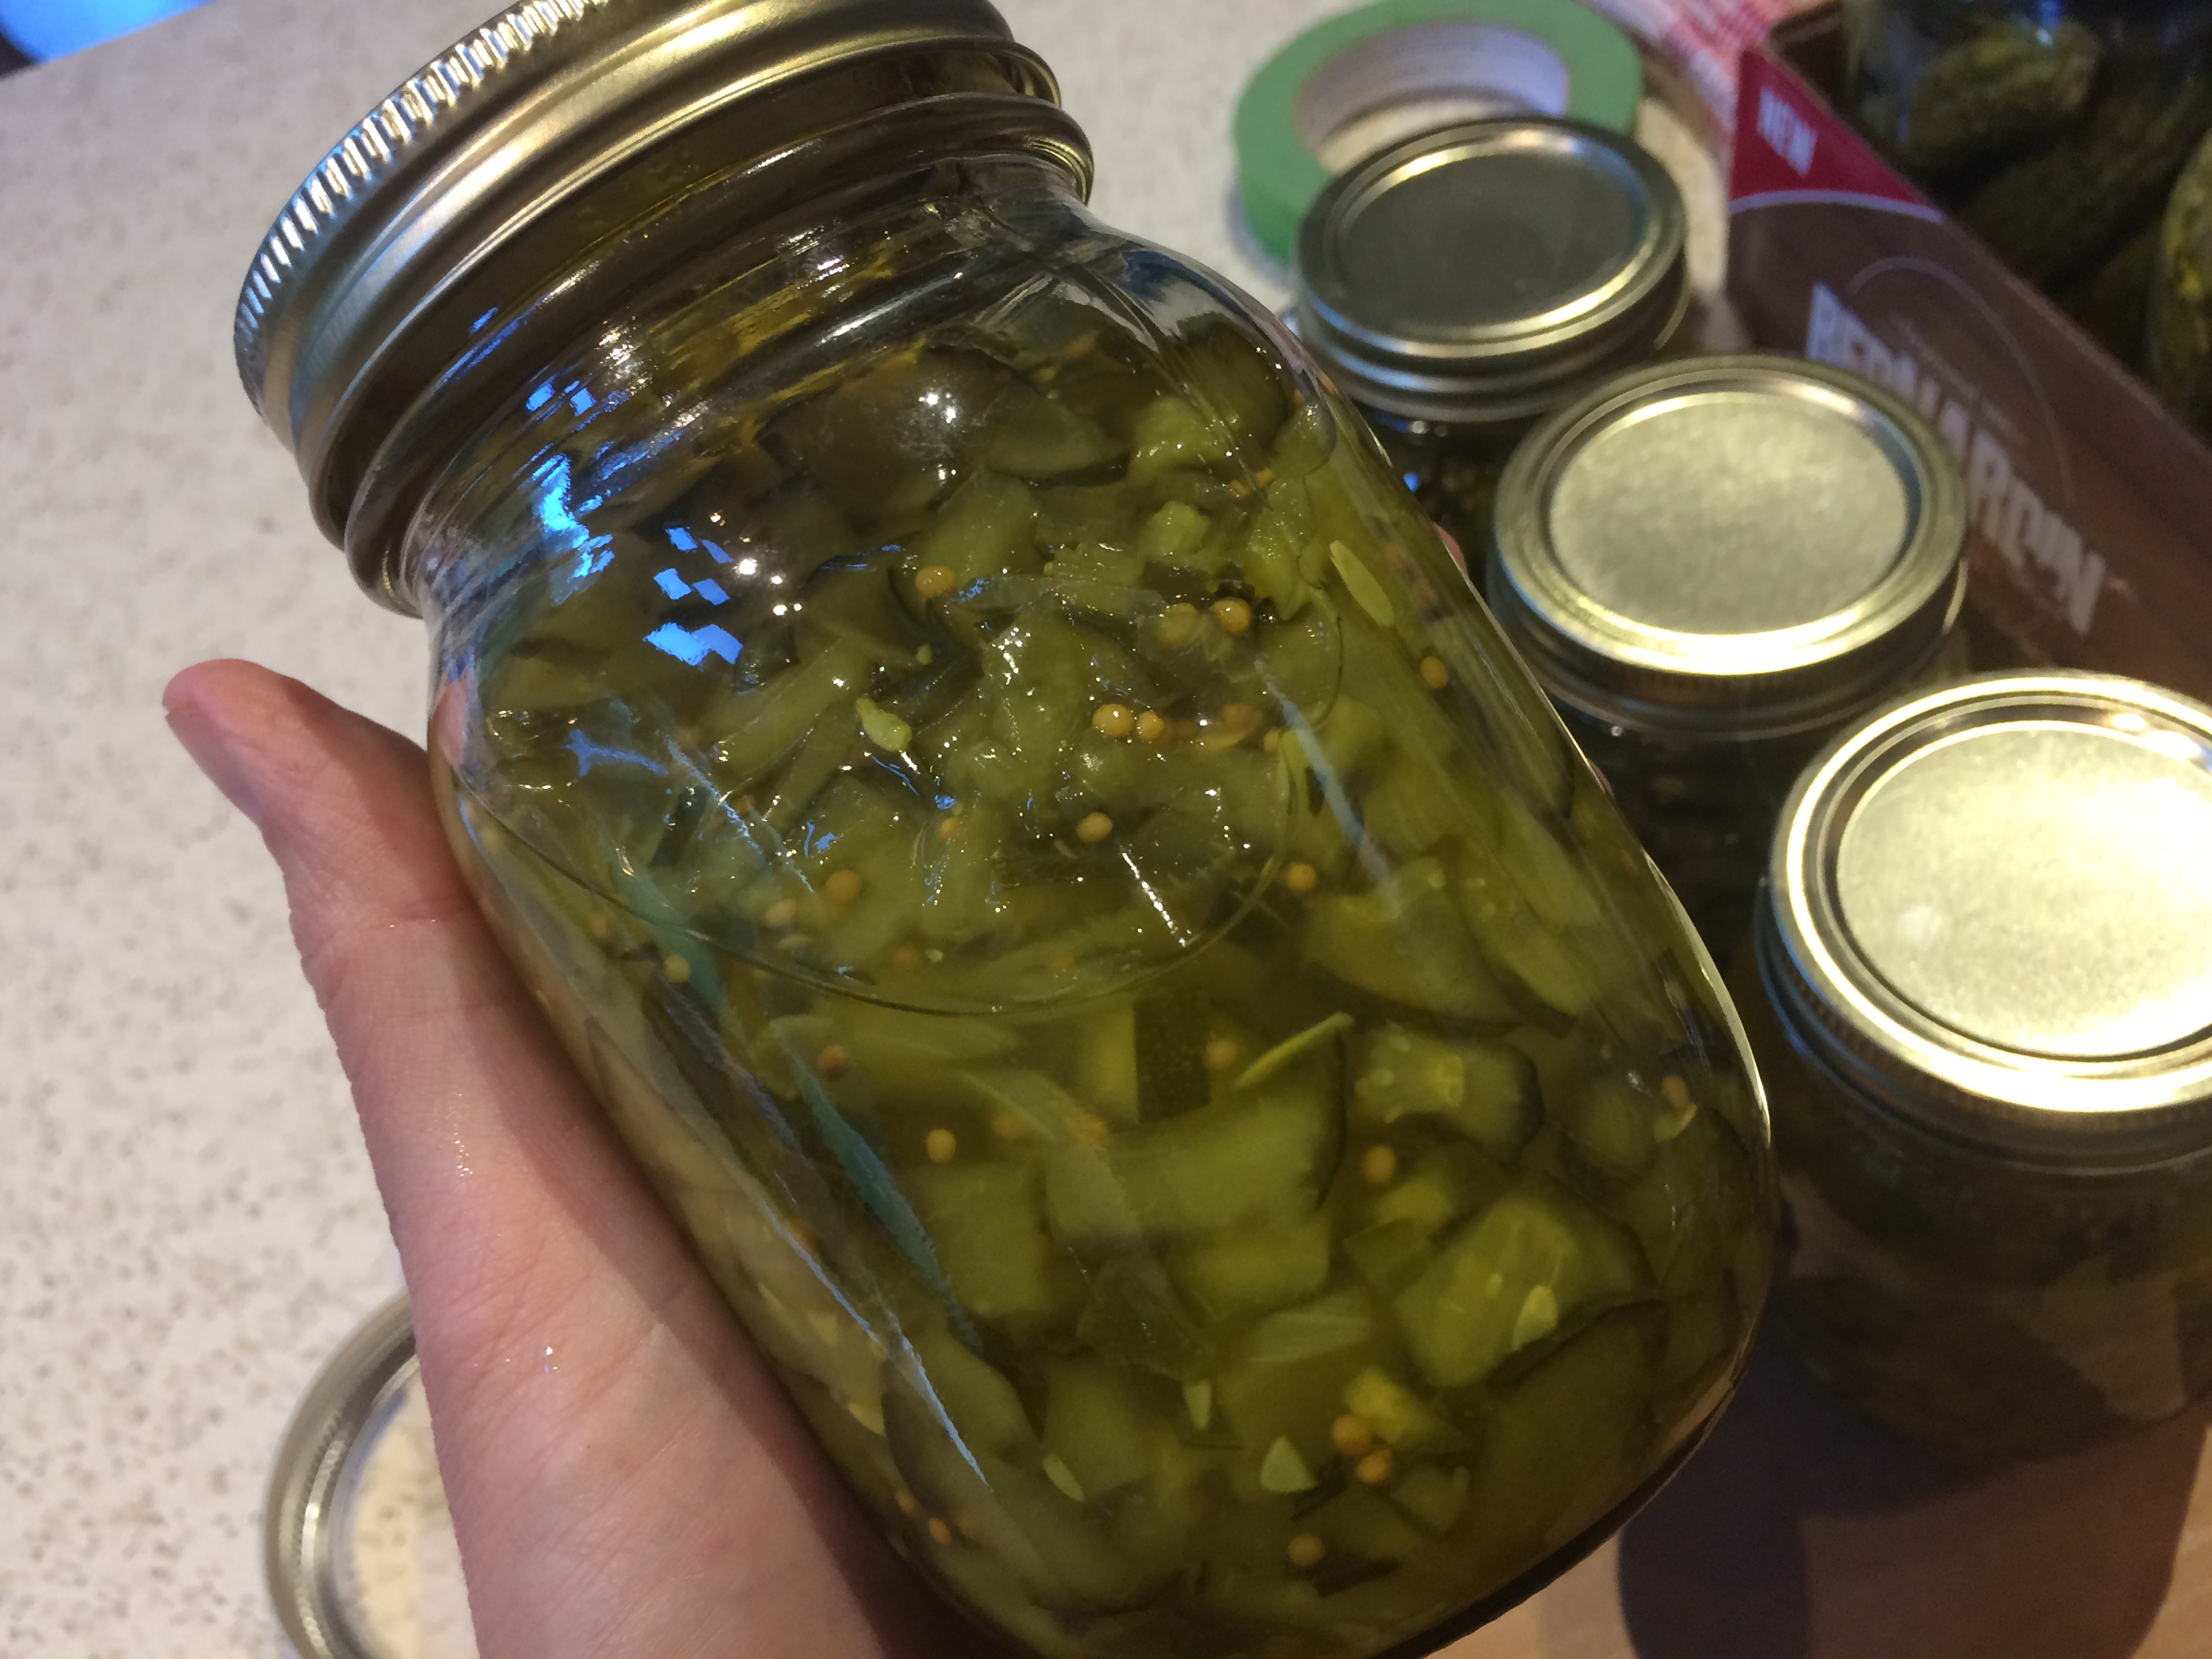
    To make soda, I strain off 105 ml of the starter at a time, and then refill the jar with water, and keep feeding it. Now and then, I’ll scoop out some of the ginger to make room. But basically, the ginger bug has become a regular countertop companion, alongside the kombucha and the jars of oxymel in various states of infusing. It’s just one more lovely life form I tend to (and the most low maintenance, let’s be honest, especially compared to the Significant-Other-bug, charming as he can be.)

    If you’re like me, and need to read recipes six or seven times before they stick, check out the Zero Waste Chef’s blog in which she explains her ginger bug process. (She has a book coming out in the spring!)

    As far as I can tell, you need a wire-bale or EZ cap bottle for your concoction, because pressure builds as carbon dioxide is generated.

    The New Homemade Kitchen instructs you to mix:

    105 ml of strained Ginger Bug starter

    1/3 cup of fresh lemon juice

    4 tsp of fresh ginger juice (the most finicky part of the process which involves pressing a piece of peeled ginger against a fine mesh sieve to extract some juice… I don’t ever find this very juicy, so I might be doing something wrong… but that’s the best thing I’ve taken away from this whole experiment… You might not do it perfectly, and the results are still delicious.)

    When we opened the first bottle, ceremoniously (and slightly nervously, “stand back, stand back, it could possibly explode!” which of course made my 7 year old desperate to be in charge of opening it), the boy-child drank a cup and pronounced it the best ever. “I will never drink another pop again,” he said. Subsequently, it has been increasingly difficult for me to get my hands on. It seems to disappear quickly. I tell myself it’s medicinal – after all, isn’t ginger and lemon tea the prescription to ward of colds and flu? Add probiotics. Drink up, kiddo. I’ll make another batch.

    Apparently, you can also use this ginger bug base to brew your own ginger beer… stand by, that may be a future post…

    Living in a world held hostage by an invisible pathogen, I have found it to be immensely heartening to make friends with other invisible microbes… to realize the world is full of life forms that we cannot see and barely pay attention to, and they’re part of our daily life, impacting us constantly – and often, beneficially – helping us digest our food, accelerating the action in our compost pile, turning the tea into kombucha… Befriending them, and inviting them into the kitchen as my co-creators, has helped me find a better sense of balance, mentally, than at the start of the pandemic when I hunkered down with my case of wine hoping the invisible lurgy didn’t pounce on me and my loved ones. This, after all, is the actually story of Life. Not ‘eat or be eaten’. But let’s co-exist. Symbiosis, my friends. It’s win-win.

    Symbiosis is recognition that the way life actually evolved was through different organisms working out how they could offer something to another organism. Rather than the zero-sum game we’re told Life is in the Selfish Gene concept, (everyone’s out to beat everybody else), that’s not how evolution works. It works by different entities getting together and sharing their particular skills to create something bigger that is better for all, eg the way Fungi take all that debris of plants and animal matter and reorganise it to make the soil fertile for plants. Or, plants, that are superb at photosynthesis, need help moving their seeds around, so they offer nutrition to animals who in turn move the seeds of the plants to enable the whole ecology to strengthen.

    Every single element of life is like that: we work together to create something better. ~ Jeremy Lent

  • Rainy August Day in Pemberton – Make These Cookies!

    Rainy August Day in Pemberton – Make These Cookies!

    Torrential rain here in Pemberton today. A good day for baking. These cookies I adapted from a John Bishop recipe from his cookbook At Home. They are great for road trips. I have not had luck with PB cookies lately and have been disappointed with the recipe in the Joy of Cooking (both the original edition and the updated version published about a decade ago). This one is very good! John Bishop’s recipes have good bones…

    Not a recipe high in Pemberton ingredients this post except for the Pemberton egg – only the best!

    Gluten-Free Peanut Butter Chocolate Chunk Cookies (yield: 2 dozen)

    ½ cup unsalted butter

    ½ cup natural chunky peanut butter (I used Western Family brand)

    1/3 cup white sugar

    ¾ cup coconut sugar

    1 Pemberton egg

    ½ cup pulverized gluten-free oats (pulverize in Cuisinart until oats are the consistency of flour)

    1 cup almond meal

    ½ tsp baking powder

    ¾ tsp baking soda

    ¼ tsp salt

    4 oz Lindt 90% dark chocolate, chopped

    Cream butter and peanut butter in mixer. Add all other ingredients. Blend well. Stir in chocolate chunks. Use a 1.5 tbs-sized spring-loaded cookie scoop and use it to drop dough onto 2 parchment-lined baking sheets (these cookies spread quite a bit). Bake at 375C for 12 minutes. Cool and enjoy!

  • Picklepalooza: preserving high summer for my Future Self (and friends)

    Picklepalooza: preserving high summer for my Future Self (and friends)

    It’s not really cost-effective, this pickling and preserving business, I realize, as I empty another $20 bottle of Bragg’s apple cider vinegar into a pot. My husband keeps checking in, nervously asking “Are you having fun?” because these evenings are cutting into my Netflix/book-reading time, and I tend to be an angry-and resentful-if-you-aren’t-also-contributing house-cleaner.

    IMG_1630

    But there is the small stack of rainbow-hued jars starting to accumulate after a week of busy evenings,  glowing from within. There is the sound of the “pop” that makes my heart lift a little when the seal is made. (It worked! Not incubating botulism yet!) There is a sense of deep alignment with the seasons and the fleeting urgency of this specific moment (cucumbers! carrots! beans! Pickle them now, or forfeit the opportunity entirely for another year.)

    There is a small sense that I am resourcing myself for an uncertain future, by slow-growing these skills that all my ancestors knew but that somehow skipped a generation; that I’m building a little bit of resilience to depend slightly less on a volatile global supply chain. And there is the sense that I’m packing some of the sweetness of this moment, of this abundant sunshiney moment, into a glass container, as an offering to my Future Self. I imagine her, in the fall and winter, her step a little heavier getting out of bed in the dark, looking to a low-hung grey sky, missing the feeling of hair against bare shoulders and bare feet against lush clover-filled grass… and sending this gesture to her as a reminder: sweetness returns, love. Time might feel as if it’s lurching relentlessly forward, but it’s rolling over and over, cycling, spiralling, a wheel.

    Screen Shot 2020-06-18 at 10.45.46 AM copy

    Every year, for a while now, I’ve tried to make something to preserve or pickle in the summer – starting with strawberry jam in 2012 from bare bones instructions scribbled on the back of a cereal box by Tonette McEwan. I haven’t yet absorbed this process into muscle memory, and every summer, I enter the kitchen with a sense of dauntedness. How many ways can I mess this up? How does it work again?

    IMG_1526
    Step 1. Refer to bible. Read. Review. Read again.

    IMG_1531
    Step 2. Chop and stir. Revisit book several more times during process.

    IMG_1533
    Step 3. Ignore dishes for a moment and rejoice in moment of completion. (Then realize all the steps you forgot, like stirring to remove air bubbles, and wonder if that actually was half an inch of head room. Wish your grandma was here. Start dishes. Label. Schedule Moment of Truth for 6 weeks+ from now. Hope Future You bloody well appreciates this.)

    I didn’t learn these things at the apron strings of a beloved elder or a practical mother. I learned them out of books, so the knowledge always feels a bit slippery, like it dumped out of my head last year the minute the pot was scrubbed (just like all the information crammed into my brain to pass an exam promptly vanished the minute we headed to the pub to celebrate the final test). I learned them at the bookshelf, and these new bibles (The New Homemade Kitchen  by Joseph Shuldiner and It Starts with Fruit by Jordan Champagne) are utterly lust-worthy and wonderful (and way better to have as a guide than a Google search.)

    And yet, each year, I have a growing sense of the rhythm of this work, the laying out of supplies, jars, tongs, the MacGyvering of a canning rack, the towels delineating where the ready jars and the full jars and the processed jars will await their turns. Each year, I find there’s a little something more I can grab from my garden, instead of at the store, to add to the mix – my own dill, my own coriander seeds.

    IMG_1535
    Enjoy August 7. Or discover they taste like a mouthful of salt and toss in compost. Vow not to try ‘winging it’ until you’re a bit more experienced.

    There are failures – like the unredeemable refrigerator pickles that I made with the leftover brine from the dill pickles and that tasted like an ocean vegetable –  a nice crunch and a mouthful of salt – to be deposited directly into the compost bin with a sigh. And there’s the worry that there are other, yet-to-be-discovered-screw-ups, that will be revealed when I eagerly open one of those jars of beets or beans or cukes or relish…

    But if I wanted guarantees, I’d go buy something industrially packed and commercially grown, from the store.

    I am realizing, deep in these days of uncertainty and strangeness, that I don’t trust those guarantees anymore.

    I want the intimacy of relationship, with my garden, my farmers, my neighbour’s generosity, my own hands conjuring a future snack or meal, with my family and friends when I lay out a small platter of cheeses and crackers and home-made relish, with the friends who shared recipes and whose names blazon the top of my barely-legible recipe cards.

    Perversely,  I’ve absorbed the idea that the latter is a much riskier prospect to depend upon. Probably because emotional vulnerability – failure, rejection, disappointment – always feels so live and lurking. But that terrain is the most rewarding. The faceless amorphous industrial food complex has seduced us with the idea of being reliable, invulnerable, of providing us whatever we want whenever we want it… but it’s fracturing right now as every faultline that has ever existed gapes under COVID19 pressure loads.

    Activate in the space you have influence

    I’m not pickling and preserving to save money, or to plant a flag for hope, or to stockpile my apocalypse arsenal. I’m doing what Kate Raworth, the renegade economist and founder of Doughnut Economics (which preaches the radical idea of building economic models that operate within the Earth’s carrying capacity and try to meet everyone’s needs), says: I’m activating in the space in which I have influence. In this small way, in the small space of my kitchen, I shape a small aspect of my future. Buying local, saving seeds, sharing abundance, observing the seasons, trading recipes with friends, falling into step with Nature… in these small ways, we all can.

    IMG_1527
    “A kitchen compendium, a handbook, a reference guide, and an inspiration, The New Homemade Kitchen includes step-by-step instructions, helpful tips, and delicious recipes that feature ingredients you just learned how to make yourself.” Amazing new book from Chronicle Books for rookies and veterans, covering all kinds of basics, as well as enticing experiments like making your own miso, cider or roasting your own coffee.


  • Chic’weed: A weed so chic you will love it like a flower.

    Chic’weed: A weed so chic you will love it like a flower.

    With the botanical name of ‘Myosoton aquaticum’ it becomes clear that there is more than meets the eye when acquainting oneself with the perennial weed known as ‘Chickweed’.

    These triumphant little wonders that grow in nitrogen rich soil pack a powerful punch of medicine. Chickweed is consumed for stomach and bowel problems, blood disorders, asthma, lung diseases, obesity, vitamin C deficiency (scurvy) and skin conditions such as psoriasis, rabies, itching, muscle and joint pain!

    Nestled among flocks of clover and dandelion allies there is great joy to be discovered upon first glance. Pristine symmetry of ten white fronds and with a closer look, noticing there are in fact five immaculate heart shaped petals split down the gentle center of her alluring, aromatic excellence.

    Building a relationship with this plant has been a joyful adventure and thankfully they grow wildly upon mountain tops, valleys and most lawns in the Pemberton Valley in every season sans snow. Chickweed is often overlooked as a weed, pulled up and out of the dirt without a chance to spread her delicate wings of love upon your dinner plates full of nourishing kindness and fresh flavor infusion. If you haven’t already I urge you to open your heart to this angelic wild edible and invite her into you culinary explorations!

    When wild harvesting as always only take what you need, in this case a pair of scissors, the top six inches of the plant and no more than 10% of the crop you see present. You can add her to fresh spring salads, summery mocktails and even fall soups and garnishes. My personal favorite way to integrate this wild beauty is my vegan, ‘Chic’week Pesto’. I add this into an ice cube tray and set it in the freezer for a heal(thy) does of delicious nourishment. It is especially useful on evenings when making dinner seems an unattainable feat! Many studies suggest integrating phytonutriens (an abundance of which are found in the complex immune systems of wild edible plants) into our daily diet will decrease disease, bringing us closer to our ancestors diet of grazing on a variety of nutrient dense wilderness edibles.

    Without further ado, here is the recipe!

    Chic’Weed Pesto Recipe:

    3 cups of Chickweed washed and drained

    1/4 cup of Nutritional Yeast

    1 cup raw nuts (cashews, pines, hazelnut, walnuts – pick your fave or mix)

    2-3 Raw garlic cloves

    1 tsp pink salt

    1/4 tsp black pepper

    1/2 cup olive oil

    1 tbsp fresh lemon juice

    Chop in a food processor until smooth, add to an ice cube tray and voila! Phytonutrient dense deliciousness at your fingertips!

    I can’t wait to see how you explore this wonderful plant!
    Until then you can find me on Instagram @theplayfulmooon making all vegan recipes to share with you through my recipe hashtag #eatrealrainbows🌈

    Much love!

    Leala

  • Nature’s Gifts

    Nature’s Gifts

    What is this weed in my garden, or what is this plant on this trail?! Does it have any herbal, medicinal, or edible qualities? When and how could I make elderflower cordial? You can eat ferns!? How can I preserve thimbleberries? How can I save my salad greens for later in the season when I am no longer sick of salad? I hate to waste- what can I do with carrot tops?

    Nature gives us so much for free – if we know when and where to look for her gifts. They are often sporadic, and never last long! So every Tuesday we at Nurture in Nature are offering to take you on a little Zoom walk through our garden and forests to show off what is all around us that we so often forget to notice, and give some tips on how to recognize, appreciate, and utilize the never-ending gifts from Mother Nature. For example – chamomile is out right now!!

    For more information, visit our website-

    https://www.nurtureinnature.ca/blank-page-1

    feb88c_5df941c7e9b04a198f8519d911a654a5_mv2

    Our first session is free, to offer a taste at what we want to offer, and to practice of course! Tuesday June 30 at 6:30 pm, register online here;

    https://www.eventbrite.ca/e/natures-gifts-tickets-110216229710

    We hope that by demonstrating how we connect to the land around us, we can offer insight into how you can cultivate a deeper connection with the place and community wherever you are, be that Pemberton or elsewhere. So join us Tuesday to begin walking a path of connecting more deeply to your food system, community, and the environment, as we search for more sustainable and resilient lifestyles, together.

    Nurture your Nature

  • Fine & Dandy Syrup

    Fine & Dandy Syrup

    This spring I have been truly taken with (or perhaps a better way of saying it would be: OBSESSED) with dandelions! Yes the weeds everyone attempts to terminate that spread easily upon crisp green lawns!

    These past few years I decided to make a pact with myself, to get in touch with some of my ancestral roots and learn more deeply their simple ways of existence and so, I have been exploring a deep pull within: the vast knowledge of wild edibles!

    As a young girl I always told the world that my favourite ‘flower’ was a dandelion. This remark was often met with scoffing or a simply worded statement “Dandelions are not flowers, they are weeds.” I didn’t know the difference, all I knew was that they looked like small puffs of sunshine that occasionally would turn into a fun toy that you could tell the time with. As an adult it has been many years since my dandelion days and I’m thoroughly proud to say they are back!

    As a vegan, a vegan cook and a self proclaimed kitchen witch, I have delved deep into the succulent yellow petals of our local friends and from root to tip I have explored all of the wonder this plant provides. Before I move onto the incredible recipe that features this wild edible, the health warrior in me wishes to share some fun facts about these bountiful beauties:

    • Dandelions contain fibre, vitamins A, C , K,  E, folate, small amounts of B vitamins and minerals including iron, calcium, magnesium and potassium.
    • You can consume the roots, the flower and the leaves!
    • Dandelion has been used for thousands of years in both Ayurvedic and Chinese medicine.
    • Dandelion is most commonly used as a liver remedy, diuretic and cholekinetic (increases stomach bile)
    • Dandelions are also used as a digestive aid for diseases of the mammary glands, abscesses, ulcerations and swollen lymph glands.

    They also can taste incredible! As a general rule the younger greens are less bitter and are great in salads or blanched as a side. The root can be roasted and drank with hot water as a coffee substitute. The heads can be added to salads, dressings, dips or even tempura them and add to a stir fry or salad. I have also added the yellow flowers to breads, baked goods, pancakes, coconut yogurt…you name it! Yet my favourite way to use these high mineral powerhouses is to make traditional Scandinavian dandelion honey! This is very simple, delicious and a great way to add a little sweetness to your desserts, morning pancakes and beverages.

    Recipe:

    • 2 cups of dandelion heads (presoaked in water, 1 tbsp vinegar for 10min and strained)
    • 2 tsp vanilla extract
    • 1/2 lemon
    • Organic sugar of choice
    • Water

    In a medium sized pot cover the lemon, vanilla and 2 cups of dandelion heads with water. Bring to a boil and simmer for 15min, allow to cool and place in an airtight container in the fridge overnight to infuse. Next day strain out the solids using a nut milk bag or strainer. Measure the liquid you have in a jug, typically it should be around 1.5 – 2 cups. Match the same ratio with your organic sugar of choice. Bring the dandy liquid and sugar to a boil. Keep a close eye on it until it gets thicker and turns a deeper colour (around 15min.) Once finished add to a clean jar, you can store this in the refrigerator for about 1 month and enjoy in any way you please!

    It tastes remarkably like honey, is a sweeter rich in vitamins and minerals and just might be the best thing you have ever tried on pancakes!

    Enjoy your fine and dandy syrup !

    by Leala Selina

    Instagram: @theplayfulmoon Hashtag: #eatrealrainbows🌈


  • A festival of weeds: eat more dandelions

    A festival of weeds: eat more dandelions

    Could a food chain that whispers of global vulnerability make me reconsider the value of my yard as part of my personal supply chain? I cultivate weeds better than anything. My yard is a festival of dandelions.

    IMG_9770

    There is nothing to be gained by declaring war on this. But everything to be gained by researching all the medicinal and nutritional benefits of dandelion and declaring it my most successful garden crop ever. So, with a nudge of encouragement from Natalie Rousseau, whose plant ally for early spring in her 13 Moons course was dandelion, I cooked up a dandelion saute, as the evening’s serve of greens.

    It tasted… so… weedy.

    The seven year old sniffed and said, “No.” Husband’s verdict: “not for the permanent recipe collection.”

    I went to instagram to announce this state of affairs.

    IMG_9074

    And was encouraged by friends not to give up.

    So I did some more research. They are SO GOOD FOR YOU. My coffee-to-wine IV line slash coping technique has short term effectiveness, (upping and downing me as required), but I’m not in love with the long term consequences (like looking haggard. I embrace witchiness but I’m not ready to be a hag just yet.) The promise of clear skin alone convinced me to keep trying – if not to disguise or balance the taste of dandelion, then to acquire.

    Two weeks into my experiments with dandelion (and with even more available in my yard, yay abundance!)  it’s some combination of all of the above.

    865964C7-5F3D-4BB3-A0DC-14A000007B20_1_105_c

    Susun Weed has taught that information in wild food is healing to our cells, it nourishes them with fewer glitches, it returns us to a state of health that aligns with an older Earth, because the receptor sites for minerals in our cells, are primed for the nutrients found in wild food.

    the optimum nutrition is the nutrition from the wild plants. ~ susun weed

    Dandelion is a member of the Asteraceae (daisy) family, a spring tonic and blood purifier. Dandelion leaves and roots relieve chronic stagnation in the liver, while the flowers can relieve a stagnant depressed spirit.

    “It grows almost anywhere: wild in fields, lining trails, in suburban yards, breaking through cracks in city sidewalks. Its constant presence is a reminder of its persistence to live as long as it can under any condition.” ~ Christine Buckley, Plant Magic

    It was actually imported to North America as a spring green and boasts the scientific name Taraxacum officinale, meaning the official remedy. Like, for everything.

    Its strengths are as a tonic, diuretic, alterative, antirheumatic, bitter, cholagogic, hepatic, exhilarant, mild laxative and nutritive.

    Dandelion – Are tap-rooted biennial or perennial herbaceous plants, native to temperate areas of the world. Dandelions are thought to have evolved about thirty million years ago in Eurasia, they have been used by humans as food and herb for much of recorded history. Dandelions are one of the first plants to bloom in the spring and therefore are a very important source of nectar and pollen early in the season. Its tap-root will bring up nutrients for shallower-rooting plants, and add minerals and nitrogen to the soil. Dandelions are even said to emit ethylene gas which helps fruit ripen.

    IMG_9127

    Christine Buckley, in her new (and highly recommended) book Plant Magic includes dandelion in her herbal arsenal – she makes vodka tincture with the flowers and takes that jar of liquid sunshine as deep winter medicine, confessing it is her favourite plant for being “scrappy, fierce, life giving and cheery.”

    Buckley recommends to use the roots for sluggish digestion – dandelion will not just kick your digestive system into high gear, it also improves bile production in the liver, so you can digest fats and eliminate toxins from your body with more ease.  This will reduce inflammation in the body, make your skin look better, help your metabolism and allow the liver to cleanse the blood.

    It’s high in mineral content and inulin, a type of fibre, which is an excellent prebiotic.

    Are you sold yet?

    The leaves are great spring salads – waking up our systems. It’s a tonic, so that means you can take it, every day, and little by little, you will improve.

    “It is the ultimate preventative medicine,” says Buckley. And high in potassium, too.

    So long as the leaves are green, they’re edible. They become progressively bitter, so start with tender spring leaves. It also is packed with vitamins A, E, K, b6, B1 and C. Temper the bitterness with other ingredients (like plaintain leaves, garden herbs, seeds, nuts, shaved cheese, dried fruit.)

    So, with that data fomenting in my brain, my community of wild advisors offered tips on incorporating this super food into my diet.

    IMG_9128
    Christine Buckley’s must-have new book, Plant Magic

    Holly Joseph recommends: “The roots are nice and hot right now. Add to a stir fry, they taste so good! Brush them off under the hose. They are long and thin right now. And taste pretty peppery. I just cut it up right from the garden and put it right into my stir fry. Made it kind of spicy!”

    Asta Kovanen’s advice: “My tip is to cut wild greens in slowly. Add them in small percentages to your regular veg and then your palate can adjust without major assault.”

    Leala Selina Martin said: “I often will juice them as the larger they are the more bitter. They are so good for you though!”

    Sarinda Hoilett advised: “It’s all in the balance of flavours. Macadamia nuts (although gift from heaven) are expensive and hard to find…you can substitute cashews or even avocado and try for a creamy citrus blend to balance the bitter 🍃, And mix them with other greens or drop a few in a sweet smoothie.”

    Dandelion Cream Salad

    20 dandelion leaves, finely chopped, main stem rmoved

    1/2 cup macadamia nuts

    1/4 cup diced red bell pepper

    1/4 cup coconut water

    93617264_547637935955773_8913051030801154986_n3 tbs lemon juice

    1 tsp Celtic salt

    Massage chopped dandelion leaves well with salt to break down the fibre. Let sit for at least 5 minutes. Blend nuts with coconut water and lemon to cream. Mix well to coat dandelions with cream  and add red bell pepper. This salad is a wonderful way to get the great nutrition of dandelion with a reduction of the bitterness.


    EOJO8586

    After great success with Natalie’s dandelion cordial, making Christine Buckley’s winter rescue tincture (as I call it the “dandy brandy”) is next on my list.

    1 ½ cups dandelion flower blossoms

    1 cup honey

    1 cup brandy

    Put the flowers in a glass pint jar. Dissolve the honey in the brandy by stirring or whisking vigorously together. Pour the brandy and honey over the flowers, label and store in a cool dark place for 6 weeks. Bottle your tincture but don’t hide it away so well that you forget about it by winter.

    3321C13A-9284-428D-88D8-4AF3F8561DEE_1_105_c

    Pemberton-based clinical herbalist, Evelyn Coggins,advised, after reading this post: “I love to hear this topic of wild medicine/wild food being shared as miraculous, magical news… because it is all that. A weed is just a plant that hasn’t learned to grow in rows. The bitter principal of dandelion is tricky. We like sweet, salty and to some degree sour but bitter rarely. Maybe we are cautious because the toxic constituents in plants are most often present as alkaloids and alkaloids are bitter. It must have been a real learning curve to distinguish between toxic and beneficial bitters. The beneficial bitters aid digestion and many traditional aperitifs employ plant based bitters. Gin and tonic is a good example. Gin is prepared from juniper berries and they are bitter. Bitters act on the bitter receptors on the tongue and start a chain reaction that leads to the increased flow of bile into the digestive tract and all the nutritional value that ensues from there. It is not surprising that the liver leaps into action with bitters since poisons must be metabolized and hopefully rendered harmless by this organ. I agree that one must start slowly when turning to bitter plants but the journey is so worth it.”

    I’ve been a client of Evelyn’s and can’t recommend her highly enough.

    Now, more than ever, is a time to treat nature as an ally, not a servant/slave, and to behave with honour, humility, curiousity and gratitude.

    Just because you use the derisive word weed doesn’t mean this plant has no value.

    Finally, leave some for the pollinators. They matter in this lovely web, perhaps more than anyone. Not to mention, the roots reach deep into the soil to bring up nutrients, so they’re working healing magic on the Earth, not just our bodies.

    Thanks to Tanina Williams, who first introduced me to the idea of making dandelion jelly, for sharing this video:


  • Thank you to the Vegans

    Thank you to the Vegans

    As discussed in my last post I think we owe vegans in particular an enormous debt of gratitude. These deadly viruses originate with wild animals in captivity caged inhumanely alongside domesticated animals for human consumption in markets mainly in China, but also it has been reported Indonesia and Thailand. What will happen in future and how and if this will be monitored is another matter.

    Vegans are against the use of any animal product for consumption and their choices are truly admirable. We have so many ethical food producers here and ethical and sustainable hunting practices yet unfortunately there will always be people who abuse a shared trust. Also, whenever we purchase packaged meat in the grocery store and are not connected with the hunting of the meat ourselves or the raising of the meat ourselves or by people we know in our own community (shout out to those very important and hard-working people in Pemberton now and how grateful I am to you) then we honestly cannot say for sure that the meat was raised ethically.

    So if you find this all too much to process (pun not intended) then you can just go vegan. And if that is too much to process then you can at least go partially vegan. I find vegan eating particularly easy at breakfast and lunch. Oatmeal and oat milk (yay – oat milk has 4g of protein per cup!), toast with peanut butter, etc.

    For lunch I like to serve bean dips and veggies and even a light lentil soup. I just tweaked a bean dip I found online that in its original posted form was bland and blah. This one is zippy and fluffy and very delish. Please enjoy and thank you again to the vegan community.

    White Bean Dip with Pemberton Garlic and Parsley:

    Ingredients:

    15 grams of small white cannellini beans

    **Method for dried beans: Soak a bag or two of dried cannellini beans overnight. In the AM, drain water and put beans in slow cooker and add water until beans are covered by two inches. Cook on low 8 hours. When tender, put 15 gram portions of beans in containers and freeze for future use.

    2 cloves Pemberton garlic

    4 dashes hot sauce (I like the Cholula brand from Mexico)

    1/3-1/2 cup pure olive oil

    3 tbs fresh-squeezed lemon juice

    1/3 cup Pemberton-grown parsley

    1 tsp salt

    1 tsp pepper

    1 tsp paprika

    Method: Blend all ingredients together in Cuisinart. Adjust salt and pepper to taste. Serve with sliced cucumbers, celery, carrots or sweet peppers.

  • Acclimatization, zones, and how plants adapt to weather

    Acclimatization, zones, and how plants adapt to weather

    You know when you go on a tropical vacation in the winter and at your destination, the locals are wearing hats, long sleeves and pants. You strip down, head to the beach only to get sunburn and heatstroke? Eventually, after a week, you get used to it. Upon return, that first blast of cold at the airport feels like the Arctic, yet people are wearing shorts!

    Plants experience the same affect, perhaps even more because it happens gradually at a cellular level. The more robust the cell walls become, the hardier the plant.

    Every living thing has preferred conditions. Plants are grouped into zones to help guide gardeners to choose plants that will survive in their climate. It is based on the worst weather extremes for the area: Coldest temperature, number of frost free days and exposure. It’s good to know your zone before you waste your time and money on something that won’t thrive. Zones can be pushed higher by starting plants indoors, protecting them with cloth, overhangs, windbreaks, a south facing wall and   greenhouses. Global warming is also changing things and most areas will be up-zoned in the near future.

    Microclimates exist in all zones. Sunny south facing protected areas can be a full zone or more higher than a cold, windy, shady frost pocket. Understanding your microclimates on your property can determine whether you will succeed or not. It’s something you need to constantly pay attention to, and even make notes, if you have to. The smallest changes can make a big difference.

    Slowly, plants need to adapt from one environment to the other. Our intervention is called “hardening off”. Plants started indoors are used to the warm cosy, calm and diffused light. If you put those out right away they will most likely get shocked by cold nights, wind, pounding rain and scorching sun. The trick is to, over the course of several days, slowly leave them out in their new environment a little more each day, paying attention to extremes in which case you will have to leave them indoors or add extra protection.

    When buying plants in the spring it’s good to ask the grower to what extent they’ve been hardened off, if at all. You may have to do it yourself. Something few consider. Many tropical plants in Florida, grown for export as houseplants are raised under shade cloth, not because they don’t tolerate sun, but because they will eventually live in someone’s living room. It works both ways.

    When to plant your starts or seeds outside is also tricky. Seed packages are only a rough guideline as they can’t possibly know everyone’s circumstances. Even experienced gardeners can’t rely on calendar dates, as every year is different. It’s part intuition, part trial and error and partly luck. Those in tune with nature will know when to plant something by biological clues related to the weather, like when the crocuses sprout, the ice on the lake melts, you see the first Robin or the forsythia blooms.  This study is called Phenology  and is the most accurate method. The even more in tune will take biodynamic guidance into account such as moon cycles, the almanac  and spiritual doctrines to plan schedules, making things  even more complicated to organize.

    Regardless, all good farmers are aware of the weather and check the forecast constantly.

    Starting some things early can be as detrimental as starting them late. A root-bound start can suffer and be stunted. A plant left too long indoors on a windowsill can get leggy and fall over searching for the sun. It’s good to know how many days it takes a particular variety to mature. Transplanting earlier may serve no benefit.

    Most plants will survive marginal temps above freezing. Few do anything and stay in a state of statice between 1-6 degrees celsius. Some tender annuals such as basil will perish at a damp 1-2 degrees. Transplanting on a windy day is terrible as it knocks them over, and sucks the moisture from the plants and soil, through transpiration. Some things that have a short lifespan may need successive planting to stagger the harvest. Cool loving crops may only work in spring and fall. and will quickly bolt in the summer. Late maturing species may need to be brought indoors to finish off or  to spend their dormancy. Hardening off is also required to adapt in this case , now humidity and introducing pests indoors becomes a concern. Plants are fickle,  you need to get to know them personally.

    There are obviously so many factors to consider: The bottom line is that you have to treat all your plants like dependents and provide the best care for them from the elements as possible. You have to guide them through life, like children, until they are strong enough to go at it with little intervention. You can never assume anything, be complacent or lazy. What if it was your infant out there? How would you care for it?


  • Spelt Bread for the New Pemberton Bakers

    Spelt Bread for the New Pemberton Bakers

    Hi everyone, and thank you for visiting this website and thank you as ever to Lisa for running it. It is a lot of fun to contribute to – now more than ever. I see at the Pemberton Supermarket that there are store-packaged containers of yeast! The usual small amount of yeast that the store stocks in jars is apparently not enough for everyone (including myself) making bread these days. I think it is wonderful. I have been making my own bread for years. A warning however – do not buy large quantities of yeast at a place like Costco, in bulk. Yeast loses its power after a while, so buy it in small jars (after this Covid crisis is over). Bread takes patience and time and it is very disappointing when your bread doesn’t rise due to outdated yeast!

    This is the recipe I have tweaked over the years. I meant to post it last June but I scrolled down today and noticed that either the recipe got bumped off or I didn’t actually post it like I meant to! Sorry about that. This bread is especially good for toast in the am. There was a butter shortage last week when I got to the Pemberton Supermarket so I bought what was left – organic butter at $10.00 per pound – yikes! We were rationing it at that price. Thank you to the Pemberton Supermarket which during regular times is well stocked, clean, friendly, and bright, but during this crisis is doing a wonderful job supplying our community.

    Delicious Fibre-full Spelt Bread (yield: 2 loaves)

    Ingredients:

    7 cups whole grain spelt flour

    (I used the Everland brand this time but Bob’s Red Mill works well too. I have recently had all my Anita’s brand sprouted spelt flour go rancid on me recently even being kept in the freezer so I am not going to use it or recommend it for the time being.)

    4 tsp instant dry yeast

    1 tbs table salt

    1 cup ground chia seed (MUST be ground first)

    1.5 cups slow old-fashioned oats

    3 ¼ cup water

    1/3 cup unsalted butter

    1 cup oat bran

    Method:

    Put 4 cups flour into stand mixer, and add: yeast, salt, oats, chia. Mix well with dough hook.

    In saucepan place water and butter, over low heat. When butter has melted remove from heat and add to mixer, with mixer on low speed.

    When flour and water mixture are well incorporated, add oat bran and 3 cups of flour slowly.

    Increase speed to medium. When dough is elastic and well mixed (10 minutes), remove dough and place in a large buttered mixing bowl. Cover bowl with plastic wrap and place in oven with oven light on for 1 hour.

    After one hour, remove dough and divide in half. Take each half and roll into a cylinder. Place each cylinder into a greased loaf pan. You will have two loaves.

    Place loaf pans into oven with oven light on for 1 hour.

    Remove pans from oven after one hour and then turn on oven to 375C.

    Bake loaves for 30-32 minutes. Cool on rack. Enjoy!