Author: gpmdesign

  • COVID Trends – No-Knead Bread

    COVID Trends – No-Knead Bread

    I’m not sure about you, but I was feeling a bit left out of the club!

    Since the start of the Coronavirus pandemic many people have either been laid off (hopefully just temporarily) or have had to close their businesses to control the spread. I am one of the lucky ones in that my 40-hour work week has remained, with only some minor changes to my schedule. However, it did mean that while everyone else was discovering the joys of breadmaking, i.e. different starters and best methods, albeit when flour and yeast were available, I was stuck in front of my computer screen!

    A little Pinterest research later I found a No-Knead Bread recipe that claimed it was “crazy easy”! And it was! Four ingredients, mix them up, leave them overnight to do their thing and then the next day make it into a ball, stick it in a dutch oven, cook it for 45 minutes and ta da – homemade artisan bread!

    But one thing still peeved me. The flavour was great, the texture was wonderful, the making of the recipe had been a success, so what was the problem? Well have you tried toasting the middle slice of a round loaf without having to cut it in half first or without trying to toast both ends so that you end up burning the middle and setting the fire alarm off? No? Me neither!

    So the next time I made the bread, when it came to shaping it into a ball I tried to make it an oblong instead and used my lasagna dish to cook it in. The result was better but the slices were still not toaster friendly.

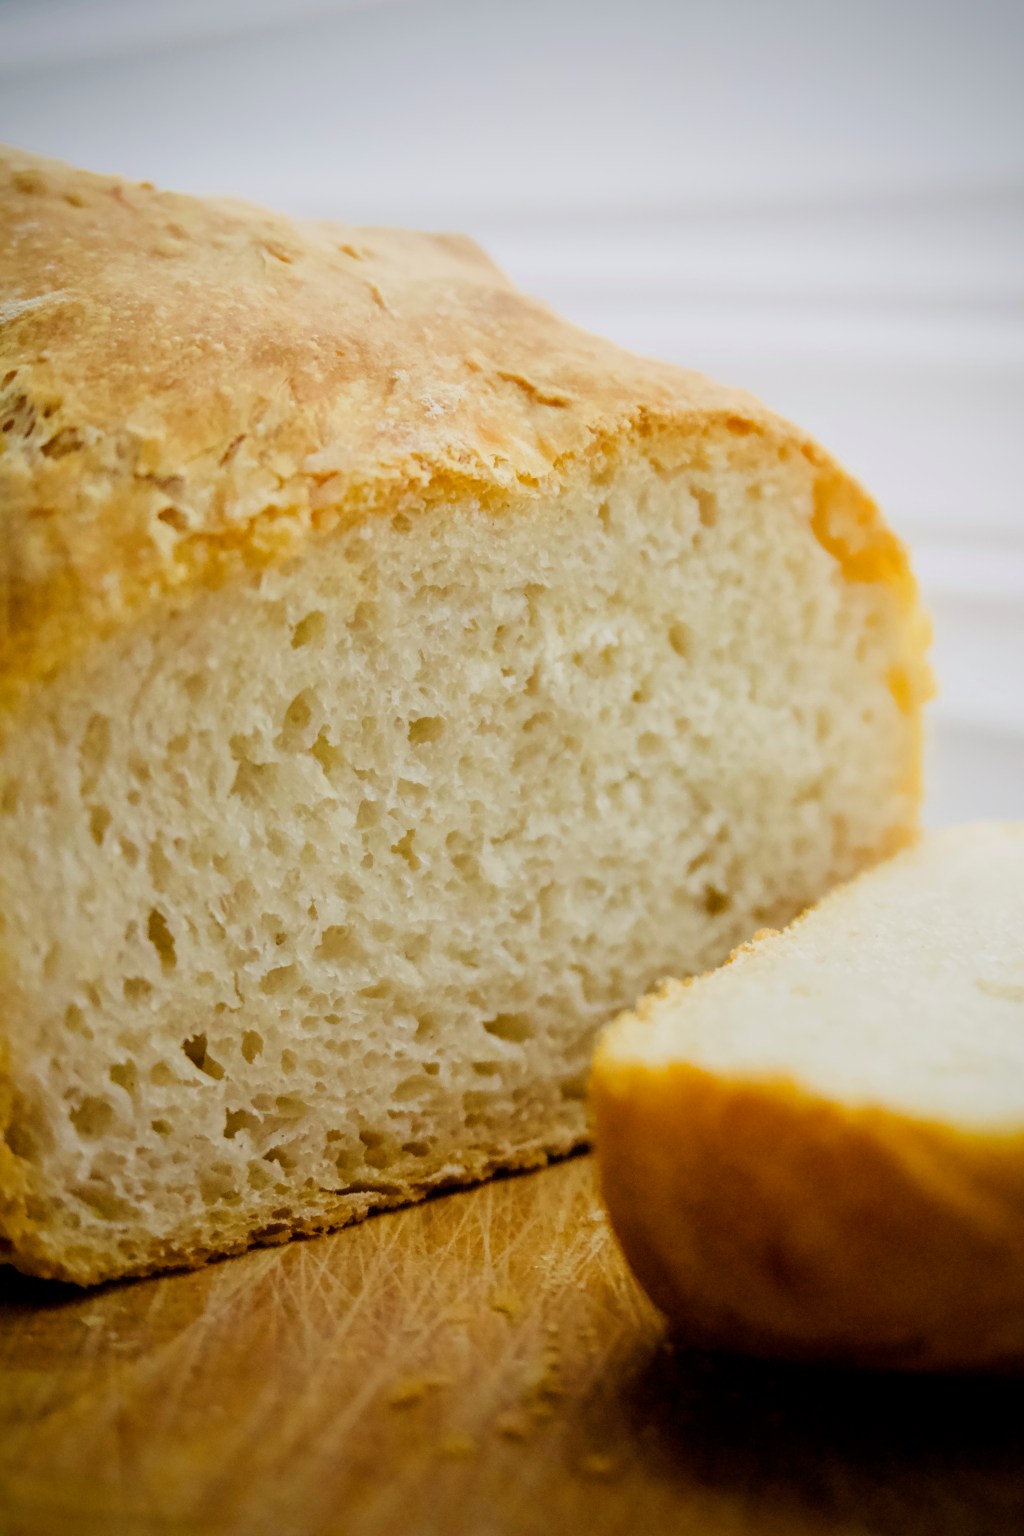
    And then I came across this No-Knead Bread hack. Instead of shaping into a ball, flatten it a little, then fold it in 3 and stick it in a [greased] traditional loaf pan.

    So far it looks like it may have worked. 🙂 It looks like a normal loaf and should fit in my toaster no problem and will be easier to cut as it won’t be wider than my bread knife. This could turn out to be a complete success and it may be one thing I don’t have to buy at the grocery store anymore. (Sorry Pemberton Valley Supermarket). Of course, the proof (no bread pun intended) will be in the eating!

    Ingredients

    (Makes 1 loaf)

    • 3 cups all purpose flour
    • 1 teaspoon salt
    • 1/2 teaspoon yeast
    • 1.5 cups warm water

    Directions

    1. In a bowl, stir the flour, salt, yeast and water until combined. Cover with plastic wrap and rest at room temperature for 8-24 hours.
    2. Turn dough out onto a well floured surface.
    3. Sprinkle a little more flour over the top of the dough and knead the dough just two or three times until the flour is incorporated and the dough is no longer bubble-gum sticky.
    4. Flatten into a Rectangle – Use your fingertips to gently flatten into a rough rectangle. If the dough is sticking to the counter, sprinkle a little flour underneath. Try not to use too much flour, though, or else you’ll have trouble getting the dough to stick to itself once you shape it.
    5. Place the shaped loaf into a greased bread pan and let it rise until it’s just starting to crest over the rim of the pan.
    6. Turn on the oven to 450° to pre-heat about 20 minutes before baking.
    7. Just before baking, rub a little flour into the surface of the loaf and cut a slash or two with a serrated knife.
    8. Bake the loaf for 45-50 minutes, turning them once halfway through so they bake evenly. The loaf should be golden-red with a few toasted brown spots. Shake out of the pan and tap the bottom with your knuckle – if it sounds hollow, it’s done! If you’re not sure, check the internal temperature. Bread is done when the centre registers 190°.
    9. Cool before slicing (and slathering with butter!).

  • DIY – Maple Granola

    DIY – Maple Granola

    The past few weeks, with the arrival of COVID-19 to our piece of the world, has caused me, as a normally un-anxious person, to become riddled with anxiety and a sense of foreboding, as I know is the case with many of my friends, colleagues and neighbours.

    Working in the hospitality industry in Whistler, with hotels temporarily ceasing operations and restaurants and bars closed to guests, means that is time to pull up the boot straps and find a way to both save money and release some of that tension.

    My go-to is baking and I do happen to have a banana bread in the oven as I type. But, as the hotel restaurant where I work had to close suddenly, there was a lot of food that was potentially going to go to waste and was instead given away to the staff, primarily to those who were just about to receive a temporary lay-off notice. 😦  I did, however, manage to get my hands on some yogurts and this recipe for Maple Granola is one that I have been meaning to make for a while. So now my daily breakfast consists of yogurt parfait with half a banana and, if I really needed a snack, the granola would work for that too.

    FYI I didn’t actually have any sunflower seeds in the cupboard but did have some linseeds so added those in instead. However, I’m pretty much sure you could add in whatever seeds, nuts and dried fruit you prefer and it would still taste delicious!

    Ingredients

    (Makes 8 cups)

    • 3 cups large-flake rolled oats
    • 1 1/3 cup natural almonds or pecans , chopped
    • 3/4 cups pepitas (pumpkin seeds)
    • 3/4 cups sunflower seeds
    • 1/3 cup sesame seeds
    • 1 teaspoon cinnamon
    • 3/4 teaspoons kosher salt or sea salt
    • 1/2 teaspoon ground ginger
    • 2/3 cups maple syrup
    • 3 tablespoons canola oil or melted coconut oil
    • 1/2 cup coconut chips (optional)1
    • /3 cup dried cranberries
    • 1/3 cup raisins

    Directions

    1. Preheat oven to 300°F.
    2. In large bowl, stir together oats, almonds, pepitas, sunflower seeds, sesame seeds, cinnamon, salt and ginger. Add maple syrup and oil, stirring to coat; spread evenly on baking sheet. Bake until golden brown, stirring every 15 minutes and rotating pan halfway through, about 40 minutes. Let cool completely in pan.
    3. Sprinkle with coconut chips (if using), cranberries and raisins.

  • Perfect for a cold day – Slow-Cooker Creamy Chicken With Biscuits

    Perfect for a cold day – Slow-Cooker Creamy Chicken With Biscuits

    You know those days.

    The ones that are cold, wet and miserable and you walk the dog only to feel chilled to the bones. Or it’s snowing so hard you just want to curl up in front of the fire with a good book and a huge mug of coffee. The ones when all you want to do is eat comfort food, but with the least amount of effort to make it.

    Well I found it in this recipe for Creamy Chicken with Biscuits. 🙂 Place all the ingredients (except the biscuits) in the slow cooker and leave it to do it’s thing for 3 to 6 hours, depending on the temperature setting you choose! Isn’t the slow cooker magic?

    And what makes this recipe even better are those biscuits. You could go the extra easy [ie lazy] route and buy some store-bought ready-made biscuits OR you could make up the simple recipe that’s included for Easy Drop Biscuits. Just put all the ingredients in a food processor and mix together. I ended up bringing mine together on the counter so I really felt that I had put the effort in, and because all I really have is a hand blender chopper thing so it doesn’t work quite as well! 😉

    Anyway, boy were they worth it! They made the dish even better and merited the 10 minutes it took to make them. Flaky, buttery and oh so yummy.

    Ingredients

    • 2 cups all-purpose flour, spooned and leveled
    • 1/2 cup (1 stick) cold unsalted butter, cut into small pieces
    • 1 tablespoon baking powder
    • 1 teaspoon kosher salt
    • 1 cup whole milk

    Directions

    1. Heat oven to 400° F.
    2. In a food processor, combine the flour, butter, baking powder, and salt; pulse until pea-size clumps form.
    3. Add the milk and pulse just until moistened.
    4. Drop 6 large mounds of the dough (about ½ cup each) onto a baking sheet.
    5. Bake until golden, 18 to 20 minutes.

    Now you know what to throw in the slow cooker on the next cold, wet, miserable day. You’re welcome!

  • Another soup – Sweet Potato and Red Lentil!

    Another soup – Sweet Potato and Red Lentil!

    As I sit here it is -5 (feeling like -10 and going to drop down to -13 later). So that calls for only one thing. A big bowl of something steaming and filling and nourishing for the soul.

    I’ve wanted to make a soup with lentils for ages, mainly because I have a tried and tested Chicken and Red Lentil Curry with Toasted Cashew Nuts that I absolutely love! So, after a quick search on Pinterest, this recipe for Sweet Potato and Red Lentil Soup caught my eye.

    It’s a super thick soup, almost a puree, hence really filling. Plus:

    • There’s 485% of your daily recommended dietary allowance of vitamin A. Essential for keeping all your vital organs in working order!
    • There are only 309 calories per serving, or 15% of calorie intake on a 2000 calorie per day diet.
    • The fat content is just 2g, only 3% of your daily recommended dietary allowance.

    With it being so low in calories and fat it’s good for those currently on a weight loss plan (like me – again!). Although I may have negated all the goodness with the “drop” of cream and fresh slices of bread!

    Let me know if you have any other lentil soups for me to try and I hope you like this one!

    Ingredients

    • 1 tbsp olive oil
    • 1 onion diced
    • 1 kg sweet potatoes peeled and diced
    • 1.5 L vegetable stock
    • 210 g red split lentils
    • 1 tsp ground turmeric
    • 1/2 tsp mild chilli powder
    • Freshly ground salt and pepper
    • 1 tbsp coriander chopped

    Directions

    1. Gently heat the oil in a large soup pot and add the diced onion to soften it, stirring occasionally for about 4 – 5 minutes. Then add the diced potatoes and continue to stir for a further 3 – 4 minutes.
    2. Add the vegetable stock, lentils, ground turmeric and mild chilli powder.
    3. Stir well, bring to the boil and turn down to simmer gently for 20 –25 minutes until all the mixture is completely softened. Remove from the heat.
    4. When the soup has cooled a little, blitz it in a blender / food processor and return to the pan, season to taste, garnish with the chopped coriander and then serve.
    5. Serve with fresh bread.
  • Soup for (F)all seasons!

    Soup for (F)all seasons!

    I just took the dog for a walk. It was chilly and windy. It was Fall in Pemberton.

    There’s only one thing for those kind of days and that’s a delicious, hearty bowl of soup with some fresh crusty bread, still warm if you can find it.

    I have two go to recipes. Roasted Butternut Squash, one of my all-time favourites, and Cock-a-Leekie which I love because it harks back to the Scottish side of my family and is quick and simple to make, well my version anyway!

    To make my uncomplicated variation all you will need is celery, leeks, carrots, potatoes and chicken breasts cooked together to miraculously become a wonderful warming soup.

    The traditional version includes other ingredients including prunes and oatmeal, and I have never made it this way, but the simplified version allows all the vegetables to shine – especially the leeks who are the stars of the bowl!

    Whichever version you attempt this will certainly warm you up on a cold Fall, or even Winter’s, day. Enjoy!

    Ingredients

    • 2 sticks of celery, sliced
    • 2 leeks, sliced
    • 2 carrots, sliced
    • 4 to 5 potatoes, diced
    • 2 chicken breasts, cubed
    • 1 to 1.5 litres chicken stock
    • Salt and pepper

    Directions

    1. In a large stock pot heat 1 tablespoon of vegetable oil and add in the celery and leeks and cook over a medium-high heat to soften.

    2. Add in the carrots and potatoes.

    3. Pour over the stock.

    4. Add in the chicken.

    5. Add salt and pepper to taste.

    6. Bring everything up to boil and cook for 25 to 30 minutes or until the potatoes have softened and the chicken is cooked.

    7. Serve with fresh bread.

  • Peaches, from Peachland no less!

    Peaches, from Peachland no less!

    Recently we went on a bit of road trip, starting out by heading to the Canmore / Cochrane area and then heading down to Fernie and Nelson. Our last stop, while covering some 3,000 kms, before heading home was to Peachland. We found a lovely little AirBNB right slap bang in the middle of wine country! (Don’t worry we both sampled wine and brought some back with us! 😉 )

    However, it was our host that offered us the peaches, and right from her very own garden.

    (Did you know? Peaches have been cultivated in the Okanagan since the 1890s and are available July through September.)

    Anyway, who was I to say no? Of course, having received said peaches I had to find the right recipe with which to showcase them.

    Okanagan Peaches
    Okanagan Peaches

    I wanted to make some kind of pie and have been searching for the ultimate pastry recipe for ever. Well I think I finally found it with this recipe for a Rustic Peach Galette with Orange [and Ginger – which I didn’t add as it’s not my very favourite!].

    The pastry in this galette is melt in the mouth soft, explodes with the flavour of the oranges (even more so as I used the orange juice to bind it all together) and has a lovely crumbly texture. In fact, it was to die for – no exaggeration!

    The peaches were soft and not too sweet and really showcased the very best of the Okanagan.

    For all the above reasons, this recipe is a keeper and I would encourage you all to try making it before peach season is over. It is can be especially enjoyed warm from the oven with a nice helping of decent vanilla ice cream.

    Peach Galette
    Peach Galette

    Ingredients

    Pastry

    • 1 cup all-purpose flour
    • 1 tsp granulated sugar
    • 1/2 tsp salt
    • 1/2 cup cold butter, cut into small cubes
    • 1/4 cup ice water

    Filling

    • 4 peaches, sliced 1/2 thick
    • 2 tbsp granulated sugar
    • 1 tbsp all-purpose flour
    • 1 tbsp orange juice
    • 2 tsp grated ginger
    • 1/4 tsp salt
    • 2 tbsp butter

    Additional Ingredients

    • 1 egg
    • 2 tbsp milk
    • 2 tbsp coarse sugar
    • 1 small sprig basil
    • 1/2 cup ice cream

    Directions

    1. In a medium sized bowl, mix together 1 cup of flour, 1 teaspoon of sugar, and 1/2 teaspoon of salt. Add the butter, and using a fork crush and mix the butter into the flour until it is coated and becomes the size of small peas. Add the water 1 tablespoon at a time and mix until it forms into a dough. Shape into a 1 inch disc, wrap and place in the fridge for at least 1 hour.

    2. Preheat oven to 425°.

    3. In a medium sized bowl, whisk together 2 tablespoons of sugar, 1 tablespoon of flour, orange juice, grated ginger, and 1/4 teaspoon of salt, until smooth. Add the peach slices and toss gently to coat.

    4. Remove the dough and place on a large, lightly floured, piece of parchment paper. Roll the dough out to a 14-15 inch circle. Starting from about 1 inch from the edge, layer the peach slices on their sides clockwise, one at a time, ensuring they lay on top of each slightly. Continue, working your way to the centre of the galette until the galette is filled. The peaches will be higher in the centre than the edges. Fold the edges of the dough up in 2-3 inch sections, over top the outer layer of peaches covering them by about half. Dot the peaches with 1/2 teaspoon chunks of butter.

    5. In a small bowl, whisk together the egg and milk to make egg wash. Brush a light layer of egg wash on the crust then sprinkle with coarse sugar.

    6. Place the galette on a baking sheet or pizza stone and bake for 20 minutes, until the peaches are bubbling and the crust is gold brown. Allow to cool for at least 20 minutes before serving.

    7. Serve with a scoop of vanilla ice cream and a few small basil leaves.

    Peach Galette
    Warm Peach Galette with vanilla ice cream


  • Zucchini – again!

    Zucchini – again!

    It seems to be that time of year again! So many people I know are offering up their excess zucchini’s as they have too many and don’t know what to do with them!

    So when my neighbour put out a post saying she had some up for grabs I volunteered to take one of her hands. And it was a monster! So much so that I made to make up half as much again of the recipe I found. This meant that I could make four mini-loaves and one standard size loaf. Good job I’m a fan of zucchini bread.

    Besides, I gifted back two of the mini-loaves for her, and her family, to enjoy! 🙂

    The Mini Zucchini Loaf recipe I found included walnuts which I didn’t have on hand, but the pecans worked just as well!

    So, if you have any spare zucchini’s I won’t say no. 😉

    Ingredients

    • 2 cups grated zucchini (about 2-3 zucchini)
    • 3 cups all-purpose flour
    • 1 teaspoon kosher salt
    • 1 1/2 teaspoons baking powder
    • 1 1/2 teaspoons baking soda
    • 1 tablespoon cinnamon
    • 1 cup sugar
    • 1 cup packed brown sugar
    • 1 cup vegetable oil
    • 3 large eggs
    • 1/4 teaspoon almond extract
    • 1 cup chopped walnuts

    Directions

    1. Preheat oven to 350 degrees. Coat two [or three] 5 1/2 by 3-inch loaf pans with nonstick spray, line with parchment paper, and then spray paper.
    2. To reduce the moisture, press the grated zucchini between sheets of paper towel. When most of the moisture has been absorbed, you can fluff with your hands or a fork and then set aside.
    3. In a small bowl, mix together flour, salt, baking powder, baking soda, and cinnamon.
    4. In a large bowl, combine sugar, brown sugar, vegetable oil, almond extract and eggs and mix until well combined. Stir in the zucchini.
    5. Add dry ingredients to the bowl of wet ingredients and mix well. Fold in nuts. Divide batter between the two mini loaf pans. If you have extra batter, you can drop liners into a muffin pan and make a few zucchini muffins.
    6. Bake for 35-45 minutes. Use a toothpick to test – if it comes out clean, it’s ready to take out. Let cool for about 10 minutes on wire rack before removing from the pan to cool completely.

  • Dirty Apron – Cooking School

    Dirty Apron – Cooking School

    For Christmas my OH surprised with an experience of a 4-hour hands on cooking class at the Dirty Apron in Vancouver. Not, he hastily added, because there is anything wrong with my cooking, but that it may give me tips and the confidence to try new things.

    After Christmas I browsed on their website for available dates and to see what course I would like to try based on ingredients used and techniques I could learn.

    So on 12th May I headed to Beatty Street for my “BC Dine & Vine – Wine & Food Pairings From Our Own Backyard” class.

    Along with 17 other people I first sampled some freshly baked bread with sparkling wine before we got down to the real business at hand.

    Each course was individually cooked in front of us by our instructor, giving pointers along the way, ie how to hold the knife when cutting, how to know when your sauce has reduced enough etc, and then we were sent to our stations to cook each course ourselves. The ingredients were all provided, along with the equipment we needed, so all we had to do was cook everything and then we got to eat it, paired with a BC wine. And while we were eating the kitchen fairies came in and cleared everything away in preparation for the next course!

    There were four courses in all:

    • Spot Prawn Gyoza with Dipping Sauce (recipe below)
    • Crispy Seared Duck Breast with Orange Gastrique and Apple and Green Bean Sauté
    • Crisp Seared Salmon with Horseradish Crème Fraiche and Scallion Potato Rosti
    • Apple Almond Tart

    What did I learn? How to mince my own garlic so much that it was almost a paste, not to panic when water hits a gas flame (thank god I use an electric ceramic hob!), leave the ingredient in the pan and not move it around constantly (ie have patience) and it’s okay to cheat (ie buy store bought puff pastry!).

    If you ever get the chance to head down, either for a demo class or a hands on class, I highly recommend it. Even better if you can get a small group of you together, although I am sure that everything would pretty soon become a competition! 😉

    So, as promised, here’s the recipe for Spot Prawn Gyoza with Dipping Sauce:

    Ingredients

    (Makes 10)

    Gyoza Filling

    • 60 g Prawn meat (minced)
    • 15 ml Carrots (finely chopped)
    • 15 ml Leek (finely chopped)
    • 15 ml Celery (finely chopped)
    • 1 pc Green Onion (finely chopped)
    • 1 tbsp Chives (chopped)
    • 2 cloves Garlic
    • 15 g Ginger
    • 10 mL Yuzu Juice
    • 5 mL Soy Sauce
    • 5 mL Sesame Oil
    • 1 tsp Sugar
    • 10 BC Spot Prawns
    • 10 Gyoza Skins

    Classic Dipping Sauce

    • 30 ml Soy Sauce
    • 15 ml Rice Wine Vinegar
    • 15 ml Chili Oil

    Directions 

    (For steaming but can be deep fried)

    1. Combine all ingredients into a bowl and mix well.
    2. Heat a pan to medium-high; add enough oil to coat the bottom of the pan.
    3. Place gyoza in pan and sear bottom.
    4. Turn heat down to medium and add ¼ cup of water and place lid on top to steam for 3 – 4 minutes.
    5. Carefully remove from pan with a spatula.
    6. Combine all the dipping sauce ingredients into a bowl and mix.

    Folding Gyoza

    1. Place a spoonful of filling off centre on wonton wrapper. Lay peeled Spot Prawn atop filling.
    2. Using fingertip moisten the outer edge of the wrapper with water.
    3. Fold in half, using fingertips to crimp the two sides together, creating a seam on top of gyoza.
  • Dinner made easy – Chicken Divan

    Dinner made easy – Chicken Divan

    So my OH has been away, galavanting off to the UK and Spain, leaving me with the dog, and the chores, for just over a week on my own. (Don’t get me wrong – it’s been great catching up with episodes of Desperate Housewives and enjoying some peace and quiet!)

    It has also left me with the chance to take a day off work just so I can go and collect him from the airport. At least it gets me out of the “bubble”, right?

    The flight is due to land in the early afternoon so, with the drive and subsequent stops, on the way back, I thought it would be ideal if I could make something in advance for dinner that I can just reheat and serve when we get home. Luckily, Martha came to my rescue when this recipe popped in to my Facebook feed!

    Now, I’d never heard of Chicken Divan before but apparently it’s a chicken casserole usually served with broccoli, almonds, and Mornay sauce that was named after the place of its invention, the Divan Parisienne Restaurant in the New York City Chatham Hotel where it was served as the signature dish in the early twentieth century. So there you go!

    I have since seen a few recipes on Pinterest that use Cream of Mushroom Soup but there’s nothing more satisfying than making it all from scratch (time permitting). So, hopefully it tastes great and my efforts will be appreciated!

    Note this recipe serves 6 to 8 people – I guess we’ll have plenty of leftovers! 😉

    Ingredients

    • 1 bunch broccoli, cut into florets (about 5 cups)
    • 680g (1 1/2 pounds) boneless, skinless chicken breast, cut crosswise into 1/2-inch-thick strips
    • 1 small onion, finely chopped (1 cup)
    • 225g cremini mushrooms, sliced (about 2 1/2 cups)
    • 4 tbsps unsalted butter, plus 2 tablespoons melted
    • Kosher salt and freshly ground pepper
    • 3 tbsps unbleached all-purpose flour
    • 3 cups whole milk, room temperature
    • 255g shredded medium-sharp cheddar (3 cups)
    • 2 tsps Dijon mustard
    • 1 tsp Worcestershire sauce
    • 1/8 tsp cayenne pepper
    • 1/2 cup sour cream
    • 1 cup panko breadcrumbs
    • Cooked egg noodles or steamed white rice, for serving (or whatever you prefer)

    Directions

    1. Preheat oven to 400 degrees. In a large straight-sided skillet, simmer 1/2 cup water over medium-high heat, then add broccoli and a pinch of salt. Cover, reduce heat to medium-low, and cook until crisp-tender, about 6 minutes. Drain well, then transfer to a large bowl; set aside. Wipe out skillet.

    2. Pat chicken dry; season with salt and pepper. Melt 2 tablespoons butter over medium-high heat. Add half the chicken and cook, turning once, until browned and cooked through, about 4 minutes. Transfer to a plate. Repeat with remaining chicken; set aside.
    3. In same skillet, melt 2 tablespoons butter, then add onion and mushrooms. Cook, stirring occasionally, until tender and starting to brown, 6 to 7 minutes. Add flour and cook, stirring, 30 seconds. Slowly add milk, reduce heat to medium, and cook, stirring constantly, until mixture is thick enough to coat the back of a spoon, about 9 minutes. Add 2 cups cheese, Dijon, Worcestershire, cayenne, and sour cream; stir until combined. Season with salt and pepper. Add cheese sauce to bowl with broccoli, followed by chicken and accumulated juices; toss to combine. Transfer to a 2 1/2-quart baking dish.
    4. In a small bowl, combine 2 tablespoons melted butter, panko, and remaining 1 cup cheese. Sprinkle over broccoli-and-chicken mixture. Bake until bubbly and golden, 20 to 25 minutes. Let cool 15 minutes, then serve over noodles or rice.
  • Banana Bread – another variation, with cream cheese frosting!

    Banana Bread – another variation, with cream cheese frosting!

    I’d seen this recipe months ago while, undoubtedly, searching for something entirely different on Pinterest.

    However, it caught my eye and was one of those cakes I could imagine baking up for team-mates at work or for a large get-together with friends. I mean who doesn’t like banana bread or cream cheese frosting?

    So the opportunity to try this recipe came up because we were meeting up with two sets of friends and would be able to share the banana bread love. But then one of the get-togethers we had planned, cancelled at the last minute. This meant that there was far more cake to eat, on our own, than was anticipated! But, as it turned out, this cake is so light and the frosting is so dreamy that it was way too easy to eat more than one serving.

    There goes the waistline – again!

    Ingredients

    For the Banana Bread Cake

    • 1/2 cup butter, softened
    • 1 1/2 cups granulated sugar
    • 2 large eggs
    • 1 cup sour cream full-fat is best
    • 1 teaspoon vanilla extract
    • 2 cups all-purpose flour
    • 1 teaspoon baking soda
    • 1/4 teaspoon salt
    • 1 cup mashed bananas about 2 or 3 bananas

    For the Cream Cheese Frosting

    • 1/2 cup butter, softened
    • 1 bar (8 oz/227 g) cream cheese full-fat is best
    • 1 teaspoon vanilla extract
    • 2 1/2 – 3 cups powdered sugar
    • 3-4 tablespoons heavy whipping cream

    Directions

    1. Heat oven to 350 degrees. Prepare a 9×13 baking dish and spray with cooking spray. Set aside.
    2. In a large bowl, cream butter and sugar together until light and fluffy. Add eggs, sour cream, and vanilla. Blend together until combined and creamy.
    3. In small bowl, add flour, baking soda, and salt. Whisk together to break up clumps. Add it into the wet batter and stir with spatula just until mixed and no flour pockets remain.
    4. Add mashed banana and gently stir together. Dump batter into the baking dish and spread out evenly. It makes it easier if you dump large spoonfuls of the batter all over the baking dish, instead of just one big pile of batter.
    5. Cook for 25-35 minutes or until toothpick inserted in middle does not come out with wet batter. The edges and top will be light browned. Mine takes about 32 minutes.
    6. Let cake cool completely before frosting.
    7. To make frosting: beat butter and cream cheese together until combined. Add in vanilla extract, 2 cups of the powdered sugar, and 3 tablespoons heavy cream. Beat together until frosting forms. Add more powdered sugar and/or milk until desired frosting consistency is reached.* NOTE: if you use anything other than heavy whipping cream, start with 1 tablespoon and work from there. Heavy cream is so thick that you need more of it, lower fat milks you will need less of.
    8. Cut into squares and garnish each piece with banana slices and chopped walnuts.

    Please don’t blame me if this becomes your next favourite Banana Bread recipe! I will certainly be making it again!