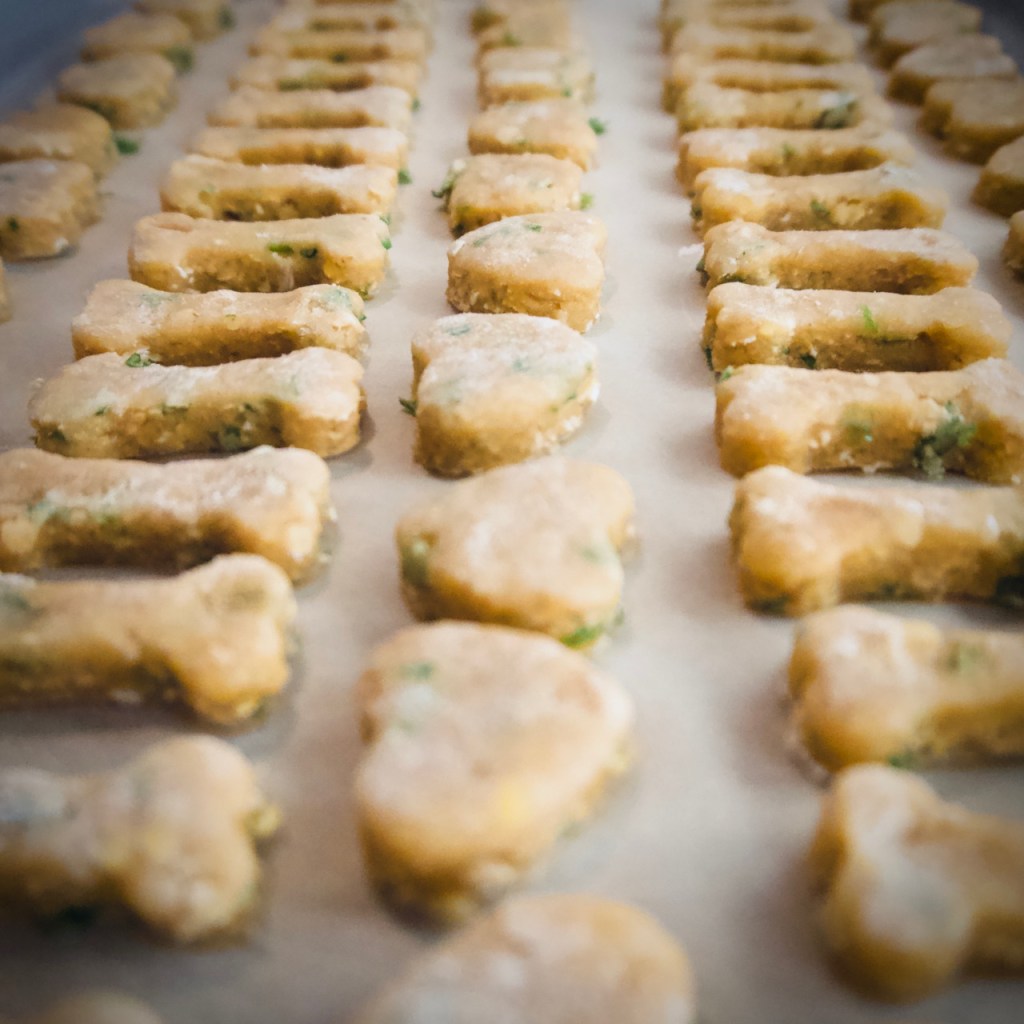
Well, of course, it’s only people that can do the baking, but everyone can benefit from the outcomes. Like my puppy, who just turned one!
What says love and happy birthday more than some home-baked cookies. Nothing, that’s what!
I researched a few different recipes knowing that the main ingredient should be peanut butter as that’s one of his very favourite things! Also, I wanted to make something so I knew what was going into his cookies. The only difference with mine, compared with the recipe, was that I didn’t have any wholewheat flour so used all-purpose instead and used some chicken stock to bind it all together.
For this occasion I went with the “Best of Breed” biscuits but I’ve already decided that the next biscuits I make will be peanut butter and banana and peanut butter and pumpkin – all three of his favourite things!
Ingredients
2 cups White Whole Wheat Flour or Whole Wheat Flour
1 cup rolled oats, regular or quick
1 tablespoon dried parsley or 2 tablespoons chopped fresh parsley
1/2 cup nonfat dry milk
1/2 teaspoon salt
2 large eggs
1 cup (9 1/4 ounces) peanut butter, crunchy or plain
1/2 cup + 1 tablespoon cold water, or enough to make a cohesive dough
Directions
Preheat the oven to 300°F. Lightly grease a couple of baking sheets, or line them with parchment.
Put the dry ingredients in a mixing bowl and stir to combine.
Add the eggs and peanut butter. Stir to combine; the mixture will be crumbly.
Add 1/2 cup + 1 tablespoon cold water, or enough to make a cohesive dough. Depending on the season, you may need to add a bit more (winter), or a bit less (summer).
To make the cookies, roll the dough into walnut-sized balls onto a lightly greased or parchment-lined baking sheet and flatten to about 1/4” thick.
Alternatively, roll the dough out to about 1/4” thick and cut out with a cutter of your choice. Gather and re-roll the scraps, and continue to cut biscuits until you’ve used all the dough.
Lay the biscuits close together on the prepared baking sheets. Since the biscuits don’t include any leavening (baking powder, yeast, etc.), they won’t spread.
Bake the biscuits for about 40 to 60 minutes, baking the smaller cookies for the shorter amount of time, the larger biscuits for the longer amount of time.
When finished, the biscuits will be dark golden brown, and will be dry and crisp all the way through.
Bittersweet times are upon me these days as my personal stock levels of fresh garden produce dwindle down to the last survivors. Luckily seed ordering is in full effect to keep the dream alive! Yet, even though the light at the end of the winter tunnel grows brighter every day, you can still guarantee there will be times when we feel the need to: bundle up, get adventurous, come home and devour a hot bowl of soup.
But I’ll reiterate before continuing that… #summeriscoming.
Feeling inspired from an Instagram post by my “neighbor” Anna for a mega hearty vegetable broth and a recipe from My New Roots, I set forth to honor my last butternut squash with a soup so full of nutritional goodness that would make the new Canadian Food Guide salivate.
• Once you’ve got all the goods simmering away go out and adventure for a few hours then come home to the most AMAZING smell, ladle up yourself a cup and savor the goods! Freeze what you don’t use in different sized containers for later. (I added in some carrot and celery because I had it on hand and well, I’ve never made a stock with out either!)
Step Two: Start making the soup.
Butternut squash, peeled & diced into ½“ pieces (approx. 3 cups), roasted at 375°F with some coconut oil, salt and pepper – one medium sized onion, diced – 3-4 cloves garlic, minced – 2-3 Tbsp fresh grated ginger (I keep mine in the freezer for easy grating and its keeps longer) – miso paste (Fuji Market in Whistler has a great selection, I used AWASE Miso)
Add some coconut oil into a Dutch oven over medium heat, then add the onion and cook until translucent then add in the garlic and ginger; allow everyone to mingle until fragrant. Then add in the butternut squash and cook for 5 minutes to absorb the flavors. Top the lot with the veggie stock and allow to simmer for 10-15minutes. Use one cup of water and combine with ¼ cup miso paste, whisking to combine then add to the pot. Remove from the heat and use an immersion blender to smooth out the soup. Add more stock or water to obtain your desired consistency and season with salt & pepper.
Step 3: Wasabi cream.
1 Tbsp wasabi powder – 1 Tbsp water – 2 Tbsp mayo – squeeze lemon or lime juice – dash of tamari
Whisk everything together and get ready to be addicted, and willing to putting this sauce on everything.
Step Quatro: Eat the soup.
Serve the soup drizzled with the wasabi cream, sprinkled with black sesame seeds and topped with some pea shoots, micro greens or whatever is on hand. That is all.
Simple. Delicious. Nutritious. Most importantly: made and grown with love.
I grew up in rural Ontario, and every New Years Eve my family and I would drive 3 miles down our snowed-in gravel road to the farm of Joanne Cowling. Having come to Canada from England many years earlier, Joanne kept her meticulous British accent and a series of beautifully maintained gardens, complete with goats, sheep, pigs, geese, ‘chooks’ (chickens) and a pony named Sandman. Upon entering the red brick farm house my brother and I would remove our winter clothes and make a beeline for the kitchen where Joanne would ladle out a hand-thrown clay goblet of homemade egg nog for each of us. As I sipped its heady creamy goodness, I always wondered what made the adults laugh so loud as they drank theirs. (I suppose I did not see the brandy making its way from goblet to goblet, how conversation slipped more easily in its presence). Then my brother and I would weave between the legs of neighbours to get to the large table that was laid out with hundreds of Joanne’s famous hors d’ourves: crab wrapped in filo pastry, thin slices of marinated beef tongue, smoked salmon sprinkled with capers, warm brie cheese, and Christmas cookies cut into the shapes of animals, decorated with fancy icing and tiny silver balls. But in the collage of these most delicious morsels, it is the egg nog that I remember most; that rich impossible creaminess. About 10 years ago, through a series of arm wrestles, afternoon coffees, and barn chore trades, my mom finally convinced Joanne to write her recipe down, and the ‘nog became part of our family tradition. Every year when I go home for Christmas there is the requisite jug of thick, creamy (and quite boozy) ‘nog chilling in a snowdrift outside the back door. Over the years I’ve sampled many attempts at the enigma that is egg nog. And I have to tell you that nothing, and I mean NOTHING has come close to the velvety indulgence of this homemade ‘nog. It takes a little bit of time and effort, a little bit of coaxing and folding and stirring and chilling. But the results are worth it: a rich, milkshake-thick ‘nog, meant to be sipped, savoured, and shared- or stirred into your morning coffee.
Recently, concern had been expressed over the consumption of raw eggs (which are essential to traditional egg nog’s frothy texture) because of the possibility of exposure to Salmonella bacteria. The Canadian Food Inspection Agency states that “Although Salmonella is rarely found in eggs in Canada… foods made from raw or lightly cooked eggs may be harmful to vulnerable people such as young children, the elderly, pregnant women and people with weak immune systems.” (A study conducted by the USDA in 2002 showed that only one in every 30,000 eggs in the national food system was contaminated with Salmonella bacteria). In quest of an opinion closer to home, I visited Trout Lake farmers market and talked to vendors selling local eggs. “An egg is an egg.” One farmer told me. “I’m a big believer in cooked food. But I’ve got a friend who gulps them down raw all the time, and never seems to have a problem.” “The big thing is to know your farmer” another told me, restating the mantra of the local food movement. “You want to know that the flock has no history of salmonella, and that the eggs have been properly washed and stored.” Eggshells themselves form a hermetic seal, which means they are impervious to contamination once they have been laid, unless the shell has been cracked or compromised. So when sourcing eggs for this recipe, choose ones with shells that are clean, uniform, and unbroken, that have been refrigerated as soon as possible after laying, and that are not past the best before date. (If you’ve bought undated eggs from a local farmer, use them 3-4 weeks after purchasing, and don’t be afraid to ask if he or she ever eats them raw.) If you want to be extra cautious you can always buy cartons of pasteurized egg yolks and whites from any large grocery store. I personally prefer the full-bodied taste of eggs from organic free-run hens, and believe that chickens who’ve had a chance to scratch in the dirt and get splashed with the occasional raindrop lay healthier, more nutrient-rich eggs. I also like knowing the name of the person who hands me my carton, rather than selecting one from the cold glare of a supermarket display case. Whichever source of eggs you choose, after you’ve whipped, mixed and folded a batch of this incredible egg nog into being, take a moment to send a few thoughts to the chickens that have made all of this possible. Then take a sip. Let the holidays begin!
Old Fashioned Egg Nog
Makes approx. 2 litres
I find it easiest to separate eggs by cracking the whole egg into the palm of a clean hand, and then letting the white drain out between my fingers. You can also use an egg separating tool, or pour the yolk from shell to shell until all the white has drained away. Be careful not to get any yolk in with the whites, or they will not whip as well.
If you wish to make a non-alcoholic ‘nog, substitute 1 ½ cups whole milk and 1 tsp vanilla in place of the brandy or rum.
10 Egg Yolks 3 1/2 cups white sugar 1 1/2 cups Brandy or Rum 10 egg whites 1 litre whipping cream ½ tsp fresh grated nutmeg
Put a bowl in the freezer to chill for making the whipped cream.
Whip the yolks together with the sugar using an electric mixer until they are light in colour and a consistency similar to buttercream.
Add the alcohol a little at a time, mixing all the while. Continue to mix until all the sugar has lost its granular texture.
In a clean stainless, ceramic, glass or copper bowl, whip the egg whites until they form stiff peaks. Room temperature whites whip best. Fold the egg whites into the yolk/sugar/alcohol mixture.
Whip the cream in the bowl that has cooled in the freezer until it is stiff. Gently fold it into the ‘nog along with the grated nutmeg.
Store in the freezer for a milkshake-like consistency, as the alcohol will keep the ‘nog from freezing. Or keep refrigerated. Either way, the ‘nog is better if allowed a few hours for the flavours to mingle. Stir before pouring, and grate additional nutmeg over the top of each glass before serving. Enjoy!
*Author’s note: this article originally appeared in Edible Vancouver’s Winter 2011 issue, but as the online edition is no longer available in its entirety, I though it was worth a repost. 🙂
The rainy days of fall have come at last and today even a bit of the white stuff. But thanks to our extended August weather my garden saw yet another expansion complete with an Asian pear tree, perennials, and flowering bulbs; plus I finally got the garlic planted. My focus has taken a small hiatus from planning out next year to filling my freezer with quick dinner options for the dark hibernating nights of winter.
I don’t have kids but I ended up with pumpkins and carving them didn’t happen. I also had potatoes – go figure. So, I thought I’d channel my inner nonna, combine the two and make some gnocchi. To say I followed a single recipe would be far from the truth… more like scoured through a ton of websites and drew on certain elements from each to make one. Biased opinion or not I think it turned out pretty delicious. They are in no way gluten-free or dairy-free but rich in flavour and love.
Step Uno: Roast your pumpkin – cook your potatoes
Cut your pumpkin into half, gut it and then cut it into wedges (save the seeds to roast). Place on a cookie sheet skin side down, drizzle with a bit of olive oil and season with salt & pepper. Bake at 350°F for about an hour then remove from the oven and set aside to cool. Scoop out all the flesh and keep aside 1½ cups – freeze the rest for a rainy day. While your pumpkin is cooking place 3 medium sized russet potatoes into a pot and start to boil them. There is no need to cut or take the skin off just place them in whole! This will help you achieve the perfect texture – fork tender no more no less. Remove them from the water and allow to cool completely. When they’re ready peel the skin off and either grate the potatoes or use a potato ricer to process them.
Step Two: Prepare your dough
In a large bowl add your pumpkin, prepared potato, 2 egg yolks, some fresh grated nutmeg, 1 cup of ricotta, ¼ cup grated parmesan, salt and approximately ½ cup+ of oo Italian flour. Now some of you are probably wondering; what the hell is oo flour? Basically, it’s more refined then normal flour and while it’s not necessary for this recipe I think it creates a superior, silkier dough and helps the pasta maintain chewiness once cooked. But use whatever you have on hand. I’d also like to mention that the flour amount will vary and this is where “channeling your inner nonna” comes in. As a friend recounted to me from her recent trip to Italy where she learnt to make pasta with a real live nonna, “they don’t measure – they feel; and just know when it’s enough.” Start with only ½ cup of flour and use a wooden spoon to bring all the mixture together, adding in flour as you go until the dough does not feel wet any more. Turn the dough onto a floured surface and knead until smooth.
Step 3: Make your gnocchi
Cut a slice of dough off and roll it out into a rope about ½” thick. Using a sharp knife cut your rope into 1” pieces. Keep flour on hand for this stage as well, you don’t want your gnocchi sticking to the counter. Use a fork or a gnocchi board to gently roll your pieces, creating texture on top and a small indent on the bottom to catch your sauce. Continue this formula until all the dough is used.
Step Quatro: Cook & eat!
Bring some salted water up to a boil, working in small batches to cook your gnocchi. When they float to the surface they are done… it does not take long – do not leave them unattended. At this point the rest is up to you: skies the limit. Sauce them up with whatever your heart is craving. For this round I used A LOT of butter then some sage, chili pepper, garlic and toasted hazelnuts (plus a little extra pancetta I had on hand). Like with pasta I added a bit of the water the gnocchi was cooked in to make it extra saucy.
Step 5: Freeze your extras
This recipe produces a lot of little gnocchi so I froze the extras in a single layer on cookie sheet lined with parchment (as seen in the featured image).
In my kitchen I experiment just as much, if not more, as I do in my garden. I did not nail this recipe on the first try and it’s still not nonna’s gnocchi but it’s mine. It’s really about how the more I cook, the more I learn, the more I love to do it and the more I eat! And, let’s be honest, there are way worse problems to have then a full stomach and heart.
Okay everyone, there’s something I need to get off my chest.
I. Love. Food.
I absolutely love it. I love everything about it. I love the act of eating. I love the sheer variety of foods to eat. I love the challenge of creating your own. And I especially love the joy around food.
I work at the Blackbird Bakery and one of the things I love most is when people tell us how good our food is. When their faces light up and they say things like “I haven’t had an almond croissant that good outside France,” or “That was the best muffin I’ve ever had.” Something as simple as a really tasty muffin can make someone’s day, and that makes me so happy. I love when people gather at the bakery and chat over sandwiches and turkey pies, or start their day off on a positive note with a cheesy breakfast sandwich. There is something magical about how really good food can change our whole day.
I have a friend who is a chef in Vancouver and primarily does catering for films. On a recent visit he told me how much he dislikes food, and how much he’d prefer it if there were a pill he could take instead of eating food. That made me so sad. Growing up I always had joy around food. I have so many happy memories around the making and eating of food, especially with family. I can close my eyes right now and conjure up the joy I would feel walking into my house after school and being greeted with the warm smell of freshly baked banana bread. Our family of seven had dinner together every night and I can still hear the buzzing conversation of all of us sharing our days over chicken cacciatore or my mom’s amazing chili. For me, food, family, and joy go hand in hand (in hand).
So recently when I learned we’d be having a quick visit by my partner’s parents I knew I wanted to make a special dinner. It felt like a perfect opportunity to break out the fall flavours and use up some items in my freezer and pantry. I pulled out a chicken I had gotten from a friend here in Pemberton and made Maple Rosemary Chicken from the New York Times Cooking, with a simple rice pilaf that wouldn’t overpower the flavour of the chicken, and some roasted Brussel sprouts with bacon (because why do I only make this dish at Thanksgiving? It’s amazing.). But the thing I was most excited about was something tasty for dessert, and I wanted to make something that would shine. Something I hadn’t done before, because experimenting with food is fun. Continuing with the fall flavour theme, I decided to go for Maple Pecan Monkey Bread that I adapted from another NYT recipe, paired with a simple cream cheese icing. I’m happy to share it with you here:
Maple Pecan Monkey Bread
Brioche Dough:
1 tbsp yeast
3 tbsp warm water
2 tbsp maple syrup
1 1/2 tsp salt
3 1/2 cups all purpose flour
4 eggs, room temperature
1 1/2 sticks (3/4 cup) unsalted butter, softened
Maple Brown Butter:
8 tbsp unsalted butter
1/2 cup maple syrup
1 tsp salt
1/4 cup sugar
1 tsp cinnamon
1 cup pecans, toasted
1.Mix the yeast in a small bowl with 3 tbsp warm water. Add 1/2 tbsp maple syrup. Let sit 5-10 minutes to rise.
Note: I tend to use Fleischmann’s traditional dry active yeast in my recipes, which requires a little proofing. If you are using instant yeast you can skip this first step and add the yeast directly into the flour/salt mixture, and add the warm water when you add the eggs.
2. Combine the flour and salt in the bowl of a stand mixer. Mix on low speed using the paddle attachment to blend. Add the eggs, remaining 1 1/2 tbsp maple syrup, and yeast/water mixture. Use the paddle attachment until the dough starts to come together.
Ready to rise!
3. Switch to the hook attachment and continue mixing on low. Add the softened butter in small chunks, a few pieces at a time, until fully incorporated. Continue mixing, stopping and scraping any stray pieces of butter on the sides or hook as needed, until the dough is smooth and elastic. This may take up to 10 minutes. Turn the dough into a buttered bowl and cover with a clean towel. Let rise until doubled in size, approx. 90 minutes.
4. When you’re ready to assemble, melt the butter in a small saucepan over medium heat. Cook, stirring with a wooden spoon, until the dairy solids turn golden brown and the butter smells nutty. While stirring add the maple syrup and salt. Bring to a boil while stirring, then remove from the heat. Set aside while you get your dough ready.
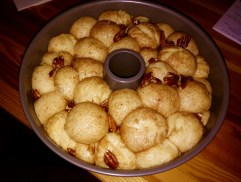
5. Mix the cinnamon and sugar in a small bowl. Butter a 10-inch Bundt or tube pan. Turn your dough onto a clean work surface and roll into a thick rope, approx. 2 inches in diameter. Cut this rope into eight even pieces, and then cut each of those pieces into eight, until you end up with 64 small dough balls.
Note: I didn’t have a Bundt pan so I used my tall tube pan that I use for angel food cake and it worked fine. You don’t need any flour for your work surface because of the amount of butter used in this dough. It should be soft and slightly greasy, but not sticky.
6. Gently roll a piece into a small ball and dip in the cinnamon sugar, rolling it around until evenly coated. You can do multiple dough balls at the same time, but avoid overcrowding to ensure they are evenly coated with the sugar. Place the sugared balls in the pan and repeat until you have a single layer. Scatter some of the toasted pecans on top. Repeat this process until all the dough balls and pecans are in the pan.
Note: Because I was using the large tube pan, I was only able to make two layers of dough balls. It doesn’t look like much, but when we do the second rise the dough balls will expand dramatically.
Ready to bake!
7. Drizzle the maple brown butter all over the tops and sides of the dough balls. Cover with a clean towel and let rise in a warm spot until puffed and the dough comes to about an inch below the top of the pan, approx. 30-45 minutes.
8. Preheat oven to 350ºF. Uncover the pan and bake until golden brown on top, approx. 35-40 minutes. Put the pan on a wire rack for 5 minutes. Place a large plate on top of the pan, grip both together, and quickly and carefully flip. The monkey bread should come away easily from the pan. Serve warm or room temperature.
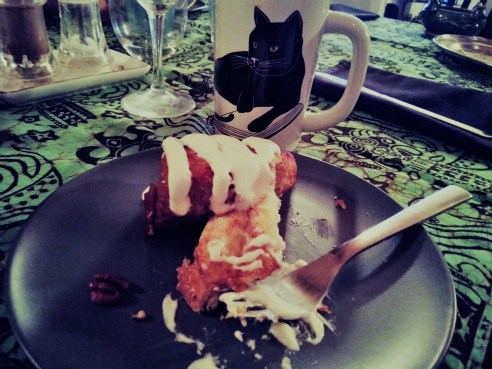
And there you have it. Maple pecan monkey bread. I was very pleased with the way this recipe turned out. The edges are crispy and sweet, and the inside is soft and fluffy. A perfect combination. You could jazz this recipe up with some caramelized apples or bananas, or chocolate, or use almonds or hazelnuts instead. This would be a great recipe to make with kids, who can help roll and dip the dough balls. You can serve this warm with just butter, or a little more maple syrup drizzled on top. I used a basic cream cheese icing, made with butter, icing sugar, cream cheese, and heavy cream. The possibilities are endless.
In fact, to my mind, I am actually late! For what, you ask. Christmas, I say. More specifically Christmas Cake, the traditional fruit, soaked in alcohol, version.
In years past I have made my cake at the end of September and then spent the next few months feeding it before marzipanning and icing it in mid-December. A rich fruit cake can be made 2 to 3 months in advance and kept in an airtight container in a cool, dark place. Feeding a cake means that once every few weeks you make holes in the cake using a skewer and then pour an amount of alcohol over it, before re-wrapping.
The recipe I always use comes from a cake decoration cook book that I purchased way back when! But the recipe works every time, albeit I always need to cook it for longer than suggested. I even used the same recipe to make my friends wedding cake!
You need a little time for this recipe as you should ideally start it the day before you want to actually make the cake mixture to allow the fruit to soak in the alcohol overnight. Once the mixture is in the tin, the surface can be covered with clingfilm and stored in a cool place overnight if cooking is not possible on the day (there are no leavening agents to worry about). However, do remember to allow for a longer cooking time as the temperature of the mixture will be colder.
I know that a lot of people don’t like fruit cake, but this recipe offers a moist cake with the delicious spices and and flavours of Christmas and is a must in my house. The instructions below are for an 8″ round or 7″ square tin, but if you want the recipe for another size tin let me know as I can provide details for a 6″ round, all the way up to a 13″ round tin!
Ingredients
325g raisins
250g sultanas
175g currants
150g glacé cherries (the bright red cocktail ones)
50g cut mixed peel (I omit this in favour of more cherries!)
50g flaked (sliced) almonds
2 tsps lemon rind
2 tbsps lemon juice
3 tbsps Brandy or Sherry
275g plain flour
2.5 tsps ground mixed spice
65g ground almonds
200g dark brown soft sugar
200g butter or margerine, softened
1.5 tbsp black treacle or molasses
4 eggs
Directions
Preheat the oven to 275F degrees and prepare the cake tin by double lining the inside of the tin with greaseproof paper, and the outside with a double thickness of brown paper. This will prevent the outside of the cake from bing overcooked.
In a large mixing bowl place the raisins, sultanas, currants, glacé cherries, mixed peel, flaked almonds, lemon rind and lemon juice together with the Brandy or Sherry. Mix all the ingredients together until well blended, then cover the bowl with clingfilm. Leave for several hours or, ideally, overnight.
Sift the flour and mixed spice into another mixing bowl. Add the ground almonds, sugar, butter (or margerine), treacle (or molasses) and eggs. Mix together with a wooden spoon, then beat for 2-3 minutes until smooth and glossy.
Gradually add the mixed fruit to the creamed mixture and fold it in, using a spatula, until all the fruit has been evenly blended. Spoon the mixture into the prepared tin and spread it evenly. Give the tin a few sharp taps to level the mixture and to remove any air pockets. Smooth the surface with the back of a metal spoon, making a slight depression in the centre.
Bake the cake in the centre of a pre-heated oven. Test the cake to see if it is cooked 30 minutes before the end of the cooking time (total 2.5 to 3 hours for a cake of this size). If it is cooked, the cake should feel firm and a fine skewer inserted into the centre should come out clean. If the cake is not cooked, re-test it at 15 minute intervals. Once cooked remove from the oven and allow it to cool in the tin.
Once cooled, turn the cake out of the tin but do not remove the lining paper as it helps to keep the moisture in. Using half the quantity of alcohol as used in the recipe, spoon over the top of the cake and then wrap it in a double thickness of foil.
Store the cake in a cool, dry place on its base with the top uppermost for a week. Unwrap the cake and spoon over another half quantity of the Brandy or Sherry. Re-wrap the cake well and store it upside down, so that the Brandy or Sherry moistens the top and helps to keep it flat. The cake will store well for up to 3 months; if it going to stored for this length of time, add the Brandy or Sherry just a little bit at a time at monthly intervals.
I have a cake decorating “bake off” with one of my friends in the UK so I will provide an update once decorated so you can see the finished result too!
You already know that fall is my favourite time of the year. It also happens to be one of the busiest times of year for me at work. So busy that sometimes it feels hard to find a full breath. A breath that I can get behind: my normal rhythm. Yet one thing that constantly replenishes my soul is when my house if full of friends and family. It’s then that my breath returns to normal – no matter what. This is why every year I muster up some energy to host Thanksgiving dinner, even if all I want to do is sit in silence.
Initially I thought I’d post some great, amazing Thanksgiving recipe the day after dinner but I could not find any words and you can’t force something that’s not there. Instead I chose to harness the good vibes from a room full of laughter, sing-a-longs, amazing food and love, to put my garden to sleep. It was the perfect remedy and the bonus? – I got to do it with my dad. However, I thought I’d share a recipe for a pie that usually graces my Thanksgiving feast but just didn’t have time to make. I mean I barely got the turkey in the oven on time and that only happened because my mom did it!
This is apple season. When your parents show up with a massive bag of said fruit from a friend’s tree on the Island and you’re eating at minimum and apple a day, or two, but barely making a dent in the stock, you make pies.
So, without further ado… here is Apple Cheddar Pie: an instant crowd pleaser and a delicious breakfast supplement.
Step Uno: make your crust.
2½ cups all purpose flour – TBSP sugar – TSP salt – 1½ cups grated white cheddar (kept cold in fridge until ready to use) – ¾ cup grated butter (frozen) – ½ cup ice-cold water (maybe a bit more)
Add the flour, salt and sugar to your mixing bowl and combine them. Then grate your butter into the bowl and add in your cheddar. Next start gently rubbing the ingredients through your hands; you’re aiming to get a “pea like” texture (you may recall me using this method in my previous pie recipe). Pour the water in and use your hands to bring the dough to together. I always end up turning it out onto my counter to finish kneading it. Separate the dough into two balls with one slightly larger then the other. Flatten them out to resemble small saucers and a place in the fridge for at least an hour.
Step Two: prepare your apples.
8-9 apples peeled, cored & cut into eighths – juice of half a lemon – cinnamon, nutmeg, ground clove – a sprinkle of cornstarch
Place your apples in a bowl, add in your preferred amount of spice, squeeze the lemon on top and sprinkle that cornstarch… then toss.
Step 3: build your pie.
Preheat your oven to 375°F. Roll out the smaller disc on a floured surface, place it in your pie dish then add your apple mixture. Before rolling out your second dough disc and topping the apples with it, dot them with a bit of butter. Seal the edges together and then cut some shapes in the top crust or keep it simple with a few little knife slits that will allow the air to escape. Brush the pie with an egg wash (I forgot but you should really do it).
Step Quatro: bake & wait.
Place the pie on a baking sheet and pop it in the oven. Let bake for a least an hour or until the crust is golden brown. Allow it to cool on a wire rake for an hour or more… I am not capable of this step. Not even a little bit.
Step Five: consumption.
Serve this bad boy with some ice cream or nothing at all.
So if you’re wondering what to do on this rainy weekend and have a bunch of apples, you should make this pie and fill your house with people to share it with.
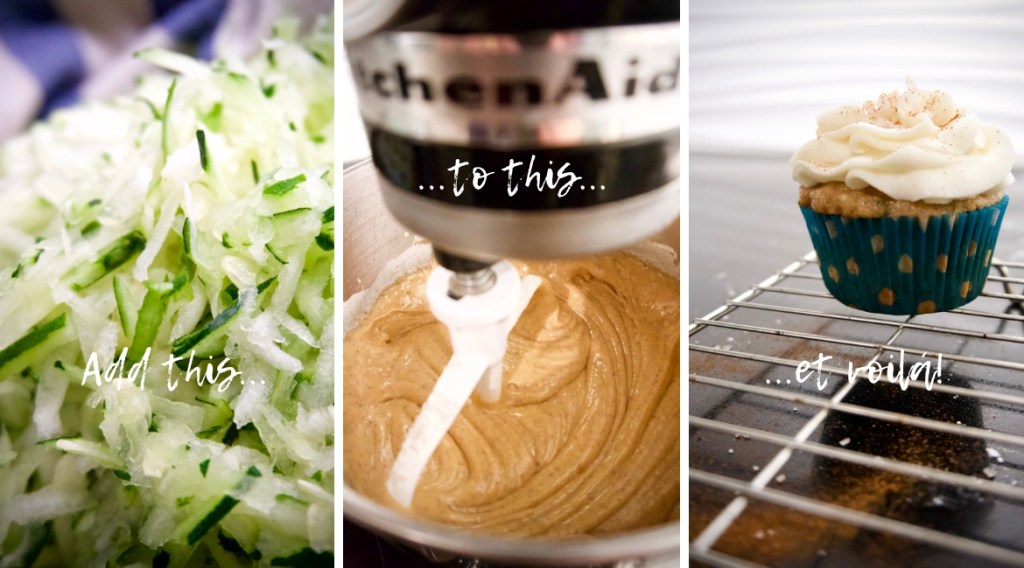
I know, I know! I’ve already written about zucchini, surely there must be some other ingredient I can use?
Yes there is, but there was still some sitting in my fridge to be used up and Thanksgiving is just round the corner. Plus, I like to make cupcakes for all the boys and girls at my work, just to let them know that they are appreciated so having had success with my other zucchini cake and bread recipes I thought I’d give one more recipe a try.
Besides, I am thankful that I had my granny to show me her love for baking and that I have people to appreciate the bakes that I try out on them.
So enjoy these zucchini cupcakes, which have delicate pumpkin spice flavours and are so soft they melt in your mouth, topped off with a wonderfully fluffy cream cheese buttercream.
I can’t think of anything better this Thanksgiving.
Cupcake Ingredients
3/4 cup finely grated zucchini (I actually used a cup!)
1 1/2 cups all-purpose flour
2 teaspoons baking powder
1/4 teaspoon salt
1 teaspoon ground cinnamon
1/4 teaspoon nutmeg
1/8 teaspoon ground cloves
1/2 cup vegetable or canola oil
2/3 cup white sugar
1/3 cup brown sugar
2 large eggs
2 teaspoons vanilla extract
1/4 cup milk
Cream Cheese Frosting Ingredients
1/2 cup unsalted butter, softened
4 oz brick-style cream cheese
3 – 4 cups powdered sugar
1 tablespoon heavy cream, if needed
Cupcake Directions
Preheat the oven to 350F degrees and line a muffin pan with muffin papers.
Gently dab the grated zucchini with a paper towel to remove excess liquid. It shouldn’t be dry, but there shouldn’t be extra water.
In a large bowl whisk together the flour, baking powder, salt, cinnamon, nutmeg and cloves.
In a separate large bowl whisk together the oil and sugars until no lumps remain. Then whisk in the eggs, vanilla extract and milk.
Whisk the dry ingredients into the wet ingredients, then gently fold in the grated zucchini using a rubber spatula or wooden spoon.
Spoon the batter into the prepared muffin tin, filling each about 2/3 full. Be careful not to fill them any more than 3/4 full.
Bake in the preheated oven for 16-19 minutes, or until an inserted toothpick comes out clean.
Allow to cool in the pan for 5-10 minutes, then continue cooling on a wire rack.
Cream Cheese Frosting Directions
In a large bowl using an electric mixer, beat the butter until soft.
Then mix in the cream cheese.
With the mixer on low, beat in 3 cups of powdered sugar until combined.
If needed, slowly beat in the rest of the powdered sugar a little at a time until the desired consistency and sweetness level is reached. If it gets a little too thick, then beat in the cream.
Frost the cupcakes with a knife or using a piping bag and piping tip.
If they last that long the cupcakes can be stored in an airtight container at room temperature for up to 3 days. Unfrosted cupcakes can be frozen and thawed in the fridge overnight.
There’s something to be said for being in the right place at the right time.
Over the consumption of tasty beverages at the Beer Farmers, my girlfriend was casually asked if she’d like to host a bunch of mountain bikers at Sky Camp (one of Tyax Adventures’ most balling backcountry locations). She was quick to mention that I could cook and would be a great addition to the hostess-with-the-mostest team and it took me about 0.01 seconds to agree to this union. As of yet I had only heard the tales of this remote location and recognized that it was an opportunity one should not shy away from.
Allow me to create a visual for you: Board a floatplane that takes you deep into the South Chilcotin range to a fully set-up cabin. This location comes complete with wood-burning sauna, canoes/kayaks/paddle boards, hot showers, the sound of loons atop a lake full of trout, adventure Crocs, old school board games, guest tents stocked with flannel sheets & duvets and nothing else but the silent sounds of the forest. Everyone in favour of glamping, raise his or her hand! Easily 90% of you just did.
A simple, delicious menu was drawn up for us and I couldn’t help but raid my garden for a few extras to tie in to the plan. My spare time has taken a hard hit lately (aka neglected garden) and there are a few species that have gotten massive due to this lack of maintenance – or someone has secretly been feeding them steroids. So, may I introduce to you the current, uncontested, and very underrated, heavy weight champion of my garden… kohlrabi.
Out came the biggest bulb, a leek, the dried coriander seeds from my bolted cilantro plants and a cured garlic bulb; all grown in my backyard and all destined to become a side-dish served with salmon. What follows is a rough outline of how I cooked it via an old school propane oven.
Pre heat oven to 375°F. While that is happening, lightly toast your coriander seeds then grind them with a mortar & pestle to desired texture.
Cut the kohlrabi into ½” cubes and place them into a medium-sized mixing bowl.
Add in some sliced leeks, minced garlic, the ground coriander, salt & pepper to taste and then drizzle with olive oil; tossing to combine.
Pour the mixture into a cast iron pan and place in the oven for 30-45 minutes. Make sure to take the kohlrabi out of the oven and stir it around every so often to avoid burning.
The key ingredient for making this dish tremendous, aside from the fact it was grown with love, is the company it was shared with. For some it was their introduction to kohlrabi and that alone makes it a success.
Sky camp is a magical place: you arrive unplugged and leave fully charged.
I recently bumped into a friend who has a veggie patch and she asked if I had any recipes for zucchinis as she had lots growing. She also wanted to know what it was with Pemberton that zucchinis grew so well!
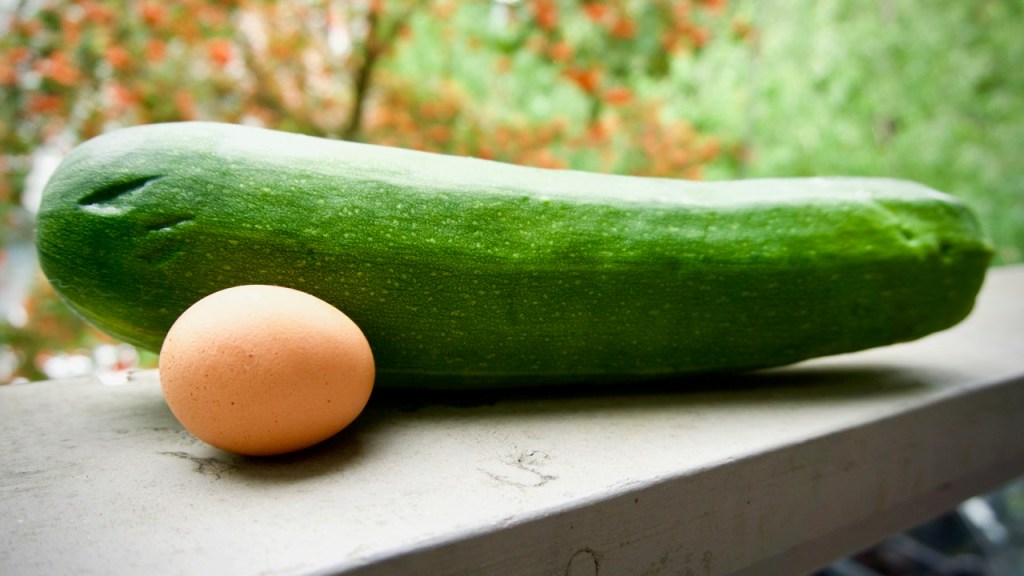
I wasn’t quite sure what she meant until another friend gifted me the mother of all zucchinis! I mean, this one was about as large as the marrows my grandad used to grow! (Egg for scale.)
Being curious I did a Google search on zucchinis, which are a summer squash and are a cultivar of the marrow I remember from my childhood. It appears that they can actually reach almost 1 metre (100 cm; 39 in) in length, but are usually harvested when still immature at about 15 to 25 cm (6 to 10 in). They are also very productive plants and just one or two plants will produce enough for a small family. You can also harvest the large yellow squash blossoms and eat them raw or cooked. Only female blossoms produce fruit, so you can harvest most of the male flowers without slowing down the plant’s productivity. Who knew?
With a zucchini this large I didn’t know what I was going to do with it. I could make a quiche, galettes or even gnocchi. But no, with temperatures much cooler, and with my propensity towards baking, I decided to try both a savoury and a sweet bread.
The trick to cooking or baking with the grated zucchini is to squeeze some of the moisture out before adding to your recipe. Just use a clean tea towel, place the zucchini in the centre, twist and watch the excess water drip out.
Whether you prefer savoury or sweet I hope one of the following recipes helps you out with your glut of zucchinis, but if you still have too many then I have a couple more bread recipes that I’d like to try!
First up is a Zucchini Cheddar Quick Bread made with buttermilk (or a home-made version as in the recipe) and which smelled as delicious cooking in the oven as it tasted not long out of it. Cheesy mouthwatering goodness!
Ingredients
1 1/2 cups zucchini, grated
2cupsall purpose white flour
2teaspoonsbaking powder
1/2teaspoonsbaking soda
1/2teaspoonsalt
1cupmilk plus 1tablespoonvinegar, white or apple cider to make home-made buttermilk or use 1 cup buttermilk
1egg
3tablespoonsbutter, melted
1 1/2cupsgrated sharp cheddar
2green onions, chopped
Directions
Preheat oven to 350 degrees and spray a 9 x 5 bread pan with non stick spray. (I would also add a layer of parchment paper to the bottom of the pan to ensure that the bread does not stick.)
Wrap grated zucchini in a paper towel, or clean tea towel, and squeeze until some of the liquid releases. (You don’t need to completely dry it out.)
In a large bowl, combine flour, baking powder, baking soda and salt.
If making home-made buttermilk, combine milk and vinegar in a small bowl. (The milk will curdle a bit). If not making then use 1 cup traditional buttermilk. Mix in melted butter and egg.
Add milk mixture to dry mixture being careful not to over mix to avoid the bread turning out flat.
Add grated zucchini, cheese and onions, mixing lightly until just combined.
Pour batter into prepared pan and bake at 350 degrees for one hour.
If toothpick inserted comes out clean, bread is done! Cool for 10 minutes in the pan. Remove carefully and cool on wire rack.
After your savoury zucchini bread what do you need? Orange Zucchini Bread with Orange Glaze of course! The orange provided a nice zing and the glaze was a touch of sweetness against the bread itself. My orange was very juicy and I could have done with a bit more icing sugar to thicken it up. I’ll know for next time. 😉
Ingredients
For the bread:
3largeeggs
2cupssugar
1cupvegetable or canola oil
1tspvanilla
zest and juice of 1 large orange
3cupsall-purpose flour
1tspsalt
1tspcardamom (optional)
1/4tspbaking soda
2cupsgrated zucchini
For the glaze:
zest and juice of 1 large orange
3tbsp.buttermelted
1tsp.vanilla
3cupspowdered sugar
Directions
For the bread:
In a large bowl, whisk together eggs, sugar, oil, vanilla, and orange zest and juice.
In another large bowl, whisk together flour, salt, cardamom (if using), and baking soda.
Add the wet ingredients to the dry ingredients, along with the zucchini, and stir until just combined. Do not overmix.
If you’d like to add any nuts, fold in about 1 cup chopped nuts.
Line a 9×5-inch loaf pan with foil or parchment paper, letting the edges hang over the pan. This is a MUST as the bread will to stick to the pan. Coat with non-stick spray.
Spread batter into prepared pan.
Bake at 325 degrees for 60-70 minutes, or until top and edges are golden and a toothpick inserted near the centre comes out clean.
Remove to a wire rack to cool for 10 minutes.
Run a knife along any edges that may have seeped and stuck to the pan.
Remove bread from the pan completely using the foil or parchment paper edges. Cool completely.
Meanwhile, prepare glaze.
For glaze:
In a medium bowl, whisk together all the glaze ingredients until smooth.
Depending on how juicy your orange was, you may need to add a little water or more powdered sugar! You should be able to drizzle or pour it, but it shouldn’t easily run off the bread.


 you’ve bought undated eggs from a local farmer, use them 3-4 weeks after purchasing, and don’t be afraid to ask if he or she ever eats them raw.) If you want to be extra cautious you can always buy cartons of pasteurized egg yolks and whites from any large grocery store. I personally prefer the full-bodied taste of eggs from organic free-run hens, and believe that chickens who’ve had a chance to scratch in


 Besides, I am thankful that I had my granny to show me her love for baking and that I have people to appreciate the bakes that I try out on them.


 Ingredients
