Tag: joy

  • Monkeying Around With Dessert

    Monkeying Around With Dessert

    Okay everyone, there’s something I need to get off my chest.

    I. Love. Food.

    I absolutely love it. I love everything about it. I love the act of eating. I love the sheer variety of foods to eat. I love the challenge of creating your own. And I especially love the joy around food.

    I work at the Blackbird Bakery and one of the things I love most is when people tell us how good our food is. When their faces light up and they say things like “I haven’t had an almond croissant that good outside France,” or “That was the best muffin I’ve ever had.” Something as simple as a really tasty muffin can make someone’s day, and that makes me so happy. I love when people gather at the bakery and chat over sandwiches and turkey pies, or start their day off on a positive note with a cheesy breakfast sandwich. There is something magical about how really good food can change our whole day.

    I have a friend who is a chef in Vancouver and primarily does catering for films. On a recent visit he told me how much he dislikes food, and how much he’d prefer it if there were a pill he could take instead of eating food. That made me so sad. Growing up I always had joy around food. I have so many happy memories around the making and eating of food, especially with family. I can close my eyes right now and conjure up the joy I would feel walking into my house after school and being greeted with the warm smell of freshly baked banana bread. Our family of seven had dinner together every night and I can still hear the buzzing conversation of all of us sharing our days over chicken cacciatore or my mom’s amazing chili. For me, food, family, and joy go hand in hand (in hand).

    So recently when I learned we’d be having a quick visit by my partner’s parents I knew I wanted to make a special dinner. It felt like a perfect opportunity to break out the fall flavours and use up some items in my freezer and pantry. I pulled out a chicken I had gotten from a friend here in Pemberton and made Maple Rosemary Chicken from the New York Times Cooking, with a simple rice pilaf that wouldn’t overpower the flavour of the chicken, and some roasted Brussel sprouts with bacon (because why do I only make this dish at Thanksgiving? It’s amazing.). But the thing I was most excited about was something tasty for dessert, and I wanted to make something that would shine. Something I hadn’t done before, because experimenting with food is fun. Continuing with the fall flavour theme, I decided to go for Maple Pecan Monkey Bread that I adapted from another NYT recipe, paired with a simple cream cheese icing. I’m happy to share it with you here:

    Maple Pecan Monkey Bread

    Brioche Dough:
    1 tbsp yeast
    3 tbsp warm water
    2 tbsp maple syrup
    1 1/2 tsp salt
    3 1/2 cups all purpose flour
    4 eggs, room temperature
    1 1/2 sticks (3/4 cup) unsalted butter, softened

    Maple Brown Butter:
    8 tbsp unsalted butter
    1/2 cup maple syrup
    1 tsp salt

    1/4 cup sugar
    1 tsp cinnamon
    1 cup pecans, toasted

    1.Mix the yeast in a small bowl with 3 tbsp warm water. Add 1/2 tbsp maple syrup. Let sit 5-10 minutes to rise.

    Note: I tend to use Fleischmann’s traditional dry active yeast in my recipes, which requires a little proofing. If you are using instant yeast you can skip this first step and add the yeast directly into the flour/salt mixture, and add the warm water when you add the eggs.

    2. Combine the flour and salt in the bowl of a stand mixer. Mix on low speed using the paddle attachment to blend. Add the eggs, remaining 1 1/2 tbsp maple syrup, and yeast/water mixture. Use the paddle attachment until the dough starts to come together.

    20181027_131618
    Ready to rise!

    3. Switch to the hook attachment and continue mixing on low. Add the softened butter in small chunks, a few pieces at a time, until fully incorporated. Continue mixing, stopping and scraping any stray pieces of butter on the sides or hook as needed, until the dough is smooth and elastic. This may take up to 10 minutes. Turn the dough into a buttered bowl and cover with a clean towel. Let rise until doubled in size, approx. 90 minutes.


    4. When you’re ready to assemble, melt the butter in a small saucepan over medium heat. Cook, stirring with a wooden spoon, until the dairy solids turn golden brown and the butter smells nutty. While stirring add the maple syrup and salt. Bring to a boil while stirring, then remove from the heat. Set aside while you get your dough ready.

    5. Mix the cinnamon and sugar in a small bowl. Butter a 10-inch Bundt or tube pan. Turn your dough onto a clean work surface and roll into a thick rope, approx. 2 inches in diameter. Cut this rope into eight even pieces, and then cut each of those pieces into eight, until you end up with 64 small dough balls.

    Note: I didn’t have a Bundt pan so I used my tall tube pan that I use for angel food cake and it worked fine. You don’t need any flour for your work surface because of the amount of butter used in this dough. It should be soft and slightly greasy, but not sticky.

    6. Gently roll a piece into a small ball and dip in the cinnamon sugar, rolling it around until evenly coated. You can do multiple dough balls at the same time, but avoid overcrowding to ensure they are evenly coated with the sugar. Place the sugared balls in the pan and repeat until you have a single layer. Scatter some of the toasted pecans on top. Repeat this process until all the dough balls and pecans are in the pan.

    Note: Because I was using the large tube pan, I was only able to make two layers of dough balls. It doesn’t look like much, but when we do the second rise the dough balls will expand dramatically.

    20181027_162003
    Ready to bake!

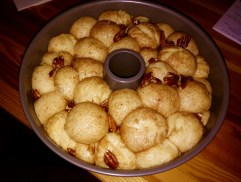
    7. Drizzle the maple brown butter all over the tops and sides of the dough balls. Cover with a clean towel and let rise in a warm spot until puffed and the dough comes to about an inch below the top of the pan, approx. 30-45 minutes.

    8. Preheat oven to 350ºF. Uncover the pan and bake until golden brown on top, approx. 35-40 minutes. Put the pan on a wire rack for 5 minutes. Place a large plate on top of the pan, grip both together, and quickly and carefully flip. The monkey bread should come away easily from the pan. Serve warm or room temperature.

    20181027_171707

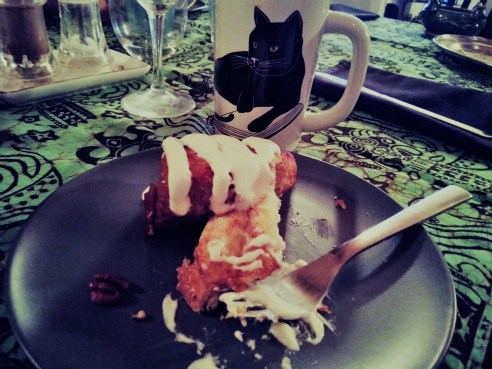
    And there you have it. Maple pecan monkey bread. I was very pleased with the way this recipe turned out. The edges are crispy and sweet, and the inside is soft and fluffy. A perfect combination. You could jazz this recipe up with some caramelized apples or bananas, or chocolate, or use almonds or hazelnuts instead.  This would be a great recipe to make with kids, who can help roll and dip the dough balls. You can serve this warm with just butter, or a little more maple syrup drizzled on top. I used a basic cream cheese icing, made with butter, icing sugar, cream cheese, and heavy cream. The possibilities are endless.

    20181027_213516

    Happy cooking everyone, and enjoy the joy!


  • Wildflower Gummies!

    Wildflower Gummies!


    20180509_1701241
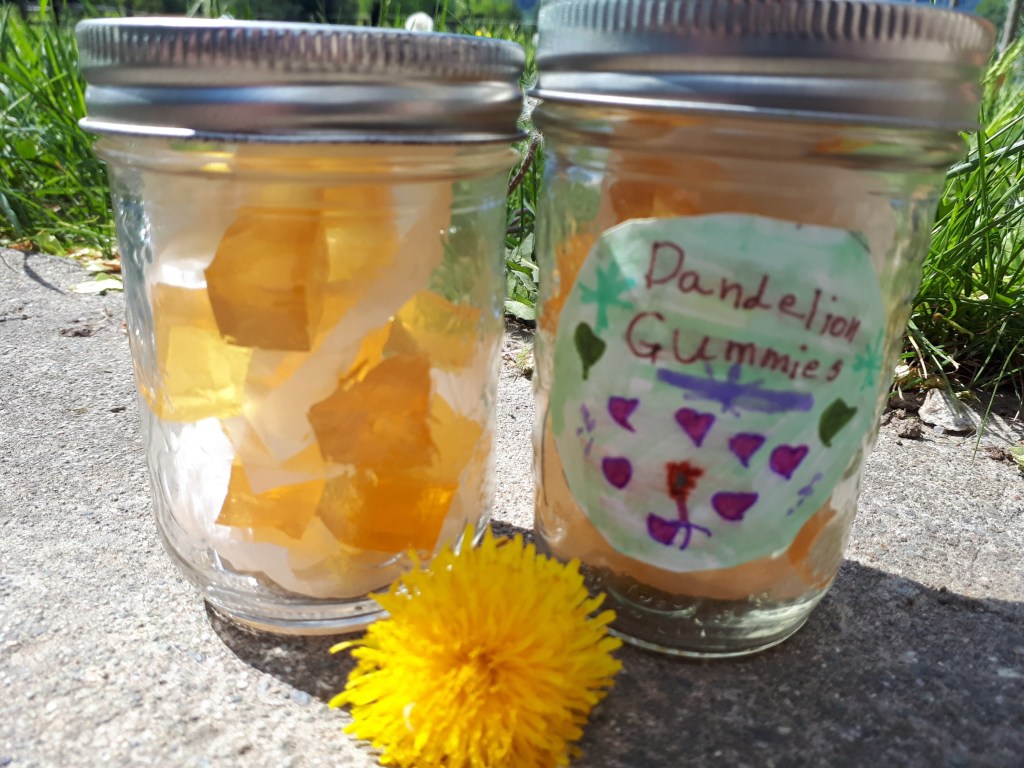
On May 11, I hosted a camp where we were supposed to make dandelion jelly. I had all these beautiful ideas in my head about the kids picking a huge bowl of blossoms out in the back field with the bees and other pollinators, their, fingers becoming stained yellow with pollen… how romantic. Of course, this is not how it happened in real life.

    “Jelly, what’s that?” one of the girls asked.

    “Well, it’s like jam, except there are no chunks in it, and we can make it from flowers!”

    “THAT SOUNDS GROSS!!” They replied in chorus. “EWWWW! WE ARE NOT MAKING THAT!! DISGUSTING!!”

    Well, that stumped me. For a moment.

    “Wait… we could make dandelion GUMMIES. Would that be better?”

    “YES!!” It was unanimous. GUMMIES were obviously WAY better than jelly.

    While we were waiting for our gummies to set in the freezer, we went outside and picked dandelions in the front yard. I showed the girls something my dad taught me when I was a little kid: that if you pick the largest dandelion stem you can find and take off its flower, it makes a noise like a kazoo! It takes a bit of patience to find the right stem, and sometimes you have to break it shorter and shorter before it will start to make  noise. It’s some kind of magic that happens when the dandelion milk in the bottom of the stem starts to vibrate, so it helps to have a juicy one! Two of the girls got bored and wandered away to play tag with Vinnie the sheep. But Avery was very excited about playing dandelions. “This is the best day of my life!” she exclaimed. “Now I can annoy everyone FOREVER!”


    20180511_142337
    Our gummies after being cut into bite sized morsels!

    As we cut up, divided up and packaged our very own homemade dandelion gummies, I realized this gummie making is an incredible way to get even the most squeamish of kids interested in the world that is growing all around them. If seasonal edible flower gummies can lead them to being able to identify a few species growing in their own back yard, then they learn to have a relationship with that particular plant, and that relationship can be a gateway to curiosity. In what other ways that plant can be used? What kind of environment does it like to grow in? Knowing a single plant intimately is enough to make the natural world come alive. I bet that even from reading this post you will notice dandelions more. Your awareness of them will become sharper, more open. And this kind of curiosity- this relatedness- is precious. It leads to a sense of belonging to the maze of green abundant life that exists outside our windows, the same way that knowing a friend in a crowd makes being amongst that many strangers less overwhelming. So if all we need is a few cups of cane sugar to kindle this relationship, then so be it!

    20180511_1432542
    Posing with our finished product!

    And don’t worry, I am going to give you recipes. I am also going to acknowledge I am leading you on a little, as dandelion season is almost completely over in Pemby. Don’t worry, you can use any edible fragrant flower to make your gummies. That means, lilacs = yes. Peonies = yes. And those wild roses that are just starting to bloom? Yes, you can use those too!!

    First, you need to make a flower syrup. I make mine in big batches, as I like to be able to keep some to make into summer drinks (a few tbsp and a bit of mineral water over ice on a hot day = heavenly). Please note that the syrup recipe is not intended to be canned, as the proportions are not tested for safety. So please keep your syrups in the fridge! I am confident you will use them up before they have a chance to go bad. This recipe makes about 6c of syrup, which is quite a lot. You can always halve or quarter the amounts if you want to make a smaller batch.

    Wildflower Syrup:20180509_165901

    2c flower petals

    4c cane sugar

    5c water

    1 organic lemon, sliced

    1. Prepare your flowers. It is best to harvest them in full sun at the height of the day. (From noon to 3 pm.) That way the flowers will retain the most potency and fragrance. Whichever kind of flower you are using, do your best to use only the petals. (In the case of dandelions, this means removing the green base of the flower.) Use flowers as close as you can to the time of harvest, as they will lose potency as soon as they are picked.
    2. Bring the water to a boil and add the cane sugar and stir until dissolved.
    3. Add flower petals and sliced lemon and cover your pot or bowl with a tea towel or cheesecloth to keep out flies, and leave out at room temperature to infuse for 2-4 days, stirring once per day. You want to optimize the length of your infusion without your syrup starting to ferment. If you see lots of bubbles or you are happy with the flavour, it’s time to move onto step 4…
    4. Strain and bottle your syrup. Enjoy!


    Wildflower Gummies 20180511_1440321

    1c flower syrup

    3pkj (3tbsp) gelatin*

    1. Find a mould for your gummies. I used the bottom of a tupperware container and cut them into squares, but you could get super creative here. You don’t need parchment or non stick spray or anything.
    2. Heat your flower syrup until just before boiling. Separate 1/4 -1/2 c of syrup and shake or whisk the Gelatin into it. (I used a small Mason jar and shook it to combine the gelatin, then strained out the residual lumps using a tea strainer as I feel you get less foam this way.)
    3. Add the gelatin mix to the rest of your syrup, stir well to combine, then pour it into your mould. If foam has accumulated on top of your gummy, skim it off with a spoon.
    4. Let your gummies set. I put mine in the freezer, but if you are not in such a rush you can just leave them out.
    5. To get your gummy out of the mould, dip your mould into warm water for a few minutes (being careful not to get water on your gummy). Then run a knife around the edge of your mould and you should be able to pull it right out. Don’t be afraid to use your fingers to pull it out of the mould- you won’t wreck it.
    6. Now you can cut your gummy into shapes with a sharp knife or cookie cutter. You could also roll them in sugar and leave them out for a few days is you want a chewier texture. I was happy with mine as they were as I found them already quite sweet. If you don’t go the additional sugar method, I would keep your gummies in the fridge as they do have quite a bit of moisture in them and will mould if they are not devoured within the first few days. Enjoy!

    *I used Knox Gelatin which comes pre-portioned in little paper packages, but I saw Stay Wild has boxed gelatin that is also gluten free!

  • Food and Feelings: Caesar Trail

    Food and Feelings: Caesar Trail

    There’s a scene from the movie Now and Then where all of the girls are joyfully riding their bikes around their town. Often when I’m riding my bike with my friends, around Pemberton, I pretend I’m in that movie. Perhaps it’s because what I’m doing is a simple yet heart-fulfilling activity? Perhaps when I’m on my bike it feels like all of life’s complications melt away? Perhaps I just really love that movie and wish I was in it?
    I’m not sure what it is but I love being on my bike and riding the “mellow” trails and routes around town.
    Being from Winnipeg, where the biggest hill I had growing up was a bridge, inclines and declines can be intimidating to me. So, I’ve established that there are certain trails in town that I’m comfortable with.
    One of those trails is called “Caesar Trail.”
    IMG_0821
    Upon moving to Pemberton in 2012 I was introduced to the activity of riding my bike along the dike to the golf course zone. It’s quite magical and beautiful to ride my bike on the dike and to be able to choose where to go next once the dike ends. I found myself more often than not riding that trail and ending up at one of the golf courses for a Caesar.
    Yum….Caesars.
    IMG_0826
    The fact that the route/trail didn’t have that exciting of a name, in my opinion, I started to call it the “Cesar Trail.” Maybe this is a name that will catch on? Maybe this is the name that only me and my friends will use?
    All that matters is that at the end of the beautiful and chill adventure is a Caesar.
    It’s my favorite trail to ride in the whole Sea to Sky Corridor and I recommend you try it out (especially if the sun is shining).
    IMG_0747 2
    IMG_0746IMG_0744
    Cheers to Tara and Kalmia for being my partners-in-caesar and to Shayne for taking pictures of us! 
  • The Joy of Hummingbirds

    The Joy of Hummingbirds

    The first time I saw a hummingbird was in Sooke, on Vancouver Island, while visiting my boyfriend’s parents. They had several feeders around their property, and the first time one of these minuscule, zippy birds approached, I was completely rapt. I’ve found them fascinating ever since, but we lived in Vancouver, where no hummingbirds dared venture.

    When Nathan and I moved to Pemberton four years ago, his mother Lisa gave us a hummingbird feeder as a housewarming gift. It was December at the time, and I couldn’t wait for spring to arrive to set up our feeder.

    hummingbirdAnd now every year, as much as I look forward to spring for the fresh green scent of new growth and the return of warmer weather, what I really look forward to is the return of the hummingbirds. I get immense joy from putting out fresh, homemade nectar for these precious visitors, and take special care to ensure my feeder is always stocked. (I haven’t planted my garden yet, but I’ve already refilled my feeder twice.)

    Part of my joy comes from being able to watch these fascinating birds closely, as the feeder is located right by our living room window. But a good portion of this joy is from the feeling that I’m helping these tiny creatures by providing them with food. Especially at this time of year, when the flowers are still just returning and nectar is low, and they are vying for the attentions of potential mates. (It must take a lot of energy to execute those dive-bombing shows the males use to impress the ladies.) Since moving here, I’ve learned there’s plenty of wildlife you shouldn’t feed, but thankfully the hummingbirds aren’t one. It gives me joy to feed these birds, while they in turn feed my joy.

    Hummingbirds can be seen as a symbol of lightness, for the incredibly light way they move about their world. They can help remind us to try to use similar lightness in the way we move through our world. To leave gentle footprints on the Earth, to care for one another, and to treat everyone with gratitude and respect. So here’s to spring, here’s to joy, and here’s to the hummingbirds.