Lately I’m having a hard time drawing the line between what should get more attention: my new Le Creuset Dutch oven or planning out my garden for next year. What to cook vs what to plant. Either way both schools of thought provide me with a constant mind game and humor my co-workers. Not to mention, a day wandering through the Van Duesen Gardens, tackling Julia Child’s ‘Beef Bourguignon’, absorbing the concepts I’ve been studying in an ‘Intro to Landscape Design’ course and an evening with Stevie (MF’in) Nicks – basically, my mind has been on overload.
Stimulation: it’s a blessing and a curse.
The Internet was slow as molasses for Cyber Monday sales as people consumed their lives away. It’s also made my normal routine of scouring through sites for new recipes to cook during the week near impossible. So, I decided to kick it old school and take to my graph paper, apply some new design techniques and start planning out my garden. Nothing like thinking in colour on a grey day: Julia Child inspirations can wait… lasagna is on the menu tonight and that recipe is engraved in my mind.
The process for me starts by making a list of what I loved and what did well, knowing full well that next year might bring completely different growing conditions. But I don’t dwell on that. Just like I’m not dwelling on the fact that last year we were shredding deep snow at this time and this year it’s warm and wet with the lowest base we’ve seen in years. Gross – but c’est la vie.
The second list I make is what’s sucked or I just don’t want to grow anymore. This is largely based on the fact that I can get it from someone local like Laughing Crow Organics or Helmer’s or without sacrificing my own garden space. Supporting our local farmers is equally as important in the grand equation and should not be left out!
The third list is the experimental list AKA: my favourite.
The other lists include; herbs, flowers and things that grow on the deck. This list will change and grow which is part of the glory of working in pencil.
Second step of the layout plan is to draft your garden space on paper, preferably graph (enter a hint of obsession here), to somewhat of an exact scale in 2D form and trace the outline with permanent marker. Then the fun begins – what grew where and where do they go next: the power of rotation.
Be sure to sharpen your HB2 pencil and prepare your eraser for this stage. Start plopping your veggies, flowers and herbs in as you see fit. Ideas will come and go as fast as you think them and are on to the next. And to be completely honest, by the time you go to plant they’ve probably changed but hey, remember, it’s just as much fun to colour outside of the lines as within.
Third step… sit and wait. It’s winter – the ground is frozen, you can’t plant shit but somehow your kale still seems to grow; roll with it. Pour yourself a tasty beverage, dream up new ideas, play around with your design, your ideas and aspirations. No thought is too small or unachievable. Remember, I started my current garden with nothing but a “green house”.
To obsess over what you want to grow and eat is a healthy, sustainable step in the right direction – you just have to be willing to try.
I live in a barn. Between the barn and my little house is a mud room. It’s a liminal place: half barn, half house. These days, it’s where I keep all my tack, tools, and wild/crafting materials for the camps that I run. The counter is generally littered with things that need to be put away. Like that unidentified bracket fungi that smells like apricots… and the bags of sand and gravel from October’s Fairy Gardens.
Because I keep it at about ten degrees all winter (to keep the various stored items happy and the pipes from freezing) the mud room is also where I throw all the veggies I pull out of the garden and procrastinate about dealing with. One morning a few weeks (when I had to remove 6 large pumpkins from the top of the washing machine so I could do a load of laundry) I realized things were out of hand. The pumpkins were still too intimidating. I couldn’t quite look them in the eye. Plus they were in great shape so there was no need to rush processing them. The cabbages on the other hand… and the bowl filled with unwashed root veggies… oh dear. Definitely starting to go. I cut away the rotting bits from the cabbages, washed the salvageable carrots and beets, and then did the only responsible thing: I made Kraut.
Sauerkraut is the best way to make a large volume of cabbage store in as small a space as possible. The lactic acid fermentation process loads it with helpful wild gut bacteria, boosts its nutritional value, and enables us to store it for a long time. It also makes a boring vegetable delicious. ‘Kraut- while traditionally just cabbage, salt and water- is also flexible and can accommodate the addition of a wide variety of veggies and flavours. For mine, I used the 3 small heads of cabbage, two handfuls of carrots and beets, kale stalks and leaves from Four Beat Farm, and two wild apples that I picked on the way home from Clinton last summer. For flavour, I added a small thumb of ginger, a handful of dried Saskatoon Berries, and five Juniper Berries.
Kraut-to-be: here you can see the texture and flavourings before salt is added
Directions:
First, shred or chop your cabbage. If you are going to play with adding other veggies, make sure you keep about 75% cabbage to make sure achieve a good lactic acid ferment. You add use almost anything you can think of to flavour your ‘Kraut. Caraway seeds. Black peppercorns. Seaweed. Dried fruit. Spruce tips. Citrus zest.
Add salt, and mix/rub it well into the veggies with your hands. You want to macerate your cabbage, as you want the salt to break down the cell walls and begin to release water. How much salt should you add? Well… more than you think you should. The salt acts as a preservative, and will help your ‘Kraut keep its texture so it doesn’t ferment down into a goopy mess. Taste your cabbage/veggie mix. It should taste quite salty. As you rub them, the veggies should start to shine a little bit, as well as moisten and soften.
Pack your crock! I use a small pottery crock I found at a thrift store. You can also pack your ‘Kraut into a large mouth Mason Jar. You can use utensils for this, but I prefer to use my fist. It’s fun to punch your food, and you can put more pressure on the ‘Kraut. You want to REALLY mash it down so that all the air pockets are squished out and it starts to release water. Add more handfuls of cabbage/veggies, and press down. Continue in this way until all your Kraut-to-be is in the crock. You should have enough water that’s been released at this point that it covers the top of the ‘Kraut when you apply pressure.
Because you can’t stand there squishing it forever, you need to add weight to the top off your ‘Kraut. The ‘Kraut needs to stay submerged in its own juices so that it doesn’t mould as it ferments. (Fermentation=good, mould=bad.) I use a large class coaster that’s a little smaller than the diameter of my crock, topped with a Mason Jar. You can also use rocks as weights, provided they’re clean! Then you can cover the top of your crock with cheesecloth or a dishtowel to keep out dust and mould spores but still let it breathe, which is essential for the Lactic Acid fermentation process. If you don’t have enough juice that’s been released from the veggies to keep your ‘Kraut submerged, you can top it up with a little water or brine.
The crock and (and accompanying Mason Jar of water that acts as a weight to keep the Kraut submerged)
Wait and taste! How long it takes your ‘Kraut to be done depends on how warm your environment is, and how tangy you like your ‘Kraut. The usual window is one to four weeks. The longer you let the fermentation go, the stronger the flavour will be, and the more beneficial bacteria you will cultivate. However, the longer you wait the softer your veggies become. If you keep tasting the ‘Kraut as it progresses, then you will be able to stop the fermentation it when it reaches your favourite balance of flavour and texture.
When you’re smitten with your ‘Kraut, take it out of the crock and compost any bits with surface mould. (Sometimes a little ‘Kraut will stick to the sides of the crock and turn white and fuzzy, but the rest of the batch that is still submerged will be fine). I pack mine into clean half pint jars and keep them in the fridge. This stops the fermentation process, but does not kill any of the lactic acid and other goodness.
Enjoy! Yum. Cleaning up and making more space was never so delicious…
Okay everyone, there’s something I need to get off my chest.
I. Love. Food.
I absolutely love it. I love everything about it. I love the act of eating. I love the sheer variety of foods to eat. I love the challenge of creating your own. And I especially love the joy around food.
I work at the Blackbird Bakery and one of the things I love most is when people tell us how good our food is. When their faces light up and they say things like “I haven’t had an almond croissant that good outside France,” or “That was the best muffin I’ve ever had.” Something as simple as a really tasty muffin can make someone’s day, and that makes me so happy. I love when people gather at the bakery and chat over sandwiches and turkey pies, or start their day off on a positive note with a cheesy breakfast sandwich. There is something magical about how really good food can change our whole day.
I have a friend who is a chef in Vancouver and primarily does catering for films. On a recent visit he told me how much he dislikes food, and how much he’d prefer it if there were a pill he could take instead of eating food. That made me so sad. Growing up I always had joy around food. I have so many happy memories around the making and eating of food, especially with family. I can close my eyes right now and conjure up the joy I would feel walking into my house after school and being greeted with the warm smell of freshly baked banana bread. Our family of seven had dinner together every night and I can still hear the buzzing conversation of all of us sharing our days over chicken cacciatore or my mom’s amazing chili. For me, food, family, and joy go hand in hand (in hand).
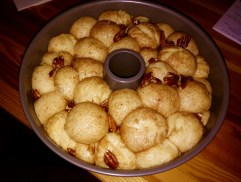
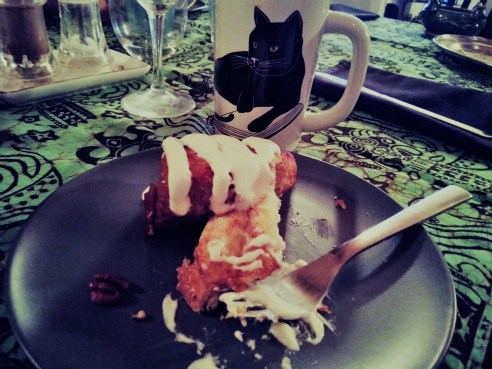
So recently when I learned we’d be having a quick visit by my partner’s parents I knew I wanted to make a special dinner. It felt like a perfect opportunity to break out the fall flavours and use up some items in my freezer and pantry. I pulled out a chicken I had gotten from a friend here in Pemberton and made Maple Rosemary Chicken from the New York Times Cooking, with a simple rice pilaf that wouldn’t overpower the flavour of the chicken, and some roasted Brussel sprouts with bacon (because why do I only make this dish at Thanksgiving? It’s amazing.). But the thing I was most excited about was something tasty for dessert, and I wanted to make something that would shine. Something I hadn’t done before, because experimenting with food is fun. Continuing with the fall flavour theme, I decided to go for Maple Pecan Monkey Bread that I adapted from another NYT recipe, paired with a simple cream cheese icing. I’m happy to share it with you here:
Maple Pecan Monkey Bread
Brioche Dough:
1 tbsp yeast
3 tbsp warm water
2 tbsp maple syrup
1 1/2 tsp salt
3 1/2 cups all purpose flour
4 eggs, room temperature
1 1/2 sticks (3/4 cup) unsalted butter, softened
Maple Brown Butter:
8 tbsp unsalted butter
1/2 cup maple syrup
1 tsp salt
1/4 cup sugar
1 tsp cinnamon
1 cup pecans, toasted
1.Mix the yeast in a small bowl with 3 tbsp warm water. Add 1/2 tbsp maple syrup. Let sit 5-10 minutes to rise.
Note: I tend to use Fleischmann’s traditional dry active yeast in my recipes, which requires a little proofing. If you are using instant yeast you can skip this first step and add the yeast directly into the flour/salt mixture, and add the warm water when you add the eggs.
2. Combine the flour and salt in the bowl of a stand mixer. Mix on low speed using the paddle attachment to blend. Add the eggs, remaining 1 1/2 tbsp maple syrup, and yeast/water mixture. Use the paddle attachment until the dough starts to come together.
Ready to rise!
3. Switch to the hook attachment and continue mixing on low. Add the softened butter in small chunks, a few pieces at a time, until fully incorporated. Continue mixing, stopping and scraping any stray pieces of butter on the sides or hook as needed, until the dough is smooth and elastic. This may take up to 10 minutes. Turn the dough into a buttered bowl and cover with a clean towel. Let rise until doubled in size, approx. 90 minutes.
4. When you’re ready to assemble, melt the butter in a small saucepan over medium heat. Cook, stirring with a wooden spoon, until the dairy solids turn golden brown and the butter smells nutty. While stirring add the maple syrup and salt. Bring to a boil while stirring, then remove from the heat. Set aside while you get your dough ready.
5. Mix the cinnamon and sugar in a small bowl. Butter a 10-inch Bundt or tube pan. Turn your dough onto a clean work surface and roll into a thick rope, approx. 2 inches in diameter. Cut this rope into eight even pieces, and then cut each of those pieces into eight, until you end up with 64 small dough balls.
Note: I didn’t have a Bundt pan so I used my tall tube pan that I use for angel food cake and it worked fine. You don’t need any flour for your work surface because of the amount of butter used in this dough. It should be soft and slightly greasy, but not sticky.
6. Gently roll a piece into a small ball and dip in the cinnamon sugar, rolling it around until evenly coated. You can do multiple dough balls at the same time, but avoid overcrowding to ensure they are evenly coated with the sugar. Place the sugared balls in the pan and repeat until you have a single layer. Scatter some of the toasted pecans on top. Repeat this process until all the dough balls and pecans are in the pan.
Note: Because I was using the large tube pan, I was only able to make two layers of dough balls. It doesn’t look like much, but when we do the second rise the dough balls will expand dramatically.
Ready to bake!
7. Drizzle the maple brown butter all over the tops and sides of the dough balls. Cover with a clean towel and let rise in a warm spot until puffed and the dough comes to about an inch below the top of the pan, approx. 30-45 minutes.
8. Preheat oven to 350ºF. Uncover the pan and bake until golden brown on top, approx. 35-40 minutes. Put the pan on a wire rack for 5 minutes. Place a large plate on top of the pan, grip both together, and quickly and carefully flip. The monkey bread should come away easily from the pan. Serve warm or room temperature.
And there you have it. Maple pecan monkey bread. I was very pleased with the way this recipe turned out. The edges are crispy and sweet, and the inside is soft and fluffy. A perfect combination. You could jazz this recipe up with some caramelized apples or bananas, or chocolate, or use almonds or hazelnuts instead. This would be a great recipe to make with kids, who can help roll and dip the dough balls. You can serve this warm with just butter, or a little more maple syrup drizzled on top. I used a basic cream cheese icing, made with butter, icing sugar, cream cheese, and heavy cream. The possibilities are endless.
I am submitting my November entry early because I cannot bear to think people are going to chuck their Halloween pumpkins into the compost or attend a pumpkin-smashing event to get rid of their creations. As long as your carved pumpkin hasn’t been mauled by wildlife or is going moldy then why not consume it?
What to do:
Take your carved pumpkin and slice it into manageable pieces. Lay the pieces skin side down onto baking dishes with a couple inches of water in them. Bake at 350F until soft and mushy. Then scoop out flesh into a large bowl and cool. Then freeze in 2-cup portions. You can make pumpkin soup, muffins, or pumpkin bread. Here is a great recipe for pumpkin bread that is very moist and also freezes well. I adapted it from Susan Mendelson’s recipe from her 1980 cookbook Mama Never Cooked Like This (which also contains a delicious banana bread recipe). In short – respect your pumpkin! Its use extends far beyond decorating your porch on Halloween night.
Pumpkin Bread (yield: 2 loaves)
Ingredients:
2 cups mashed cooked Pemberton-grown pumpkin (no need to puree first)
2.5 cups spelt flour
3/4 cup almond meal
2 cups white sugar
4 eggs
1 cup grapeseed oil
2/3 cup water (can use the water from bottom of pumpkin baking pans)
2 tsp baking soda
1.5 tsp cinnamon
1.5 tsp nutmeg
1 tsp cloves
1 tsp ginger
1/5 tsp salt
1 tsp cardamom (optional)
Method: Preheat oven to 350F. Mix all ingredients well in stand mixer. Pour batter into 2 well-greased standard-size bread loaf pans. Bake 60-70 mins. Done when skewer inserted in centre of loaf comes out clean.
**Note: this bread often sticks to the bottom when removing, so grease pans very well and consider flouring the pans too. Silicone loaf pans are a better choice than pyrex.
In fact, to my mind, I am actually late! For what, you ask. Christmas, I say. More specifically Christmas Cake, the traditional fruit, soaked in alcohol, version.
In years past I have made my cake at the end of September and then spent the next few months feeding it before marzipanning and icing it in mid-December. A rich fruit cake can be made 2 to 3 months in advance and kept in an airtight container in a cool, dark place. Feeding a cake means that once every few weeks you make holes in the cake using a skewer and then pour an amount of alcohol over it, before re-wrapping.
The recipe I always use comes from a cake decoration cook book that I purchased way back when! But the recipe works every time, albeit I always need to cook it for longer than suggested. I even used the same recipe to make my friends wedding cake!
You need a little time for this recipe as you should ideally start it the day before you want to actually make the cake mixture to allow the fruit to soak in the alcohol overnight. Once the mixture is in the tin, the surface can be covered with clingfilm and stored in a cool place overnight if cooking is not possible on the day (there are no leavening agents to worry about). However, do remember to allow for a longer cooking time as the temperature of the mixture will be colder.
I know that a lot of people don’t like fruit cake, but this recipe offers a moist cake with the delicious spices and and flavours of Christmas and is a must in my house. The instructions below are for an 8″ round or 7″ square tin, but if you want the recipe for another size tin let me know as I can provide details for a 6″ round, all the way up to a 13″ round tin!
Ingredients
325g raisins
250g sultanas
175g currants
150g glacé cherries (the bright red cocktail ones)
50g cut mixed peel (I omit this in favour of more cherries!)
50g flaked (sliced) almonds
2 tsps lemon rind
2 tbsps lemon juice
3 tbsps Brandy or Sherry
275g plain flour
2.5 tsps ground mixed spice
65g ground almonds
200g dark brown soft sugar
200g butter or margerine, softened
1.5 tbsp black treacle or molasses
4 eggs
Directions
Preheat the oven to 275F degrees and prepare the cake tin by double lining the inside of the tin with greaseproof paper, and the outside with a double thickness of brown paper. This will prevent the outside of the cake from bing overcooked.
In a large mixing bowl place the raisins, sultanas, currants, glacé cherries, mixed peel, flaked almonds, lemon rind and lemon juice together with the Brandy or Sherry. Mix all the ingredients together until well blended, then cover the bowl with clingfilm. Leave for several hours or, ideally, overnight.
Sift the flour and mixed spice into another mixing bowl. Add the ground almonds, sugar, butter (or margerine), treacle (or molasses) and eggs. Mix together with a wooden spoon, then beat for 2-3 minutes until smooth and glossy.
Gradually add the mixed fruit to the creamed mixture and fold it in, using a spatula, until all the fruit has been evenly blended. Spoon the mixture into the prepared tin and spread it evenly. Give the tin a few sharp taps to level the mixture and to remove any air pockets. Smooth the surface with the back of a metal spoon, making a slight depression in the centre.
Bake the cake in the centre of a pre-heated oven. Test the cake to see if it is cooked 30 minutes before the end of the cooking time (total 2.5 to 3 hours for a cake of this size). If it is cooked, the cake should feel firm and a fine skewer inserted into the centre should come out clean. If the cake is not cooked, re-test it at 15 minute intervals. Once cooked remove from the oven and allow it to cool in the tin.
Once cooled, turn the cake out of the tin but do not remove the lining paper as it helps to keep the moisture in. Using half the quantity of alcohol as used in the recipe, spoon over the top of the cake and then wrap it in a double thickness of foil.
Store the cake in a cool, dry place on its base with the top uppermost for a week. Unwrap the cake and spoon over another half quantity of the Brandy or Sherry. Re-wrap the cake well and store it upside down, so that the Brandy or Sherry moistens the top and helps to keep it flat. The cake will store well for up to 3 months; if it going to stored for this length of time, add the Brandy or Sherry just a little bit at a time at monthly intervals.
I have a cake decorating “bake off” with one of my friends in the UK so I will provide an update once decorated so you can see the finished result too!
Every October I sort of lose my mind. I could choose to call it seasonal affective disorder, depression, pieces of shadow I have not eaten. But I am careful not to put it into any of these neat little boxes, because then I would stop extending my most compassionate curiosity toward this strange seasonal storm. I want it to remain a wild thing, an unknown tempest of fury and flying sticks, because every time it shows up it serves a purpose. I’d even go so far as calling it sacred, because each time I allow it to sweep my floor clean, something I have been praying for enters.
There’s a pattern here. A seasonality. Every October, I used to migrate like a swan. As soon as the last of September’s warmth sank over the horizon, I blew up my life, put the pieces in a backpack, and left. Later, when I stopped traveling to far-off countries and instead moved in a series of lunges across the North American continent, October became the month I put everything I owned into my car (or my truck, or a suitcase in the underbelly of a Greyhound bus) and drove until I hit a coast and had to stop.
Now that I’ve rooted myself in the kind of life that contains four horses, one sheep, one pig, one dog, twelve ducks and two roosters, the ferocious energy of THE MIGRATION THAT SHOULD BE HAPPENING no longer blows me across the continent. Instead, it bowls me over. This year, I looked out over the crazy abundance of harvest season, my belly full of squash and roast duck (all the incredible generosity of the natural world!) and was so irrevocably angry that nothing made sense anymore. The anger burnt until there was nothing left but nothingness. While all around me trees dropped their leaves in an incredible display of letting go, I was furious at them for making it look so easy. This is insane, no?
How does this connect to Pemberton food culture, you ask? Well, it doesn’t. But it does. Because a couple of days ago, before this year’s particular loss of mind levelled out and let me think with something akin to clarity, I opened my medicine cabinet and saw this:
“This” is the library of wild-foraged tinctures I’ve created over the past 4 years. (Their labels are double-sided, so the essence of the words can seep into the medicine.) As I read their labels, I realized something: I created each of these medicines in October. Each was created as a support for weathering that particular year’s energetic storm. As I felt into their contents, I realized that looking at the interior of my medicine chest was like looking at the growth rings of my own evolution, as well as my connection to this wild part of the world I call home.
2015: Love, Compassion, Congruence. Usnea longissima: the long, delicate single strands of lichen that hangs from trees like the animate glowing trees in Avatar. Potent antiviral and immune support, grows only where the air is pure and the forests contain old growth.
2016: Changes toward Infinite Potential. Again Usnea longissima, this time with Lungwort Lichen (Lobaria pulmonaria.) I was still working with air beings, still striving for lightness. This one recognized the animus of the invisible transmission of air as connector between the animal and plant realms and between all beings. (If I breathe in air a tree exhaled and then YOU then take in the air I breathed-)
2017: Liberation. Atonement. Unity. This was a graduation ceremony from air to earth, something I created specifically when I moved from Squamish Valley to Pemberton. Devil’s club root and bark (adaptogen), willow bark (for deep pain and calling in receptivity and remediation).
2018: Belonging, Lightness, Radiance, Love. This one I made in secret after hiking up to Tenquille Lake with Pemby herbalist Evelyn Coggins this summer. We were not supposed to take any plants. (Evelyn, I am sorry I am so terrible at obeying rules.) There’s a chance a few flower heads of Valerian and River Fireweed (along with a few hemlock tips, a piece of old man’s beard (another Usnea!), and a piece of quartz may have made their way into my pocket on this hike. (Barely a handful of plant matter, I swear…) Covered in 100 proof vodka and shaken every day for 20 days, this one is light and floral but POTENT. Holy $^%&. The first time I tried it I almost fell asleep in the library. It’s for taking before bed, to encourage new neural connections to form through dreams…
Then I had a conversation with myself that I’m embarrassed to disclose. But I will anyway, because I think we all have these sorts of conversations from time to time. It’s just not something we talk about.
“Well Kera, you should try to remember to take some of these. That was the point of making them.”
“Humph.”
“??”
“Oh, right. Okay, okay.”
“And you know that St John’s Wort tincture you have in a mason jar under the kitchen sink? You should take that too. Because you made it SPECIFICALLY for coping with Octobers. Remember?”
“Um, yeah. Yeah I did.”
I did. I do. I am. Taking them. Ten drops in the morning of Liberation/Atonement/Unity and 6 drops of Belonging/Lightness/Radiance/Love before bed. Could the prescription be anymore poetic?
Pharmaceutical companies, take note. You could do better.
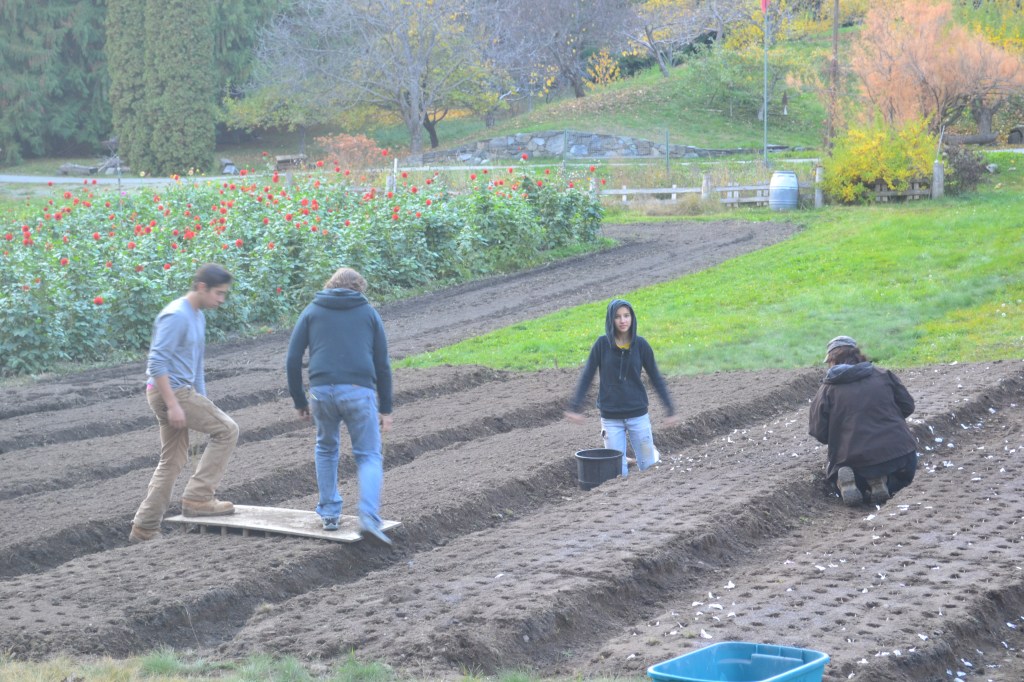
Q; What is a Wwoofer? A: Its a dog that pulls weeds! Jokes aside, WWoof can be an acronym for either World Wide Opportunities on Organic Farms or Willing Workers on Organic Farms depending on the area and its labour laws. They are basically homestay farm volunteers who work 4-6 hrs /day in exchange for room and board. The organization began in the UK in 1971 when there was a revival of back to the land interest, volunteering and adventure travel.
I can only imagine the logistics of organizing such an endeavour back then, with snail mail and hard copy photos. Since the advent of the internet it is so much easier, with quite a few other similar websites such as HelpX and Workaway. These new sites have become popular because they’re not just organic farm related. It’s easy, using the same format as a dating web site with profiles and photos from both parties. Fortunately, the meetings are less awkward.
We have hosted an average of a dozen helpers a year, for the last few years. They come from all places, cultures and ages. There are many pros and cons, but to be honest, so far, about 90% of our visits have been a good experience for everyone involved.
The pros are:
We get to meet new people every few weeks without leaving our bubble. It’s been great to introduce our somewhat sheltered kids to others and their cultures. We always get out the atlas and they explain to us where they are from and where they’ve been. A homeschool geography lesson.
We get to be tour guides and ambassadors for our area, showing them our secret spots (only if they promise not to post it on social media.)
We’ve become more productive, Many hands make light work, whether it’s tediously picking berries, cleaning garlic or heavy work such as firewood. This leaves us more time for other projects and leisure.
We get to share our wholesome lifestyle and food with others who may have otherwise never experienced an authentic BC mountain environment.
We have made some fleeting as well as long term friendships, with a few repeat visitors. and have even stayed with some while travelling abroad.
We get to teach others new skills and teaching is learning.
The cons:
It takes work to organize work for others and stay productive. It takes a game plan and most farmers are constantly adjusting plans, especially due to weather.
Sometimes people are just not compatible (remember the dating analogy). I can tell within hours if the person grew up in an urban or country setting. While most are adaptable, some are just out of their element, scared of wildlife or not accustomed to isolation.
You have to assume they don’t know a thing, explaining and demonstrating exactly how you want something done and setting the pace, especially if you plan to leave them unsupervised.
You may have to accomodate their dietary restrictions, religious or cultural practises. You have to be polite, politically correct, entertain them and drive them around. It can be a hassle and an invasion of privacy. You have to have blind faith and trust in a total stranger.
Like I said, on the whole its been mostly great for us, but it’s not for everyone. It’s hard not to discriminate and develop stereotypes, but that’s human nature as we look for the most compatible fit. We are weary of bringing the elderly, disabled and the permanently transient. We have to accept that different cultures have different work ethics. We have to choose the right candidates at the right time depending on the season.
There are no set rules or contracts, and the only repercussions come in the form of reviews. We have chosen to do between 2 -3 week stays, mostly to keep things fresh and avoid complacency. A recent couple who have had some negative experiences elsewhere noted that most other hosts require a minimum as opposed to a maximum stay. My response was “with a private cabin, wholesome work and farm fresh food, most travellers don’t want to leave. We treat others how we would like to be treated.”
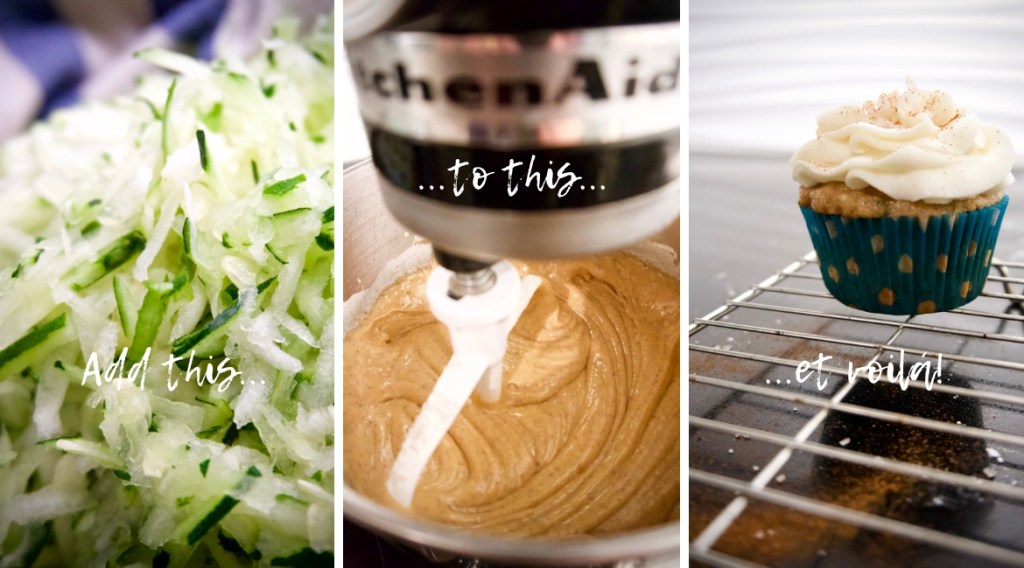
I know, I know! I’ve already written about zucchini, surely there must be some other ingredient I can use?
Yes there is, but there was still some sitting in my fridge to be used up and Thanksgiving is just round the corner. Plus, I like to make cupcakes for all the boys and girls at my work, just to let them know that they are appreciated so having had success with my other zucchini cake and bread recipes I thought I’d give one more recipe a try.
Besides, I am thankful that I had my granny to show me her love for baking and that I have people to appreciate the bakes that I try out on them.
So enjoy these zucchini cupcakes, which have delicate pumpkin spice flavours and are so soft they melt in your mouth, topped off with a wonderfully fluffy cream cheese buttercream.
I can’t think of anything better this Thanksgiving.
Cupcake Ingredients
3/4 cup finely grated zucchini (I actually used a cup!)
1 1/2 cups all-purpose flour
2 teaspoons baking powder
1/4 teaspoon salt
1 teaspoon ground cinnamon
1/4 teaspoon nutmeg
1/8 teaspoon ground cloves
1/2 cup vegetable or canola oil
2/3 cup white sugar
1/3 cup brown sugar
2 large eggs
2 teaspoons vanilla extract
1/4 cup milk
Cream Cheese Frosting Ingredients
1/2 cup unsalted butter, softened
4 oz brick-style cream cheese
3 – 4 cups powdered sugar
1 tablespoon heavy cream, if needed
Cupcake Directions
Preheat the oven to 350F degrees and line a muffin pan with muffin papers.
Gently dab the grated zucchini with a paper towel to remove excess liquid. It shouldn’t be dry, but there shouldn’t be extra water.
In a large bowl whisk together the flour, baking powder, salt, cinnamon, nutmeg and cloves.
In a separate large bowl whisk together the oil and sugars until no lumps remain. Then whisk in the eggs, vanilla extract and milk.
Whisk the dry ingredients into the wet ingredients, then gently fold in the grated zucchini using a rubber spatula or wooden spoon.
Spoon the batter into the prepared muffin tin, filling each about 2/3 full. Be careful not to fill them any more than 3/4 full.
Bake in the preheated oven for 16-19 minutes, or until an inserted toothpick comes out clean.
Allow to cool in the pan for 5-10 minutes, then continue cooling on a wire rack.
Cream Cheese Frosting Directions
In a large bowl using an electric mixer, beat the butter until soft.
Then mix in the cream cheese.
With the mixer on low, beat in 3 cups of powdered sugar until combined.
If needed, slowly beat in the rest of the powdered sugar a little at a time until the desired consistency and sweetness level is reached. If it gets a little too thick, then beat in the cream.
Frost the cupcakes with a knife or using a piping bag and piping tip.
If they last that long the cupcakes can be stored in an airtight container at room temperature for up to 3 days. Unfrosted cupcakes can be frozen and thawed in the fridge overnight.
Full disclosure: the following post isn’t actually about food or farming. I know, I’m sorry. I ran it by Lisa Richardson because I had my doubts as to whether it would be appropriate, and as she jokingly said, “there’s no mention of dirt anywhere!”
Random photo of freshly harvested Pemberton potatoes still cloaked in dirt, to meet the 1% dirt content requirements of a Traced Elements contribution. Photo by Lisa Richardson. As you were saying, Kristine…
But it is about Pemberton, and the people that live here, so please bear with me. It’ll be worth it in the end, I promise.
My partner and I didn’t end up in Pemberton by choice, per se, but by chance. He received an offer for a job based mainly out of Whistler, but his route would cover Squamish to Pemberton. We had the choice of which town we wanted to live in, and we chose Pemberton. The funny thing is that we didn’t choose Pemberton specifically because of its world renowned mountain biking and outdoor sports, or thriving farming community. It just seemed like a nice, quiet place to live, and we were tired of the hustle and bustle of big city living.
When we first moved here, I quickly came to realize how steeped Pemberton is in outdoor adventure sports. Mountain biking, BMX, hiking, climbing, skiing, sledding, paragliding, fishing, hunting, and everything in between. Once I started meeting people in the community, I realized that many of them came to Pemberton specifically for this reason, and would spend every free moment they had exploring and experiencing the rugged backcountry. I knew people who worked two jobs just to make sure they could afford both their ski pass and bike pass every year, and many that would keep their gear ready to go in their vehicle for a quick ride or climb after work. Because you never know.
I am not one of those people. I’m not what you would call athletic or even adventurous. I am the nerd. The book worm. I would much rather have my adventures within a really good book from the comfort of my sunny deck. I haven’t been on a bicycle in about eight years. I haven’t been on a pair of skis in probably fifteen.
And that started to bother me a little. Here I was, living in a gorgeous valley full of fun and adventure in the great outdoors, and I started to feel that I was missing something. And with housing prices rising and the town really growing, I had a little thread of disquiet that I didn’t belong in Pemberton if I wasn’t into that, and that maybe I’d be better suited somewhere else. That I should let someone else take my place who would enjoy those activities.
Let’s change course a little here. Two weeks ago I attended my first writing conference in Seattle held by the Pacific Northwest Writers Association, of which I’m a member. I spent four days taking workshops, meeting other authors, including those specifically in my genre (fantasy fiction), chatting with agents and editors, and overall immersing myself in the world of writing. I was incredibly nervous to go. I didn’t know a single person there. I had never done this before. And I had only been seriously writing for about three years, a process that I’ve gone through almost entirely alone. I was a little nervous that I’d meet more established, published authors and they’d laugh in my face.
I’m happy to say they didn’t. I had the most incredible, uplifting, energizing time of my life. From the very first morning, I had no problem chatting up strangers and engaging in intelligent conversation about writing. I got to ask their opinions on topics I was a little unsure about, like self-publishing vs. traditional publishing, and share what I’ve learned on how to write fiction. I made friends that I saw again and again during the conference, friends that I imagine I’ll have for a very long time. I pitched my novel to agents and editors for the first time and didn’t make a fool of myself. I got to meet incredible authors like: Kay Kenyon, who has 14 published novels under her belt; Donald Maas, veteran literary agent and expert fiction instructor; Christopher Vogler, who’s been a story consultant for major Hollywood companies (including Disney) for decades. I even got to shake hands with R.L. Stine, who was the featured speaker for the conference. (He’s hilarious, by the way.)
All signed by their authors. Eek!
I realized from this conference that those are my people. Writers, editors, literary agents. People involved in the writing world and for whom writing is their whole life. Because writing is my whole life too. My first novel is almost finished and I’ve already got plans for three more. I think about my books every day. Every minute that I’m not at work or managing the tasks of my life, I’m thinking about writing. I keep a notebook and pen with me ready to go at all times. Because you never know.
So now, I’ve finally realized that I’m not betraying my beloved town of Pemberton by not participating in adventure sports. It’s just that my adventurist friends have found their people, and they happen to live in Pemberton. Their people are fixed on a geographic location, while my people are more spread out. I needed to put in a little extra effort to find my people. And the good news is that you can have multiple people. My community in Pemberton are my people too, because while we may not share a love for outdoor sports, there is something else we share. A love for this town. We love its rugged beauty, its incredible natural bounty, and its thriving, vibrant community.
So I say whatever it is that calls to you, that drives you, that fills you up, you need to find your people. Find the people that share that love, that drive, and it will make everything better.
(And if you’re one of my writing people, feel free to chat me up about all things writing! You can usually find me at the Blackbird Bakery serving coffee and delicious treats.)
It’s the most wonderful time of the year – or at least it’s MY favourite time of the year.
Colours start to pop as the foliage begins its natural, beautiful progression to death and my appreciation for the warmth of the sun on my back is revived. Praise arises for the rainy days as reason to stay in, make soup and stock the freezer with food. Then there is also the rush of the game to see who gets to the fruit trees first – me or the bears. I go to bed with an extra blanket but leave the windows wide open while the coyote’s howl echoes through the night. Of course the dusting of snow on Mount Currie gets me pretty excited too! And, most importantly, my garden is still delivering the goods.
This time of the year, I also sit back and think about my garden; what worked, what I want to do more of and what I can do away with next year. Journaling for the win: do it, do it now. So, what I thought I would do is share some of my favourite photos of the summer complete with commentary.
First up is purple daikon radish. I pickled the shit out of these guys while in season. When a vegetable randomly forms heart shape upon cutting into it you really can’t help loving it. More will be planted in my garden next year, their spicy flavour is beyond delicious.
Melons. Who doesn’t love a good melon. Previously I had tried watermelon but with little success there, this year I tried cantaloupe. Gave it a sunnier spot and was rewarded big time. Go figure: #shadowruffruff loved it too… juicy and flavourful beyond both our expectations!
I have mentioned that kohlrabi was the undisputed heavy-weight champion in my garden but my Borage babes blew my mind; turns out they’re MASSIVE! They helped pollinate my butternut squash and many other things in my garden, plus the flowers were delicious in salads. This year I trained my squash to grow along the fence in hopes it would take up less space overall. As it turns out this move was a game changer. I will incorporate this method next year as well, perhaps to even shade something that requires less sun. And for the bee’s sake, borage will forever be in my garden regardless of the space it takes up.
You know you’ve made it to the big time when your whole pasta sauce has been sourced from your backyard… I mean it’s SO good you want to share but really not really. Last season was the first year where I grew my own Roma tomatoes, celery, carrots, garlic, onions, basil, rosemary, thyme, oregano and cayenne peppers. I basically vowed from then on this was the way forward every year; always plant enough to make sauce for Dbot. I will also openly admit I have a love affair with fried green tomatoes served with soft poached eggs – you would too, if you’ve had it. Never underestimate the power of a green tomato.
Does your cilantro bolt like crazy in the heat of the summer even if you’re giving it shade from the hot afternoon sun? No problem. Let them bolt and go to flower. The coriander seeds born from the delicate white flowers will produce the best ground version of this spice you’ve ever had. I guarantee you’ll start to plant cilantro just to let it go to seed!
Fall is also the time when members of the brassica family shine. I remember being amazed when I learned how Brussel sprouts grew, so they became a yearly addition to my garden (just be sure to give them plenty of space). New this year was Savoy cabbage grown from seed and it’s sure to make my cabbage rolls go from A+ to A++. Another tip for cabbage is to space out their planting times then you don’t end up with a whole bunch at the same time even though they keep quite well.
Flowers… I will plant way more flowers in my garden next year both perennials and annuals. Some of my perennials are ready to split which benefits both the plant and my wallet. Plus, having fresh cut blooms in my house just makes me smile.
I feel like I could carry on for a long time but as I write the weeds are still growing and they sure aren’t picking themselves! So I’ll just leave you with this last photo that I call, “The Mushroom that had all the Thyme in the World”. #dadjoke #sorrynotsorry


 Besides, I am thankful that I had my granny to show me her love for baking and that I have people to appreciate the bakes that I try out on them.


 Let’s change course a little here. Two weeks ago I attended my first writing conference in Seattle held by the Pacific Northwest Writers Association, of which I’m a member. I spent four days taking workshops, meeting other authors, including those specifically in my genre (fantasy fiction), chatting with agents and editors, and overall immersing myself in the world of writing. I was incredibly nervous to go. I didn’t know a single person there. I had never done this before. And I had only been seriously writing for about three years, a process that I’ve gone through almost entirely alone. I was a little nervous that I’d meet more established, published authors and they’d laugh in my face.


