Category: food

  • Space Saving Sauerkraut

    Space Saving Sauerkraut

    I live in a barn. Between the barn and my little house is a mud room. It’s a liminal place: half barn, half house. These days, it’s where I keep all my tack, tools, and wild/crafting materials for the camps that I run. The counter is generally littered with things that need to be put away. Like that unidentified bracket fungi that smells like apricots… and the bags of sand and gravel from October’s Fairy Gardens.

    Because I keep it at about ten degrees all winter (to keep the various stored items happy and the pipes from freezing) the mud room is also where I throw all the veggies I pull out of the garden and procrastinate about dealing with. One morning a few weeks (when I had to remove 6 large pumpkins from the top of the washing machine so I could do a load of laundry) I realized things were out of hand. The pumpkins were still too intimidating. I couldn’t quite look them in the eye. Plus they were in great shape so there was no need to rush processing them. The cabbages on the other hand… and the bowl filled with unwashed root veggies… oh dear. Definitely starting to go. I cut away the rotting bits from the cabbages, washed the salvageable carrots and beets, and then did the only responsible thing: I made Kraut.

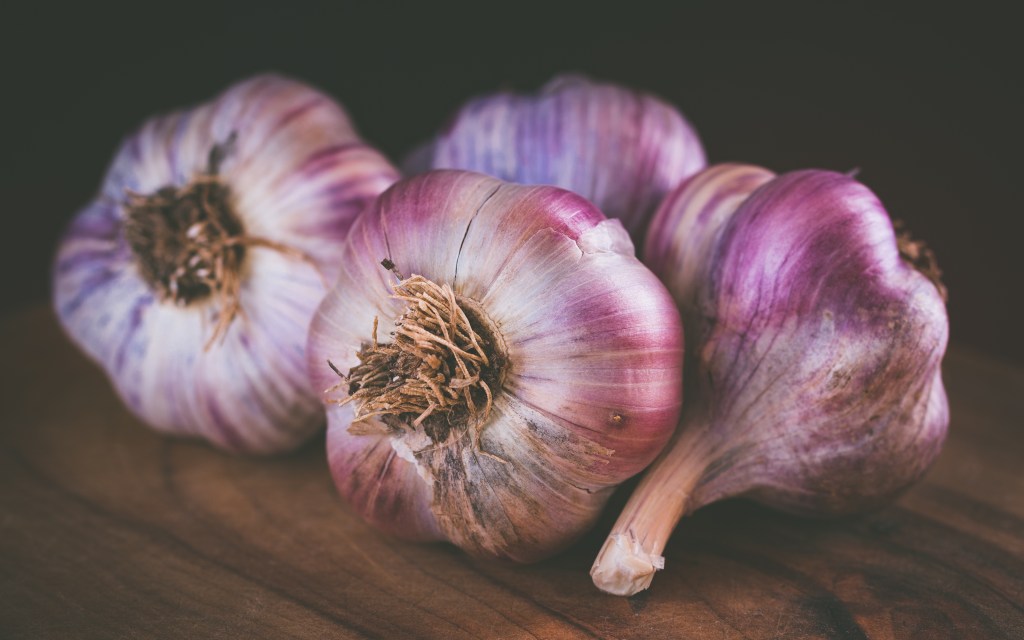
    Sauerkraut is the best way to make a large volume of cabbage store in as small a space as possible. The lactic acid fermentation process loads it with helpful wild gut bacteria, boosts its nutritional value, and enables us to store it for a long time. It also makes a boring vegetable delicious. ‘Kraut- while traditionally just cabbage, salt and water- is also flexible and can accommodate the addition of a wide variety of veggies and flavours. For mine, I used the 3 small heads of cabbage, two handfuls of carrots and beets, kale stalks and leaves from Four Beat Farm, and two wild apples that I picked on the way home from Clinton last summer. For flavour, I added a small thumb of ginger, a handful of dried Saskatoon Berries, and five Juniper Berries.

    20181115_121843
    Kraut-to-be: here you can see the texture and flavourings before salt is added

    Directions:

    • First, shred or chop your cabbage. If you are going to play with adding other veggies, make sure you keep about 75% cabbage to make sure achieve a good lactic acid ferment. You add use almost anything you can think of to flavour your ‘Kraut. Caraway seeds. Black peppercorns. Seaweed. Dried fruit. Spruce tips. Citrus zest.
    • Add salt, and mix/rub it well into the veggies with your hands. You want to macerate your cabbage, as you want the salt to break down the cell walls and begin to release water. How much salt should you add? Well… more than you think you should. The salt acts as a preservative, and will help your ‘Kraut keep its texture so it doesn’t ferment down into a goopy mess. Taste your cabbage/veggie mix. It should taste quite salty. As you rub them, the veggies should start to shine a little bit, as well as moisten and soften.
    • Pack your crock! I use a small pottery crock I found at a thrift store. You can also pack your ‘Kraut into a large mouth Mason Jar. You can use utensils for this, but I prefer to use my fist. It’s fun to punch your food, and you can put more pressure on the ‘Kraut. You want to REALLY mash it down so that all the air pockets are squished out and it starts to release water. Add more handfuls of cabbage/veggies, and press down. Continue in this way until all your Kraut-to-be is in the crock. You should have enough water that’s been released at this point that it covers the top of the ‘Kraut when you apply pressure.
    • Because you can’t stand there squishing it forever, you need to add weight to the top off your ‘Kraut. The ‘Kraut needs to stay submerged in its own juices so that it doesn’t mould as it ferments. (Fermentation=good, mould=bad.) I use a large class coaster that’s a little smaller than the diameter of my crock, topped with a Mason Jar. You can also use rocks as weights, provided they’re clean! Then you can cover the top of your crock with cheesecloth or a dishtowel to keep out dust and mould spores but still let it breathe, which is essential for the Lactic Acid fermentation process. If you don’t have enough juice that’s been released from the veggies to keep your ‘Kraut submerged, you can top it up with a little water or brine.
    20181115_1230191
    The crock and (and accompanying Mason Jar of water that acts as a weight to keep the Kraut submerged)
    • Wait and taste! How long it takes your ‘Kraut to be done depends on how warm your environment is, and how tangy you like your ‘Kraut. The usual window is one to four weeks. The longer you let the fermentation go, the stronger the flavour will be, and the more beneficial bacteria you will cultivate. However, the longer you wait the softer your veggies become. If you keep tasting the ‘Kraut as it progresses, then you will be able to stop the fermentation it when it reaches your favourite balance of flavour and texture.
    • When you’re smitten with your ‘Kraut, take it out of the crock and compost any bits with surface mould. (Sometimes a little ‘Kraut will stick to the sides of the crock and turn white and fuzzy, but the rest of the batch that is still submerged will be fine). I pack mine into clean half pint jars and keep them in the fridge. This stops the fermentation process, but does not kill any of the lactic acid and other goodness.
    • Enjoy! Yum. Cleaning up and making more space was never so delicious…


  • Pumpkin Gnocchi

    Pumpkin Gnocchi

    The rainy days of fall have come at last and today even a bit of the white stuff. But thanks to our extended August weather my garden saw yet another expansion complete with an Asian pear tree, perennials, and flowering bulbs; plus I finally got the garlic planted. My focus has taken a small hiatus from planning out next year to filling my freezer with quick dinner options for the dark hibernating nights of winter.

    I don’t have kids but I ended up with pumpkins and carving them didn’t happen. I also had potatoes – go figure. So, I thought I’d channel my inner nonna, combine the two and make some gnocchi. To say I followed a single recipe would be far from the truth… more like scoured through a ton of websites and drew on certain elements from each to make one. Biased opinion or not I think it turned out pretty delicious. They are in no way gluten-free or dairy-free but rich in flavour and love.

    Step Uno: Roast your pumpkin – cook your potatoes

    • Cut your pumpkin into half, gut it and then cut it into wedges (save the seeds to roast). Place on a cookie sheet skin side down, drizzle with a bit of olive oil and season with salt & pepper. Bake at 350°F for about an hour then remove from the oven and set aside to cool. Scoop out all the flesh and keep aside 1½ cups – freeze the rest for a rainy day. While your pumpkin is cooking place 3 medium sized russet potatoes into a pot and start to boil them. There is no need to cut or take the skin off just place them in whole! This will help you achieve the perfect texture – fork tender no more no less. Remove them from the water and allow to cool completely. When they’re ready peel the skin off and either grate the potatoes or use a potato ricer to process them.


    Step Two: Prepare your dough

    • In a large bowl add your pumpkin, prepared potato, 2 egg yolks, some fresh grated nutmeg, 1 cup of ricotta, ¼ cup grated parmesan, salt and approximately ½ cup+ of oo Italian flour. Now some of you are probably wondering; what the hell is oo flour? Basically, it’s more refined then normal flour and while it’s not necessary for this recipe I think it creates a superior, silkier dough and helps the pasta maintain chewiness once cooked. But use whatever you have on hand. I’d also like to mention that the flour amount will vary and this is where “channeling your inner nonna” comes in. As a friend recounted to me from her recent trip to Italy where she learnt to make pasta with a real live nonna, “they don’t measure – they feel; and just know when it’s enough.” Start with only ½ cup of flour and use a wooden spoon to bring all the mixture together, adding in flour as you go until the dough does not feel wet any more. Turn the dough onto a floured surface and knead until smooth.

    Step 3: Make your gnocchi


    • Cut a slice of dough off and roll it out into a rope about ½” thick. Using a sharp knife cut your rope into 1” pieces. Keep flour on hand for this stage as well, you don’t want your gnocchi sticking to the counter. Use a fork or a gnocchi board to gently roll your pieces, creating texture on top and a small indent on the bottom to catch your sauce. Continue this formula until all the dough is used.


    IMG_6497

    Step Quatro: Cook & eat!

    • Bring some salted water up to a boil, working in small batches to cook your gnocchi. When they float to the surface they are done… it does not take long – do not leave them unattended. At this point the rest is up to you: skies the limit. Sauce them up with whatever your heart is craving. For this round I used A LOT of butter then some sage, chili pepper, garlic and toasted hazelnuts (plus a little extra pancetta I had on hand). Like with pasta I added a bit of the water the gnocchi was cooked in to make it extra saucy.


    Step 5: Freeze your extras

    • This recipe produces a lot of little gnocchi so I froze the extras in a single layer on cookie sheet lined with parchment (as seen in the featured image).

    In my kitchen I experiment just as much, if not more, as I do in my garden. I did not nail this recipe on the first try and it’s still not nonna’s gnocchi but it’s mine. It’s really about how the more I cook, the more I learn, the more I love to do it and the more I eat! And, let’s be honest, there are way worse problems to have then a full stomach and heart.

    Buon appetito!

  • Monkeying Around With Dessert

    Monkeying Around With Dessert

    Okay everyone, there’s something I need to get off my chest.

    I. Love. Food.

    I absolutely love it. I love everything about it. I love the act of eating. I love the sheer variety of foods to eat. I love the challenge of creating your own. And I especially love the joy around food.

    I work at the Blackbird Bakery and one of the things I love most is when people tell us how good our food is. When their faces light up and they say things like “I haven’t had an almond croissant that good outside France,” or “That was the best muffin I’ve ever had.” Something as simple as a really tasty muffin can make someone’s day, and that makes me so happy. I love when people gather at the bakery and chat over sandwiches and turkey pies, or start their day off on a positive note with a cheesy breakfast sandwich. There is something magical about how really good food can change our whole day.

    I have a friend who is a chef in Vancouver and primarily does catering for films. On a recent visit he told me how much he dislikes food, and how much he’d prefer it if there were a pill he could take instead of eating food. That made me so sad. Growing up I always had joy around food. I have so many happy memories around the making and eating of food, especially with family. I can close my eyes right now and conjure up the joy I would feel walking into my house after school and being greeted with the warm smell of freshly baked banana bread. Our family of seven had dinner together every night and I can still hear the buzzing conversation of all of us sharing our days over chicken cacciatore or my mom’s amazing chili. For me, food, family, and joy go hand in hand (in hand).

    So recently when I learned we’d be having a quick visit by my partner’s parents I knew I wanted to make a special dinner. It felt like a perfect opportunity to break out the fall flavours and use up some items in my freezer and pantry. I pulled out a chicken I had gotten from a friend here in Pemberton and made Maple Rosemary Chicken from the New York Times Cooking, with a simple rice pilaf that wouldn’t overpower the flavour of the chicken, and some roasted Brussel sprouts with bacon (because why do I only make this dish at Thanksgiving? It’s amazing.). But the thing I was most excited about was something tasty for dessert, and I wanted to make something that would shine. Something I hadn’t done before, because experimenting with food is fun. Continuing with the fall flavour theme, I decided to go for Maple Pecan Monkey Bread that I adapted from another NYT recipe, paired with a simple cream cheese icing. I’m happy to share it with you here:

    Maple Pecan Monkey Bread

    Brioche Dough:
    1 tbsp yeast
    3 tbsp warm water
    2 tbsp maple syrup
    1 1/2 tsp salt
    3 1/2 cups all purpose flour
    4 eggs, room temperature
    1 1/2 sticks (3/4 cup) unsalted butter, softened

    Maple Brown Butter:
    8 tbsp unsalted butter
    1/2 cup maple syrup
    1 tsp salt

    1/4 cup sugar
    1 tsp cinnamon
    1 cup pecans, toasted

    1.Mix the yeast in a small bowl with 3 tbsp warm water. Add 1/2 tbsp maple syrup. Let sit 5-10 minutes to rise.

    Note: I tend to use Fleischmann’s traditional dry active yeast in my recipes, which requires a little proofing. If you are using instant yeast you can skip this first step and add the yeast directly into the flour/salt mixture, and add the warm water when you add the eggs.

    2. Combine the flour and salt in the bowl of a stand mixer. Mix on low speed using the paddle attachment to blend. Add the eggs, remaining 1 1/2 tbsp maple syrup, and yeast/water mixture. Use the paddle attachment until the dough starts to come together.

    20181027_131618
    Ready to rise!

    3. Switch to the hook attachment and continue mixing on low. Add the softened butter in small chunks, a few pieces at a time, until fully incorporated. Continue mixing, stopping and scraping any stray pieces of butter on the sides or hook as needed, until the dough is smooth and elastic. This may take up to 10 minutes. Turn the dough into a buttered bowl and cover with a clean towel. Let rise until doubled in size, approx. 90 minutes.


    4. When you’re ready to assemble, melt the butter in a small saucepan over medium heat. Cook, stirring with a wooden spoon, until the dairy solids turn golden brown and the butter smells nutty. While stirring add the maple syrup and salt. Bring to a boil while stirring, then remove from the heat. Set aside while you get your dough ready.

    5. Mix the cinnamon and sugar in a small bowl. Butter a 10-inch Bundt or tube pan. Turn your dough onto a clean work surface and roll into a thick rope, approx. 2 inches in diameter. Cut this rope into eight even pieces, and then cut each of those pieces into eight, until you end up with 64 small dough balls.

    Note: I didn’t have a Bundt pan so I used my tall tube pan that I use for angel food cake and it worked fine. You don’t need any flour for your work surface because of the amount of butter used in this dough. It should be soft and slightly greasy, but not sticky.

    6. Gently roll a piece into a small ball and dip in the cinnamon sugar, rolling it around until evenly coated. You can do multiple dough balls at the same time, but avoid overcrowding to ensure they are evenly coated with the sugar. Place the sugared balls in the pan and repeat until you have a single layer. Scatter some of the toasted pecans on top. Repeat this process until all the dough balls and pecans are in the pan.

    Note: Because I was using the large tube pan, I was only able to make two layers of dough balls. It doesn’t look like much, but when we do the second rise the dough balls will expand dramatically.

    20181027_162003
    Ready to bake!

    7. Drizzle the maple brown butter all over the tops and sides of the dough balls. Cover with a clean towel and let rise in a warm spot until puffed and the dough comes to about an inch below the top of the pan, approx. 30-45 minutes.

    8. Preheat oven to 350ºF. Uncover the pan and bake until golden brown on top, approx. 35-40 minutes. Put the pan on a wire rack for 5 minutes. Place a large plate on top of the pan, grip both together, and quickly and carefully flip. The monkey bread should come away easily from the pan. Serve warm or room temperature.

    20181027_171707

    And there you have it. Maple pecan monkey bread. I was very pleased with the way this recipe turned out. The edges are crispy and sweet, and the inside is soft and fluffy. A perfect combination. You could jazz this recipe up with some caramelized apples or bananas, or chocolate, or use almonds or hazelnuts instead.  This would be a great recipe to make with kids, who can help roll and dip the dough balls. You can serve this warm with just butter, or a little more maple syrup drizzled on top. I used a basic cream cheese icing, made with butter, icing sugar, cream cheese, and heavy cream. The possibilities are endless.

    20181027_213516

    Happy cooking everyone, and enjoy the joy!


  • An Apple a Day

    An Apple a Day

    You already know that fall is my favourite time of the year. It also happens to be one of the busiest times of year for me at work. So busy that sometimes it feels hard to find a full breath. A breath that I can get behind: my normal rhythm. Yet one thing that constantly replenishes my soul is when my house if full of friends and family. It’s then that my breath returns to normal – no matter what. This is why every year I muster up some energy to host Thanksgiving dinner, even if all I want to do is sit in silence.

    Initially I thought I’d post some great, amazing Thanksgiving recipe the day after dinner but I could not find any words and you can’t force something that’s not there. Instead I chose to harness the good vibes from a room full of laughter, sing-a-longs, amazing food and love, to put my garden to sleep. It was the perfect remedy and the bonus? – I got to do it with my dad. However, I thought I’d share a recipe for a pie that usually graces my Thanksgiving feast but just didn’t have time to make. I mean I barely got the turkey in the oven on time and that only happened because my mom did it!

    This is apple season. When your parents show up with a massive bag of said fruit from a friend’s tree on the Island and you’re eating at minimum and apple a day, or two, but barely making a dent in the stock, you make pies.

    So, without further ado… here is Apple Cheddar Pie: an instant crowd pleaser and a delicious breakfast supplement.

    Step Uno: make your crust.

    2½ cups all purpose flour – TBSP sugar – TSP salt – 1½ cups grated white cheddar (kept cold in fridge until ready to use) – ¾ cup grated butter (frozen) – ½ cup ice-cold water (maybe a bit more)

    • Add the flour, salt and sugar to your mixing bowl and combine them. Then grate your butter into the bowl and add in your cheddar. Next start gently rubbing the ingredients through your hands; you’re aiming to get a “pea like” texture (you may recall me using this method in my previous pie recipe). Pour the water in and use your hands to bring the dough to together. I always end up turning it out onto my counter to finish kneading it. Separate the dough into two balls with one slightly larger then the other. Flatten them out to resemble small saucers and a place in the fridge for at least an hour.

    Step Two: prepare your apples.

    8-9 apples peeled, cored & cut into eighths – juice of half a lemon – cinnamon, nutmeg, ground clove – a sprinkle of cornstarch

    • Place your apples in a bowl, add in your preferred amount of spice, squeeze the lemon on top and sprinkle that cornstarch… then toss.

    Step 3: build your pie.

    • Preheat your oven to 375°F. Roll out the smaller disc on a floured surface, place it in your pie dish then add your apple mixture. Before rolling out your second dough disc and topping the apples with it, dot them with a bit of butter. Seal the edges together and then cut some shapes in the top crust or keep it simple with a few little knife slits that will allow the air to escape. Brush the pie with an egg wash (I forgot but you should really do it).

    Step Quatro: bake & wait.

    • Place the pie on a baking sheet and pop it in the oven. Let bake for a least an hour or until the crust is golden brown. Allow it to cool on a wire rake for an hour or more… I am not capable of this step. Not even a little bit.

    Step Five: consumption.

    • Serve this bad boy with some ice cream or nothing at all.


    So if you’re wondering what to do on this rainy weekend and have a bunch of apples, you should make this pie and fill your house with people to share it with.

    And don’t forget to breathe.

  • My First Time Gardening

    My First Time Gardening

    28D3C77D-AADD-4180-8F4C-2B4EA9FDAB6C

    I never seemed to stick around long enough in one place to have a garden.  Even if I was around, I was too scared to mess it up to even try.  I have, however, always admired people who gardened. In my eyes they’re modern day witches and wizards!

    Food has taken a leading role in my life, though. I’ve worked as a chef on and off for over 10 years, transitioning from traditional butter/cream/French style cooking to now more ‘holistic’ organic, gluten free, dairy free foods. I was diagnosed with celiac disease a few years ago, so I had to change my diet. As well as, I’ve worked through an eating disorder that took over a large portion of my life. While food has always been on my mind, until now, I never got to truly experience the joys of growing my own food!

    Close to a year ago I met Derek. When I learned about his love for plants and gardening my admiration for him grew too. It wasn’t long till I moved in with him, and let Pemberton become my new home.

    After a long winter I was itching to get going. Patience has never been my best attribute, something I got to work on watching plants grow. Our first step was to get some more soil. That shit’s hard. And heavy. But it was fun watching Derek unload it all as I hobbled around with a semi sprained ankle;)  Then we got on to planting. I was nervous planting.  What if I messed something up? What if this shouldn’t go there? What if I plant too close, what if I put too much soil on top, or plant too shallow? Derek would remind me that it’s all good – it’s a process, we can thin things out later, and replant if we want to too.

    I realized I was so worried about messing up in the past, that I never tried.

    458C1AA8-806F-4DEA-994A-EBEC308469C2

    Soon our sprouts were shooting up and I was so excited to get back to the garden every day to check in on our little babies. Each time when we would walk to the garden I would mindlessly ask Derek – “Will we need to water it?” And every day he’d respond – “we’ll feel the dirt and decide.” I’d laugh and say oh ya right right. This part reminded me of cooking.

    When I teach people how to cook, one of the most common questions I get is, “How do you know when something is done?”  Or “how do you know if it’s good?”  I explain that we need to taste it, touch it and feel it! It’s so funny how often we want to rely on our brain to tell us everything. But we gotta get in there. And so I got to get my hands in the dirt and would feel around:)

    I learnt so much though over the past 5 months.

    Firstly – gardening is not as difficult as I thought it was – at least on our small community plot.  I have so much admiration for farmers who are growing large quantities of food!!  That is not easy work and I have much deeper appreciation for the food that I buy at the store now. I used to whine over $4.99 bunches of broccolis. Or a giant box of pre-washed organic mixed greens for $7.99. I won’t be complaining anymore, and will definitely be more mindful with letting things go to waste!

    It’s been an amazing summer, and I can’t wait to get planting again!!

    05E3963E-0DF0-4E09-BF02-4A932586EBCD

  • Fall in Pemberton: a Full Fridge and Pantry!

    Fall in Pemberton: a Full Fridge and Pantry!

    Hello everyone and happy fall. Welcome back to routines and merino wool clothing! Yay!! There are lots of new faces walking around town. This makes me happy. A few years ago it seemed everyone was leaving this valley.

    This is the time of year that a ton of stuff is ripening: apples, pears, zucchini, beets, chard, winter squashes, Lillooet tomatoes (yay!) and grapes. Also hazelnuts – which are my kind of harvest: no weeding or watering!

    In light of the abundance of food ripe and ready at our farmers markets and our own backyards I have a seasonal recipe this month plus a few tips for newcomers.

    First the tips:

    In Pemberton, fall is the time that field mice want to find a warm and cozy place to call home for winter. They leave the fields and will set up nest in your home if they can. If you live near a field be extra vigilant. This is NOT the time to store cardboard boxes of granola bars or Stone Wheat Thins in your garage fresh from a Costco trip. Or for that matter, any paper towel or toilet paper. If a mouse and his or her relatives find a way into your garage, this nice supply of items will be destroyed. I know all about this from personal experience. Keep your TP in a dry and clean place in your house proper, not the garage. Keep cardboard packages of food in your kitchen cupboards, or, if in a pantry, you may want to consider storing these items in hard plastic salad boxes or Tupperware bins.

    Second tip: If you keep a yard compost bin and put apple trimmings in it or other fruit waste, your yard may attract bears. So at this time of year I usually avoid putting fruit waste in the compost bin, and use the compost bin for coffee grounds and other non-bear attractant compost.

    Finally: do not discard beet tops: Blanch them and freeze in Ziploc bags. They can be added to soups all winter – when you cannot face the depressing looking and expensive imported greens!

    Recipes: Pemberton Fall Samosas

    I recently made a fresh batch of samosas – this time using seasonal ingredients – any time I can use up large zucchinis I will. They were delicious.

    Dough recipe can be found here.

    Filling:

    1 large onion, small dice

    3 cups yellow zucchini, small dice

    2 cups chick peas

    2 cups cooked chicken, small dice

    2 cups cilantro, finely chopped

    ½ can full fat coconut milk

    2 tsp cumin

    2 tsp coriander

    2 tsp allspice

    1 tsp turmeric

    2 tsp salt

    2 tsp pepper

    Method:

    Make dough according to directions in this post. I use spelt flour instead of wheat.

    Make filling by sautéing all the veggies and spices, until soft and caramelised. After this has occurred, add your coconut milk, chick peas and chicken.

    Stir and cool.

    When dough is ready cut out 6-inch diameter circular squares of dough and fill with ¼ cup filling and fold dough over in a half moon shape and pinch the rounded side so it is sealed. You may have leftover filling to freeze for another batch later.

    Bake in a 350C oven for 30 minutes.

    These make great portable lunches and snacks!!

    For dessert:

    Track down Shelley Adams first cookbook: Whitewater Cooks, and make Joey’s Apple Cake. It is an amazingly moist and flavourful spiced apple cake.

    Another one to try is Tarte Tatin. Recipes can be found online. I made it recently but the pastry was not flaky enough for my taste, so I won’t share that one, but I am going to attempt a Martha Stewart version soon and see if it is better. Tarte Tatin is an upside down apple tart baked in a cast iron fry pan.

    Best of luck with your fall produce!!

  • A Recipe to Keep Vampires At Bay

    A Recipe to Keep Vampires At Bay

    A little garlic, judiciously used, won’t seriously affect your social life and will tone up more dull dishes than any commodity discovered to date.  ~ Alexander Wright, ‘How to Live Without a Woman’ (1937)

    It’s that time of year where garlic goes into every single meal. It’s nearly unbearable to stand near or around me, not to mention @therocketnarcissist. In fact, there are days that we don’t even want to stand near each other.

    But when you love garlic — and it’s garlic season — it’s so freakin’ hard to resist.

    A few days ago, we added a whole bulb of Russian Red (the real potent shit) to a black pepper & garlic stir fry (an homage to the dish that I so dearly miss from the good ol’days of Thai One On).

    It was fine. We were fine – sitting alone, in our living room post-dinner, not harming any noses but our own. That’s how it works. Couples who eat garlic together, stay together.

    You can never have enough garlic. With enough garlic, you can eat The New York Times. ~ Morley Safer

    Because garlic goes with almost any cuisine, we’ve had a chance to use up a horde of in-season vegetables that we pick up either at the Pemberton Farmers Market on Fridays or one of the two Whistler Farmers Markets.

    Recent hauls netted us several varietals of tomatoes and spicy peppers, plus basil, eggplant, broccoli, spaghetti squash, onions, leeks and zucchini.

    Now, legend has it that Pemberton villagers almost never resort to buying a zucchini due to the simple fact that even those with a documented plant-killing history can grow award winning zucchinis in Pemberton’s personal produce patches. But, for those of us living in Pemberton south south (aka. Emerald Estates), we’re well outside of the prime growing zone.

    Due to your zucchini glut, a recent call was made for ideas. And, I happily supplied a list of google-able dishes.

    But after reading “Zucchini Two Ways” I felt inspired to contribute an actual recipe. Although this pancake could be found almost anywhere (and your recipe might even be better than the one found here), the heavy-on-the-garlic toppings, inspired by “What’s All The Fuss About Garlic?“, really are what made this recipe special.

    I see recipes calling for one clove of garlic. One clove of garlic is not enough for any recipe unless it’s a recipe for, ‘how to cook one clove of garlic’ – even in this case use two. ~ Unknown

    Note to cooks: As mentioned in “Stop glorifying the summit and enjoy the climb: an astrological forecast for pasta makers”, I rarely follow a recipe or remember to write down specifics. So again, rustic, untested instructions follow:

    Pancakes

    1 cup all purpose flour

    1 tsp baking powder

    ¾ cup of milk

    2 tbsp butter, melted

    1 egg

    1 cup of grated zucchini

    Mix the dry together. Mix the wet together, including the melted butter. Squeeze the zucchini lightly to remove some of the juice.

    Mix the zucchini shreds into the flour. Pour in the wet ingredients and mix until combined. I give a little flour if it’s too wet or add a little zucchini juice or milk if it’s too dry.

    Add fat (lard, butter or high-heat oil) to a cast-iron skillet on medium-high (our burner is a little weak, so you might go lower if you’re cooking on gas or a powerful cooktop). Place about ¼ cup of batter into the skillet, use a spatula to flatten & spread it out a bit. Add more batter, leaving enough space between pancakes to get your flipper in there.

    Flip once puffier on top and golden on the bottom.

    Sorry, from here you’ll have to use your judgment to determine when it’s time to serve. My pan tends to get hotter as time goes on, so I turn it down and leave them a little longer – until the inside is cooked. I might even crack one open to see if it’s done.

    Tomato “Salsa”

    1 cup of chopped tomatoes

    1 handful of roughly chopped basil

    2 – 4 cloves of garlic, minced (no. of cloves dependent on variety and personal preference, but we rolled the dice and went with 4)

    ½ lemon squeezed

    We used a variety of tomatoes that offered different flavours and textures. Simply chop them about the same size – we used a ½ of cherry tomato as the measure.

    Toss the ingredients in a bowl. It’s best when given a little time to marinate.

    Garlic is divine. Few food items can taste so many distinct ways, handled correctly. Misuse of garlic is a crime…Please, treat your garlic with respect…Avoid at all costs that vile spew you see rotting in oil in screwtop jars. Too lazy to peel fresh? You don’t deserve to eat garlic.  ~ Anthony Bourdain (Kitchen Confidential: Adventures in the Culinary Underbelly)

    Blue Cheese Dressing

    2 tbsp plain yogurt

    2 tbsp crumbled blue cheese

    1 tbsp honey

    Mix together.

    Top your pancakes and enjoy.

    August 2018 (7 of 7)

    ~

    Lisa Severn is going to the Whistler Writer’s Festival’s Cooks with Books: Passionate Locovore Edition — and she thinks you should too.

    ~

    Start a conversation about food with Lisa over @rhubarbstreet or look for more on Lisa and her co-conspirators… err… co-contributors.

    ~

    “Garlic Quotes.” found here https://www.torontogarlicfestival.ca/garlic-quotes/

    Images and recipes are by Lisa.


  • Sky Camp Kohlrabi

    Sky Camp Kohlrabi

    There’s something to be said for being in the right place at the right time.

    Over the consumption of tasty beverages at the Beer Farmers, my girlfriend was casually asked if she’d like to host a bunch of mountain bikers at Sky Camp (one of Tyax Adventures’ most balling backcountry locations). She was quick to mention that I could cook and would be a great addition to the hostess-with-the-mostest team and it took me about 0.01 seconds to agree to this union. As of yet I had only heard the tales of this remote location and recognized that it was an opportunity one should not shy away from.

    Allow me to create a visual for you: Board a floatplane that takes you deep into the South Chilcotin range to a fully set-up cabin. This location comes complete with wood-burning sauna, canoes/kayaks/paddle boards, hot showers, the sound of loons atop a lake full of trout, adventure Crocs, old school board games, guest tents stocked with flannel sheets & duvets and nothing else but the silent sounds of the forest. Everyone in favour of glamping, raise his or her hand! Easily 90% of you just did.

    A simple, delicious menu was drawn up for us and I couldn’t help but raid my garden for a few extras to tie in to the plan. My spare time has taken a hard hit lately (aka neglected garden) and there are a few species that have gotten massive due to this lack of maintenance – or someone has secretly been feeding them steroids. So, may I introduce to you the current, uncontested, and very underrated, heavy weight champion of my garden… kohlrabi.

    Out came the biggest bulb, a leek, the dried coriander seeds from my bolted cilantro plants and a cured garlic bulb; all grown in my backyard and all destined to become a side-dish served with salmon. What follows is a rough outline of how I cooked it via an old school propane oven.


    • Pre heat oven to 375°F. While that is happening, lightly toast your coriander seeds then grind them with a mortar & pestle to desired texture.
    • Cut the kohlrabi into ½” cubes and place them into a medium-sized mixing bowl.
    • Add in some sliced leeks, minced garlic, the ground coriander, salt & pepper to taste and then drizzle with olive oil; tossing to combine.
    • Pour the mixture into a cast iron pan and place in the oven for 30-45 minutes. Make sure to take the kohlrabi out of the oven and stir it around every so often to avoid burning.


    The key ingredient for making this dish tremendous, aside from the fact it was grown with love, is the company it was shared with. For some it was their introduction to kohlrabi and that alone makes it a success.

    Sky camp is a magical place: you arrive unplugged and leave fully charged.

    IMG_5580

  • Literary Locavores: when Pembertonians head to the Whistler Writers Festival in 2018, talk turns (obviously) to food

    Literary Locavores: when Pembertonians head to the Whistler Writers Festival in 2018, talk turns (obviously) to food

    Screen Shot 2018-08-26 at 1.22.34 PM

    Two Pembertonians will take to the stage at the 2018 Whistler Writers Festival on Friday, October 12, from 6:15pm, for the reading event Cooks with Books: Passionate Locavore Edition.

    Traced Elements contributor Nidhi Raina’s samosas and chutney have become famous at the Pemberton Farmers Market. And new Pembertonian Nicolette Richer is the creator of the Green Moustache Organic Café and the author of Eat Real to Heal: Using the Gerson Method to Boost Your Immunity, Beat Disease, Build Energy and Heal Your Body.

    They will appear alongside another local Jane Reid, who secured a publishing contract for her book after pitching at last year’s festival. Jane’s new book is Freshly Picked; A Locavore’s Love Affair with BC’s Bounty.

    40100039_10156706471735238_8306097769823600640_n

    Also, once your appetite is whet, save the date for a reading with Jane at the Pemberton Library, on Wednesday November 21, at 7pm.

    Tickets for the Whistler Writers Festival events are on sale now at https://whistlerwritersfest.ticketleap.com

    Download the program for the full weekend’s line-up here.


  • Tory Pearson explains where Pemberton’s first “community supported homestead” experiment began

    Tory Pearson explains where Pemberton’s first “community supported homestead” experiment began

    This is a story about the founding of the Wamhily CSH (Community Supported Homestead). What that is and why, is held in the story below. I hope this tale speaks to you and reminds you, as Field of Dreams profoundly taught us all: “If you build it, they will come.”

    I bought my acreage in a very tumultuous and vulnerable time. I’d been working in social and environmental justice organizations my entire career and had just transitioned into a role in Vancouver’s tech scene. It was what I felt I needed to do, but left me with a void inside and some major guilt for having transitioned to a life “for profit”. For the first time, I was dedicating my daily toils to the system that I knew was broken and only compounding the things about this world that are hollowing us out from the inside.

    It took three years working in high-paced tech sales for me to hit my wall. I was anxious, I was demoralized and I was becoming more and more disillusioned by the day.

    And then I found Pemberton.

    38637483_10156721693349306_2296609585441538048_n

    It happened as a result of a panic attack. Something that was totally foreign to me. I found myself hyperventilating under my desk in my office, overlooking the ferry boats of Granville Island with its happy tourists going about their day in the sun in one of Vancouver’s most beautiful locations. Who has a panic attack in Vancouver’s happiest place?

    I fled the office, got in my truck and ‘drove’. I say ‘drove’ but if we’re being fully honest it wasn’t driving, it was running. I ran up the Sea-to-Sky, I ran past Squamish and past Whistler, further than I’d ever been in this direction. I ran, only to find Pemby.

    It wasn’t until I hit this quiet mountain town that the anxiety lifted and I was able to breathe again. I felt it deep inside and I knew. This is it.

    It took me a few months of weekend visits and some persistence from my realtor, but I found it. I found my acreage. I found my blissful slice of paradise. I found Wamhily – five wild acres in the mountains outside Pemby that lacked cell reception. Perfect.

    37266574_10156671310489306_3804017680407592960_n

    For those of you who get it, this won’t be news to you. But for me, it was a revelation — the peace, the strength and the levelling and grounding power of these mountains. Of the land between them. And of what they can evoke in even the most desperate and hollowed out of us. So much so, I quit my job, left the upward trajectory of a stellar career and never looked back.

    I named my acreage Wamhily. It’s a long story, too long for this piece, but the short story is that the calm steadfast mountains, our deep rich forests and the serene lakes that make up our magical home manifested. Wamhily, an acronym for With All My Heart I Love You. And I do.

    Having worked in the political and not for profit trenches with others who wear their passion on their sleeves and who have been able to withstand the heartbreak that this world throws at us, things crystalized. Wamhily was built to open its arms to those still doing that great work, as a respite, as an oasis, and as a hub for support and connection between those who are able to continue the fight. A quiet place away in nature, far from the social and environmental fights we wage on behalf of others and our collective selves. A safe place in nature that is always here for you.

    Unfortunately, real life creeps in, and reality is: no acreage is an island, as much as we wish it could be so. There are bills, taxes and the costs that come with participating in greater society. And after four years, Wamhily has been forced to evolved.

    To say Wamhily was a one way street providing for the community that needed it would be a lie. After four years on the acreage, building my mini homestead, the community it fed has showed up. It has built gardens with me, it has tended bees, it has mourned their loss to bears getting fat for winter, it has supported the dream and revelled in its escapism. Now, it has moved to helping further, with supporting me in my homestead dreams and making sure the bills get paid to keep this place afloat for us all.

    This brings me to the Wamhily CSH.

    What is a CSH (Community Supported Homestead)?

    To be honest, I’ve never heard of another one. The idea came from the intrepid farmers out there running CSAs (Community Supported Agriculture), making their way with the help of their neighbours, friends and those that believe in local farming. Participants pay a fee at the outset of the season and reap the benefit that harvest season holds.

    The inaugural Wamhily CSH is the first time a monetary value will be placed on the gift that Wamhily is to me and those that draw upon it. It feels weird to bring money into this beautiful ecosystem of love and support but it came at the behest of its community, now demanding to pay into the work I do and the dream it supports in us all.

    In spring, we harvest garlic scapes from the garden and make pesto. Summer brings:  beets, beans and cucumbers for pickling; tomatoes for drying and sauce; peppers and onions to add for salsa; berries for jam; cabbages for sauerkraut; herbs and kidney beans for drying; seeds for saving; and other garden delights that find their way into jars. Down time manifests vegan soaps made from scratch with exfoliants like lavender grown and dried here, and knitted dish rags so you can say goodbye to disposable j-clothes, among many other gifts.

    39979433_10156761712549306_4218753195821760512_n

    Before the costs and toils of the season are upon me, I know I have the support of my community. Not just in spirit, but in the currency of our culture, dollar dollar bills y’all. Those who believe in what I’m doing buy in at the outset and set me up to be able to manifest the season’s bounty into what we need to get by throughout the year. A jar of raspberry jam, still smacking of the sunshine it was harvested in, shining through in the bleak grey of February.

    In short, a CSH is a community supporting an alternative “back to our roots” lifestyle, supporting a person and supporting a belief that together we can grow, make and provide for ourselves. I’m not just preserving food or making my own cheese — we’re preserving a way of living that our existing consumerist and capitalist system have thrown to the wayside and devalued.

    Wamhily’s CSH is more than just the monetary support to be able to provide healthy and love-filled food and household items. It’s the understanding between us that there is value in where we’ve come from and the knowledge passed from generation to generation. There is innate and deep importance in hands covered in dirt, arms torn up by blackberry brambles, wax from my hives dipped into tapers.

    The Wamhily CSH is the manifestation of love into action. A divergence from the corporatized and prescribed path to a more connected and nurturing one. Of my community saving me and I hope, in a small way, me saving them.

    It comes not from a place of judgment of what we’ve inherited and is easy, but of what we can do when we set our minds to it and believe that we are capable. Capable of a different narrative, capable of doing more with less and capable of knowing deep in ourselves that we don’t need the system handed to us.

    This season, with the support of my community, I go to bed each night knowing that Field of Dreams was right. When you build it, they will come. At least when you build it together.