These two unassuming primitive implements no doubt helped propel humankind from hunter-gatherer to agrarian in some sticks-and-stones fashion long before the Iron Age. As I will describe, my very being is also “owed” to these simple tools, so I thought I’d write an “ode” to them.
A rake and a shovel
Will cause you no trouble,
They don’t have a moving part.
It may seem a bore,
But it will strengthen your core,
It’s even good for your heart.
With a dig and a pull,
It will get the job done,
With the right attitude,
It might even seem fun.
If the handle should break,
It’s easy to replace,
You just need a long wooden stick.
For a shovel and a rake,
Is all you need to do the trick.
“Shovels and Rakes” was the name of my very first landscaping venture over 35 years ago. I got the idea from Arlo Guthrie’s infamous song Alice’s Restaurant where he “loaded up the red VW microbus with shovels and rakes and implements of destruction”. In retrospect, it was also fitting – they were the only tools I could afford at the time. My only power tool was my parents’ lawnmower.
My wife calls me her “digger boy” because in some strange way I enjoy shovelling and raking. There’s a quiet, zen-like, methodical motion to it that I find comforting. And it’s good exercise.
In the construction field, the shovel and rake are unaffectionately known as a D1 and D2. The D8-9-10 are large bulldozers. Being a machine operator, I love big equipment, especially if it belongs to someone else. On a landscaping job site, time is money and it belongs to the client. Machinery is needed for efficiency and to be competitive. Conversely, on the farm time is… well, simply your time. I prefer to spend it quietly with good old fashioned hand tools if I can.
At one point, I had a fair amount of machinery. A tractor and hoe, rototillers, blowers, compactors etc. These things are expensive, require fuel, maintenance, repairs, storage and they don’t last forever. For the few times a year I needed them, it made sense to eventually do away with owning them and just lease the right tool for the right job. This type of overhead is justifiable for a landscaping business but is a killer for small scale farmers. A blown motor or transmission could exceed your profit margin for a season.
We are trying to have less of an environmental footprint. I would rather use my own human-powered energy, to become more sustainable, more connected to the earth and stay in shape while breathing fresh air as opposed to exhaust fumes.We are starting to practise “no till ” methods, we’re mulching more and instead of blowing leaves,we simply rake them onto a tarp. I rarely miss my machines.
If I was on one of those survivor type reality shows, and could only have a single tool it would be a flat spade. This versatile tool is not only a shovel – it can cut, level, edge and scrape. My favourite tool is the wide aluminum landscaping rake.You see, after over 25 years of snow grooming, I’m obsessed with having perfectly level and impeccably combed garden beds. With these tools I can buff out the soil, to a standard that a ski instructor would appreciate. It’s in my DNA. I just can’t help it.
The rainy days of fall have come at last and today even a bit of the white stuff. But thanks to our extended August weather my garden saw yet another expansion complete with an Asian pear tree, perennials, and flowering bulbs; plus I finally got the garlic planted. My focus has taken a small hiatus from planning out next year to filling my freezer with quick dinner options for the dark hibernating nights of winter.
I don’t have kids but I ended up with pumpkins and carving them didn’t happen. I also had potatoes – go figure. So, I thought I’d channel my inner nonna, combine the two and make some gnocchi. To say I followed a single recipe would be far from the truth… more like scoured through a ton of websites and drew on certain elements from each to make one. Biased opinion or not I think it turned out pretty delicious. They are in no way gluten-free or dairy-free but rich in flavour and love.
Step Uno: Roast your pumpkin – cook your potatoes
Cut your pumpkin into half, gut it and then cut it into wedges (save the seeds to roast). Place on a cookie sheet skin side down, drizzle with a bit of olive oil and season with salt & pepper. Bake at 350°F for about an hour then remove from the oven and set aside to cool. Scoop out all the flesh and keep aside 1½ cups – freeze the rest for a rainy day. While your pumpkin is cooking place 3 medium sized russet potatoes into a pot and start to boil them. There is no need to cut or take the skin off just place them in whole! This will help you achieve the perfect texture – fork tender no more no less. Remove them from the water and allow to cool completely. When they’re ready peel the skin off and either grate the potatoes or use a potato ricer to process them.
Step Two: Prepare your dough
In a large bowl add your pumpkin, prepared potato, 2 egg yolks, some fresh grated nutmeg, 1 cup of ricotta, ¼ cup grated parmesan, salt and approximately ½ cup+ of oo Italian flour. Now some of you are probably wondering; what the hell is oo flour? Basically, it’s more refined then normal flour and while it’s not necessary for this recipe I think it creates a superior, silkier dough and helps the pasta maintain chewiness once cooked. But use whatever you have on hand. I’d also like to mention that the flour amount will vary and this is where “channeling your inner nonna” comes in. As a friend recounted to me from her recent trip to Italy where she learnt to make pasta with a real live nonna, “they don’t measure – they feel; and just know when it’s enough.” Start with only ½ cup of flour and use a wooden spoon to bring all the mixture together, adding in flour as you go until the dough does not feel wet any more. Turn the dough onto a floured surface and knead until smooth.
Step 3: Make your gnocchi
Cut a slice of dough off and roll it out into a rope about ½” thick. Using a sharp knife cut your rope into 1” pieces. Keep flour on hand for this stage as well, you don’t want your gnocchi sticking to the counter. Use a fork or a gnocchi board to gently roll your pieces, creating texture on top and a small indent on the bottom to catch your sauce. Continue this formula until all the dough is used.
Step Quatro: Cook & eat!
Bring some salted water up to a boil, working in small batches to cook your gnocchi. When they float to the surface they are done… it does not take long – do not leave them unattended. At this point the rest is up to you: skies the limit. Sauce them up with whatever your heart is craving. For this round I used A LOT of butter then some sage, chili pepper, garlic and toasted hazelnuts (plus a little extra pancetta I had on hand). Like with pasta I added a bit of the water the gnocchi was cooked in to make it extra saucy.
Step 5: Freeze your extras
This recipe produces a lot of little gnocchi so I froze the extras in a single layer on cookie sheet lined with parchment (as seen in the featured image).
In my kitchen I experiment just as much, if not more, as I do in my garden. I did not nail this recipe on the first try and it’s still not nonna’s gnocchi but it’s mine. It’s really about how the more I cook, the more I learn, the more I love to do it and the more I eat! And, let’s be honest, there are way worse problems to have then a full stomach and heart.
Okay everyone, there’s something I need to get off my chest.
I. Love. Food.
I absolutely love it. I love everything about it. I love the act of eating. I love the sheer variety of foods to eat. I love the challenge of creating your own. And I especially love the joy around food.
I work at the Blackbird Bakery and one of the things I love most is when people tell us how good our food is. When their faces light up and they say things like “I haven’t had an almond croissant that good outside France,” or “That was the best muffin I’ve ever had.” Something as simple as a really tasty muffin can make someone’s day, and that makes me so happy. I love when people gather at the bakery and chat over sandwiches and turkey pies, or start their day off on a positive note with a cheesy breakfast sandwich. There is something magical about how really good food can change our whole day.
I have a friend who is a chef in Vancouver and primarily does catering for films. On a recent visit he told me how much he dislikes food, and how much he’d prefer it if there were a pill he could take instead of eating food. That made me so sad. Growing up I always had joy around food. I have so many happy memories around the making and eating of food, especially with family. I can close my eyes right now and conjure up the joy I would feel walking into my house after school and being greeted with the warm smell of freshly baked banana bread. Our family of seven had dinner together every night and I can still hear the buzzing conversation of all of us sharing our days over chicken cacciatore or my mom’s amazing chili. For me, food, family, and joy go hand in hand (in hand).
So recently when I learned we’d be having a quick visit by my partner’s parents I knew I wanted to make a special dinner. It felt like a perfect opportunity to break out the fall flavours and use up some items in my freezer and pantry. I pulled out a chicken I had gotten from a friend here in Pemberton and made Maple Rosemary Chicken from the New York Times Cooking, with a simple rice pilaf that wouldn’t overpower the flavour of the chicken, and some roasted Brussel sprouts with bacon (because why do I only make this dish at Thanksgiving? It’s amazing.). But the thing I was most excited about was something tasty for dessert, and I wanted to make something that would shine. Something I hadn’t done before, because experimenting with food is fun. Continuing with the fall flavour theme, I decided to go for Maple Pecan Monkey Bread that I adapted from another NYT recipe, paired with a simple cream cheese icing. I’m happy to share it with you here:
Maple Pecan Monkey Bread
Brioche Dough:
1 tbsp yeast
3 tbsp warm water
2 tbsp maple syrup
1 1/2 tsp salt
3 1/2 cups all purpose flour
4 eggs, room temperature
1 1/2 sticks (3/4 cup) unsalted butter, softened
Maple Brown Butter:
8 tbsp unsalted butter
1/2 cup maple syrup
1 tsp salt
1/4 cup sugar
1 tsp cinnamon
1 cup pecans, toasted
1.Mix the yeast in a small bowl with 3 tbsp warm water. Add 1/2 tbsp maple syrup. Let sit 5-10 minutes to rise.
Note: I tend to use Fleischmann’s traditional dry active yeast in my recipes, which requires a little proofing. If you are using instant yeast you can skip this first step and add the yeast directly into the flour/salt mixture, and add the warm water when you add the eggs.
2. Combine the flour and salt in the bowl of a stand mixer. Mix on low speed using the paddle attachment to blend. Add the eggs, remaining 1 1/2 tbsp maple syrup, and yeast/water mixture. Use the paddle attachment until the dough starts to come together.
Ready to rise!
3. Switch to the hook attachment and continue mixing on low. Add the softened butter in small chunks, a few pieces at a time, until fully incorporated. Continue mixing, stopping and scraping any stray pieces of butter on the sides or hook as needed, until the dough is smooth and elastic. This may take up to 10 minutes. Turn the dough into a buttered bowl and cover with a clean towel. Let rise until doubled in size, approx. 90 minutes.
4. When you’re ready to assemble, melt the butter in a small saucepan over medium heat. Cook, stirring with a wooden spoon, until the dairy solids turn golden brown and the butter smells nutty. While stirring add the maple syrup and salt. Bring to a boil while stirring, then remove from the heat. Set aside while you get your dough ready.
5. Mix the cinnamon and sugar in a small bowl. Butter a 10-inch Bundt or tube pan. Turn your dough onto a clean work surface and roll into a thick rope, approx. 2 inches in diameter. Cut this rope into eight even pieces, and then cut each of those pieces into eight, until you end up with 64 small dough balls.
Note: I didn’t have a Bundt pan so I used my tall tube pan that I use for angel food cake and it worked fine. You don’t need any flour for your work surface because of the amount of butter used in this dough. It should be soft and slightly greasy, but not sticky.
6. Gently roll a piece into a small ball and dip in the cinnamon sugar, rolling it around until evenly coated. You can do multiple dough balls at the same time, but avoid overcrowding to ensure they are evenly coated with the sugar. Place the sugared balls in the pan and repeat until you have a single layer. Scatter some of the toasted pecans on top. Repeat this process until all the dough balls and pecans are in the pan.
Note: Because I was using the large tube pan, I was only able to make two layers of dough balls. It doesn’t look like much, but when we do the second rise the dough balls will expand dramatically.
Ready to bake!
7. Drizzle the maple brown butter all over the tops and sides of the dough balls. Cover with a clean towel and let rise in a warm spot until puffed and the dough comes to about an inch below the top of the pan, approx. 30-45 minutes.
8. Preheat oven to 350ºF. Uncover the pan and bake until golden brown on top, approx. 35-40 minutes. Put the pan on a wire rack for 5 minutes. Place a large plate on top of the pan, grip both together, and quickly and carefully flip. The monkey bread should come away easily from the pan. Serve warm or room temperature.
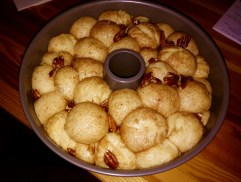
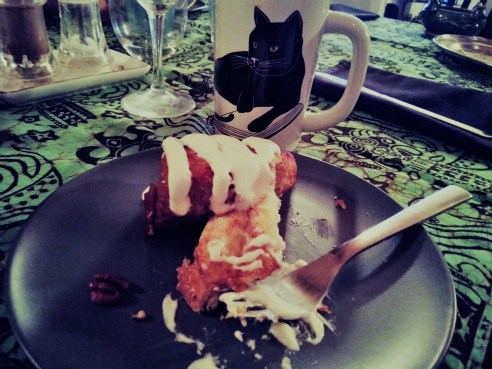
And there you have it. Maple pecan monkey bread. I was very pleased with the way this recipe turned out. The edges are crispy and sweet, and the inside is soft and fluffy. A perfect combination. You could jazz this recipe up with some caramelized apples or bananas, or chocolate, or use almonds or hazelnuts instead. This would be a great recipe to make with kids, who can help roll and dip the dough balls. You can serve this warm with just butter, or a little more maple syrup drizzled on top. I used a basic cream cheese icing, made with butter, icing sugar, cream cheese, and heavy cream. The possibilities are endless.
I am submitting my November entry early because I cannot bear to think people are going to chuck their Halloween pumpkins into the compost or attend a pumpkin-smashing event to get rid of their creations. As long as your carved pumpkin hasn’t been mauled by wildlife or is going moldy then why not consume it?
What to do:
Take your carved pumpkin and slice it into manageable pieces. Lay the pieces skin side down onto baking dishes with a couple inches of water in them. Bake at 350F until soft and mushy. Then scoop out flesh into a large bowl and cool. Then freeze in 2-cup portions. You can make pumpkin soup, muffins, or pumpkin bread. Here is a great recipe for pumpkin bread that is very moist and also freezes well. I adapted it from Susan Mendelson’s recipe from her 1980 cookbook Mama Never Cooked Like This (which also contains a delicious banana bread recipe). In short – respect your pumpkin! Its use extends far beyond decorating your porch on Halloween night.
Pumpkin Bread (yield: 2 loaves)
Ingredients:
2 cups mashed cooked Pemberton-grown pumpkin (no need to puree first)
2.5 cups spelt flour
3/4 cup almond meal
2 cups white sugar
4 eggs
1 cup grapeseed oil
2/3 cup water (can use the water from bottom of pumpkin baking pans)
2 tsp baking soda
1.5 tsp cinnamon
1.5 tsp nutmeg
1 tsp cloves
1 tsp ginger
1/5 tsp salt
1 tsp cardamom (optional)
Method: Preheat oven to 350F. Mix all ingredients well in stand mixer. Pour batter into 2 well-greased standard-size bread loaf pans. Bake 60-70 mins. Done when skewer inserted in centre of loaf comes out clean.
**Note: this bread often sticks to the bottom when removing, so grease pans very well and consider flouring the pans too. Silicone loaf pans are a better choice than pyrex.
(This is a photo of my first kitchen garden and campsite in my rookie year homesteading circa 1994 )
The few job postings I’ve come across for farming are usually for minimum wage labouring on commercial farms. You might be better seeking one of these positions if you’re not sure about a forever commitment, but I have never seen a posting for my lifestyle, that which I refer to as “Homestead Farmer” as it’s more of a self-employed way of life. So I’ve created a fictitious (yet accurate) tongue-in-cheek ad to provide some understanding as to what is entailed. Unlike most job ads, this one is in-depth and not candy-coated. It’s the good, the bad and the ugly.
HOMESTEAD FARMERS NEEDED FOR FOOD SECURITY
PHYSICAL REQUIREMENTS:
You must be strong, able-bodied, resilient and okay with getting stinky and dirty. You may work up to 14 + hr days/ 6-7 days a week, 7 or more months/year in all types of weather. There is no set schedule and you must be available at all times. Your hands will be permanently stained and callused, your back sore and you will most likely eventually get a hernia.
LOGISTICS AND JOB DESCRIPTION:
You must first acquire a piece of land preferably in the 5 acre range to start. (Finding a nice developed homestead with the infrastructure and house on it is out of the question unless you inherit one or you have a million dollars). You will need a 50% down payment on said piece as required by the banks for any undeveloped land without a house on it. For this you will have to beg, borrow or steal. You will most likely end up with a derelict lot away from an urban centre that needs driveway access, hydro, a well, a septic system, and a landline. You will probably not have cell service or wifi. You will need reliable transportation, preferably a truck. You will have to camp on this land until a cabin is built and services are in (approx 2-5yrs). During this time you will be analyzing your micro climate, making compost, improving the drainage, clearing, brushing, burning, tilling, fencing, testing the soil and water, applying for permits, and most importantly making friends with your neighbours (who you will rely on heavily for info, tools and help, but will have to reciprocate in return). You will be picking thousands of rocks, and once you think you have most of them, more will surface yearly, forever. Many trees and bushes will need to be planted for future fruit and buffers. Outbuildings such as sheds, barns, and chicken coops will have to be constructed. Salvaging, storing and using recycled building materials will take up a lot of time and effort but will be way cheaper than buying new. There is no course or training for any of this. You will have to learn everything the hard way; through trial and error. You must be able to adapt, improvise and suffer.
You will need to be resourceful and find side hustles here and there to finance the above infrastructure as production and income will slowly trickle in for many many years. Having a spouse to help is a definite asset, but finding one who will put up with such rustic conditions will be difficult. Keeping one will be even harder.
Eventually, once you’ve succeeded at producing your chosen crops and developed a niche market (you will already have learned that you can’t do everything or compete with the big farms), you will have to find a way to sell your products. This will involve attending lengthy farmers markets, setting up and maintaining a farm stand and doing cold calls, back door kitchen sales and deliveries. Once you’re at this stage you will have even more overhead in fees, fuel, insurance, advertising and additional help.
EXPERIENCE:
Any gardening, landscaping, mechanics, machine operating, tree planting or any labour intensive job experience is a definite asset. You must be able to do mindless tedious repetitious jobs yet also be a jack of all trades and problem solver.
Post secondary Diplomas and Degrees are worthless other than proving to yourself that you can stick it out on a shoestring budget. It’s also a hindrance in that you will have to explain to your family how you’ve squandered a perfectly good education and professional career possibilities to live in the bush like a hillbilly. Having student loan debt is extremely detrimental.
COMPENSATION (or lack of):
Calculating your wage is near impossible and fruitless. If you try to guess, it will rarely top minimum wage. You can only reap what you sow and that can take a long time or sometimes never. You will always be tight on funds as you straddle the poverty line. You will have to pay your bills promptly no matter what because you will rely on your credit rating very often. You will need and replace lots of implements and clothing without a tool allowance. There are no regular or extended medical benefits, injury, sickness or life insurance. Workplace injuries are not covered by WCB. There is no overtime, vacation or stat holiday pay, RRSP, pension fund or severance package. There is no crop loss insurance or subsidies for small farms. Self employed farmers are not eligible for unemployment insurance or welfare. Tips are extremely rare. You will need a well paying second job (preferably with some benefits) to survive the winter months.
OTHER BENEFITS (the positive):
You will be your own boss and work unsupervised. You can take ownership of all your failings and keep them secret.Your job will be secure, since everyone always needs to eat. You will be unaffected by recessions and global markets. You will be well positioned for a complete financial collapse or other disasters. You will not be demoted, replaced by technology or out sourced. (You will however be constantly undercut by mechanized agribusiness.) Once your farm is over 50% cultivated and you have a certain steady income you may apply for Farm Status to receive modest tax breaks on property taxes, fuel and supplies. You will live a heathy and holistic lifestyle with a sense of purpose and pride. You will become a steward of your piece of land and feel good about working toward sustainability. You will breathe clean air, drink fresh water and eat the most nutritious balanced diet. You be able to take lovely photos and post them on social media, where people will comment on the beauty and bounty that surrounds you. You will network and trade with other farmers for food, tools and help, building lasting friendships. You may sometimes be able to take a few days off (if you get someone to watch the farm) and possibly take a short vacation between seasons. In the end your children will inherit the legacy of your vision and hard work. If they decide to follow in your footsteps they will be much better set up for success.
ONLY SERIOUS CANDIDATES WHO ARE WILLING TO DEDICATE THEIR ENTIRE LIFE TO SUCH AN ENDEAVOUR NEED APPLY. THERE IS NO BACKING OUT. YOU WILL HOLD THIS POSITION UNTILL YOUR BODY CAN NO LONGER HANDLE IT.
When my kindergartener began concocting a little dirt-pile offering for the tree, to say thanks for the fallen branch he had harvested to be a sword, I wondered if maybe I’ve gone a bit far with my semi-pagan ramblings.
I had relayed the rules of the honourable harvest to my little forest sprite, as I had just absorbed them from a 15 minute online video by Dr Robin Wall Kimmerer, botanist, author, professor of environmental biology and member of the Citizen Potawatomi Nation.
I pronounced, in a conspiratorial whisper, that we should ask permission of the trees and thank them and offer something back for everything they give us, including the air we breathe.
I delivered this mystical proclamation earnestly, reveling in the captive audience that is one’s own pre-school aged progeny and the prayerful way he stage-whispered “may I” into the old cedar’s rough bark, despite the fact that I have I completely failed to live up to this pact of reciprocity in my every day life… I mean, when was the last time I gave thanks to the earth? When was the last time I remembered my reusable shopping bags? When was the last time I made a gesture of offering?
But out in the forest behind our house, where I mark the seasons by observing the shifting flows of the creek, “the earth” is not an abstract entity, it is right there, exhaling and shimmering around me, and talking to the trees seems as normal as any plot point in the fairy tales I read to the boy.
The Honorable Harvest is a set of ethics that were taught to Dr Kimmerer by her teachers to guide her when she would go out to pick berries or medicines, and they landed somewhere in my son’s small body, and there he was, weeks later, offering a gift of humus, a hand-packed dirt pie, to the cedar tree.
Is this how we grow a generation of honourable men? Or is it just a way to prolong his belief in magic a little longer? I wish I knew.
The first rule for foragers, shared Dr Kimmerer, is you never take the first one – berry, mushroom, plant – because it might be the last. You restrain yourself, until you’ve checked the health of the population, asked permission of the plant, and listened for the answer. If you’re given permission, explains Dr Kimmerer, you take only what you need. You take in the way that does the least harm. You use everything you take. Then you give thanks, and share what you glean.
The last and most important tenet is to reciprocate the gift.
“If you take from the earth, in order for balance to occur, you have to give back. We have forgotten this. Even our definitions of sustainability are all about trying to find a formula by which we can keep on taking.”
To heal our relationship with the land, says Dr Kimmerer, we have to reclaim our role as givers.
“I don’t think what we need today is more data, more studies, new technology, or more money,” says Dr Kimmerer, “but an ethical shift. A change in the story that we tell ourselves about our relationship to the living world. We need acts of restoration, not only for polluted waters and degraded lands — we need a restoration of honor. This is where our efforts at de-extinction can go. To the regeneration of the ethics of reciprocity. It’s not the land that is broken, but the relationship between us and the land. We can heal the relationship, by asking, what will I give in return for the gifts of the earth, in return for the gifts of birds and berries, in return for the privilege of breath.”
Small hands in the dirt. That’s where my answer, and a new story, begins. Will it be enough? I don’t know. But begin we must.
In fact, to my mind, I am actually late! For what, you ask. Christmas, I say. More specifically Christmas Cake, the traditional fruit, soaked in alcohol, version.
In years past I have made my cake at the end of September and then spent the next few months feeding it before marzipanning and icing it in mid-December. A rich fruit cake can be made 2 to 3 months in advance and kept in an airtight container in a cool, dark place. Feeding a cake means that once every few weeks you make holes in the cake using a skewer and then pour an amount of alcohol over it, before re-wrapping.
The recipe I always use comes from a cake decoration cook book that I purchased way back when! But the recipe works every time, albeit I always need to cook it for longer than suggested. I even used the same recipe to make my friends wedding cake!
You need a little time for this recipe as you should ideally start it the day before you want to actually make the cake mixture to allow the fruit to soak in the alcohol overnight. Once the mixture is in the tin, the surface can be covered with clingfilm and stored in a cool place overnight if cooking is not possible on the day (there are no leavening agents to worry about). However, do remember to allow for a longer cooking time as the temperature of the mixture will be colder.
I know that a lot of people don’t like fruit cake, but this recipe offers a moist cake with the delicious spices and and flavours of Christmas and is a must in my house. The instructions below are for an 8″ round or 7″ square tin, but if you want the recipe for another size tin let me know as I can provide details for a 6″ round, all the way up to a 13″ round tin!
Ingredients
325g raisins
250g sultanas
175g currants
150g glacé cherries (the bright red cocktail ones)
50g cut mixed peel (I omit this in favour of more cherries!)
50g flaked (sliced) almonds
2 tsps lemon rind
2 tbsps lemon juice
3 tbsps Brandy or Sherry
275g plain flour
2.5 tsps ground mixed spice
65g ground almonds
200g dark brown soft sugar
200g butter or margerine, softened
1.5 tbsp black treacle or molasses
4 eggs
Directions
Preheat the oven to 275F degrees and prepare the cake tin by double lining the inside of the tin with greaseproof paper, and the outside with a double thickness of brown paper. This will prevent the outside of the cake from bing overcooked.
In a large mixing bowl place the raisins, sultanas, currants, glacé cherries, mixed peel, flaked almonds, lemon rind and lemon juice together with the Brandy or Sherry. Mix all the ingredients together until well blended, then cover the bowl with clingfilm. Leave for several hours or, ideally, overnight.
Sift the flour and mixed spice into another mixing bowl. Add the ground almonds, sugar, butter (or margerine), treacle (or molasses) and eggs. Mix together with a wooden spoon, then beat for 2-3 minutes until smooth and glossy.
Gradually add the mixed fruit to the creamed mixture and fold it in, using a spatula, until all the fruit has been evenly blended. Spoon the mixture into the prepared tin and spread it evenly. Give the tin a few sharp taps to level the mixture and to remove any air pockets. Smooth the surface with the back of a metal spoon, making a slight depression in the centre.
Bake the cake in the centre of a pre-heated oven. Test the cake to see if it is cooked 30 minutes before the end of the cooking time (total 2.5 to 3 hours for a cake of this size). If it is cooked, the cake should feel firm and a fine skewer inserted into the centre should come out clean. If the cake is not cooked, re-test it at 15 minute intervals. Once cooked remove from the oven and allow it to cool in the tin.
Once cooled, turn the cake out of the tin but do not remove the lining paper as it helps to keep the moisture in. Using half the quantity of alcohol as used in the recipe, spoon over the top of the cake and then wrap it in a double thickness of foil.
Store the cake in a cool, dry place on its base with the top uppermost for a week. Unwrap the cake and spoon over another half quantity of the Brandy or Sherry. Re-wrap the cake well and store it upside down, so that the Brandy or Sherry moistens the top and helps to keep it flat. The cake will store well for up to 3 months; if it going to stored for this length of time, add the Brandy or Sherry just a little bit at a time at monthly intervals.
I have a cake decorating “bake off” with one of my friends in the UK so I will provide an update once decorated so you can see the finished result too!
You already know that fall is my favourite time of the year. It also happens to be one of the busiest times of year for me at work. So busy that sometimes it feels hard to find a full breath. A breath that I can get behind: my normal rhythm. Yet one thing that constantly replenishes my soul is when my house if full of friends and family. It’s then that my breath returns to normal – no matter what. This is why every year I muster up some energy to host Thanksgiving dinner, even if all I want to do is sit in silence.
Initially I thought I’d post some great, amazing Thanksgiving recipe the day after dinner but I could not find any words and you can’t force something that’s not there. Instead I chose to harness the good vibes from a room full of laughter, sing-a-longs, amazing food and love, to put my garden to sleep. It was the perfect remedy and the bonus? – I got to do it with my dad. However, I thought I’d share a recipe for a pie that usually graces my Thanksgiving feast but just didn’t have time to make. I mean I barely got the turkey in the oven on time and that only happened because my mom did it!
This is apple season. When your parents show up with a massive bag of said fruit from a friend’s tree on the Island and you’re eating at minimum and apple a day, or two, but barely making a dent in the stock, you make pies.
So, without further ado… here is Apple Cheddar Pie: an instant crowd pleaser and a delicious breakfast supplement.
Step Uno: make your crust.
2½ cups all purpose flour – TBSP sugar – TSP salt – 1½ cups grated white cheddar (kept cold in fridge until ready to use) – ¾ cup grated butter (frozen) – ½ cup ice-cold water (maybe a bit more)
Add the flour, salt and sugar to your mixing bowl and combine them. Then grate your butter into the bowl and add in your cheddar. Next start gently rubbing the ingredients through your hands; you’re aiming to get a “pea like” texture (you may recall me using this method in my previous pie recipe). Pour the water in and use your hands to bring the dough to together. I always end up turning it out onto my counter to finish kneading it. Separate the dough into two balls with one slightly larger then the other. Flatten them out to resemble small saucers and a place in the fridge for at least an hour.
Step Two: prepare your apples.
8-9 apples peeled, cored & cut into eighths – juice of half a lemon – cinnamon, nutmeg, ground clove – a sprinkle of cornstarch
Place your apples in a bowl, add in your preferred amount of spice, squeeze the lemon on top and sprinkle that cornstarch… then toss.
Step 3: build your pie.
Preheat your oven to 375°F. Roll out the smaller disc on a floured surface, place it in your pie dish then add your apple mixture. Before rolling out your second dough disc and topping the apples with it, dot them with a bit of butter. Seal the edges together and then cut some shapes in the top crust or keep it simple with a few little knife slits that will allow the air to escape. Brush the pie with an egg wash (I forgot but you should really do it).
Step Quatro: bake & wait.
Place the pie on a baking sheet and pop it in the oven. Let bake for a least an hour or until the crust is golden brown. Allow it to cool on a wire rake for an hour or more… I am not capable of this step. Not even a little bit.
Step Five: consumption.
Serve this bad boy with some ice cream or nothing at all.
So if you’re wondering what to do on this rainy weekend and have a bunch of apples, you should make this pie and fill your house with people to share it with.
Squamish CAN (Climate Action Network) has launched an Indiegogo calendar fundraising campaign featuring nude Squamish farmers in hopes of raising money for a community farm.
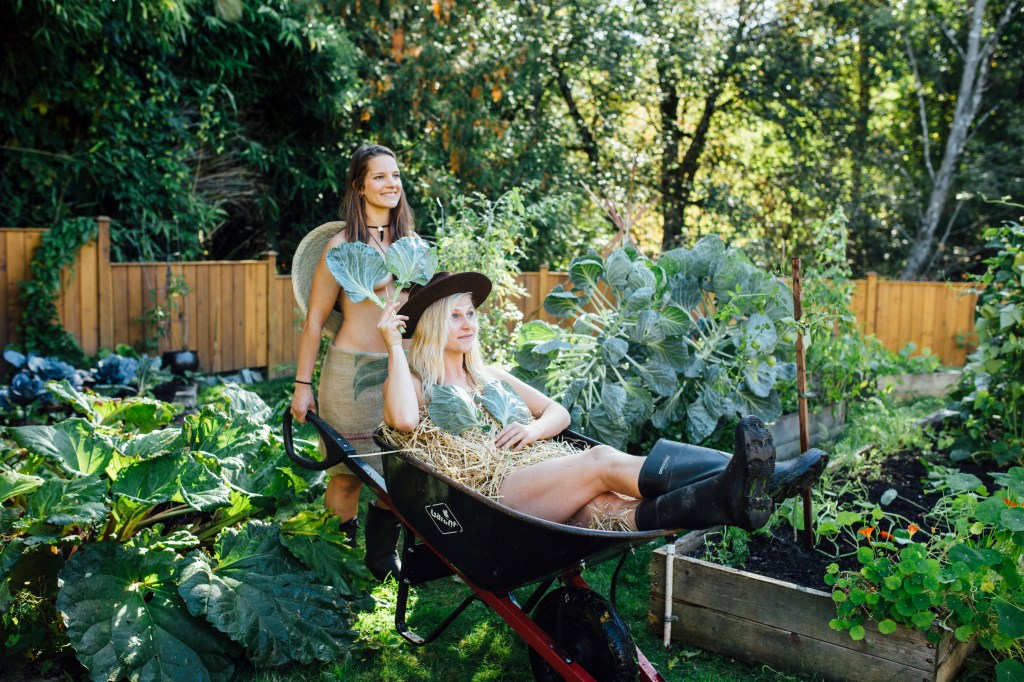
Jordie and Steph from Solscapes pose in one of their client’s edible gardens.
The group has been running community and school gardens over the past several years, and have been identifying ways to strengthen the local food system through consultations with farmers and other stakeholders in the food industry. Their community farm project aims to engage youth, attract new farmers to Squamish, and support established farmers while preserving agricultural land. They rallied local farmers to strip down for the cause, and most were willing to go along with it.
Calendar coordinator and Squamish CAN president, Michalina Hunter, was inspired by a past calendar she purchased in 2015. “The nude farming calendar I bought on Indiegogo raised $35,000 for two women to put a downpayment on farm property. I thought it was such a great idea. How amazing would it be if we could raise that much for our organization? We finally decided to go for it this year. We have incredible farmers in Squamish. I hope the idea is just cheeky enough to be successful!”
Michalina and Darwyn of Green Bee Honey–probably the most dangerous photoshoot of them all given the flying stinging insects everywhere…
There are other models of community farms and similar projects nearby. The group toured and learned about the Tsawassen Farm School, Glorious Organics (Aldergrove), Richmond Schoolyard, Fresh Roots Urban Farm (Vancouver), Amlec Organic Limited (Lillooet), Farm Folk City Folk (Vancouver), and others to design the project.
“We’re not the first community to do this,” says Hunter, “We’re really excited about the potential of creating multiple win-wins with this project. It can engage youth in growing food and learning employable skills, it can support new farmers in finding land, it can create shared sales opportunities for established farmers, and it can engage the community in sustainable agriculture. We envision a central educational market garden for us to work on, and then several 1/4 acre to 1 acre plots for new farmers to lease. There will be shared tools, equipment, wash stations, and storage for all the farmers to share. The community farm is really a jumping off point that can support so many other community initiatives.”
Dorte and Thor from the Brackendale Art Gallery.
Squamish used to be a prosperous agricultural community, growing primarily hops, hay, and potatoes. In fact, hop farming was Squamish’s first major industry. Much of the fertile valley-bottom land has since been paved and built on. Only 2% of Squamish’s remaining usable farmland is currently used for agriculture, yet skyrocketing land prices make it cost-prohibitive for new farmers to get into the industry. Leasing land, on the other hand, has less financial risk, and can allow new farmers to get into the industry, hone their skills, and build credit.
Tracy of Stony Mountain Farm. The pigs were wary about the apples once they were covered in bubble bath, but of course being pigs they ate them anyway.
The group envisions starting small with the community farm, then adding components over the years such as a Food Hub, community garden, covered workshop space, and food forest. They have not solidified a location for the community farm, but are exploring different options. Ideally they would own the piece of land, but a long term lease or memorandum of understanding would also suffice.
The frost last week was decisive. In one night our dahlia, scarlet runner, nasturtium, cosmos, marigold, sunflower, and tomato plants were killed. Meandering fall became decisively winter or deep fall. There were no questions left to ask about whether or not we should bed down the garden for winter and pull out our tubers. The decision was made and there was work to be done.
Decisiveness and decision-making seem to be the main themes of my life right now. I decisively resigned for my job of the last 10 years and will finish work there at the end of the month. I closed a door, and am now trusting that other doors will open along other paths.
I also decided to go for an investigative medical procedure that I was avoiding. I waffled and debated and agonized about it, but when I finally got still enough to sit with my thoughts, I was guided to look up the word “decide”. Decide has “cide” as its suffix, like insecticide, germicide, fungicide. To decide means to settle a dispute, make a decision, and literally cut off… to determine by killing off choices.
I appreciated frost’s lesson in decisiveness.
After the frost, our warm sunny fall days returned again. It has been energizing to rip outold plants and create massive piles of compost—little havens of rotting organic matter to plant over next spring.
I am so awed by the sincere abundance of the plants—the sheer size of a single dahlia plant with its branching stems and leaves yielding 20 blooms per week, the single stalk of sunflower producing a 40-headed plant (one seed: a miracle!), the single squash seed growing into a small acreage of leaves and spines and glorious giant fruit in my front yard.
This fall is the savasana of gardening—the death of the practice, putting it to bed, and acknowledging and anticipating death as an integral part of living.
It’s a good time to rest as part of this cycle of rebirth and renewal. There’s something exciting about this season, too—being forced into dormancy and dreaming as the summer days have been pruned away.
Neurologist, poet and author Debashish Mridha says it perfectly:
“Despite the heart numbing frost, my soul is blooming like spring.”


 (This is a photo of my first kitchen garden and campsite in my rookie year homesteading circa 1994 )